
 I posted an article on soil amendments and what each is and does. < click here > What I will do today is tell you a bit about how I actually use those products with my soil and in my garden operation. It would be really, really helpful if you read the “GARDEN : Soil Amendments…Better & Healthier Soil & Plants!” article first.
If you are blessed enough to live in the mid-west, like I did as a kid, you probably don’t have to do much to improve your soil. Their soil is called Mollisol…it’s a highly fertile prairie soil. It developed over thousands of years of deep-rooted prairie grasses (6–15 feet deep), seasonal dieback of that grass (incredible soil carbon and structure), plenty of live microbial activity and gradual organic matter accumulation. What makes it special? Very high organic matter, a rich dark color (usually black), excellent nutrient retention, good soil structure, deep root “zones” that makes for strong agricultural productivity. So we just have to recreate that in our raised beds and in-ground gardens. Simple!
Oh, I almost forgot…since it is all started with an incredible grass prairie, there was 10’ of thousands of years of animal grazing. And that natural grazing resulted in a tremendous amount of natural fertilizer on top of everything else…literally. So let’s go over some soil “fixes” and ideas.
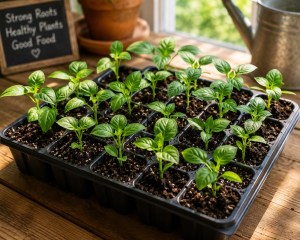
First up…seedling soil – Here is what I would use (will use) next year:
- 40% peat moss
- 25% perlite
- 25% vermiculite
- 10% worm castings

Or, optionally,
- 35% peat moss
- 25% perlite
- 20% vermiculite
- 10% worm castings
- 10% VERY fine charged biochar (optional)
I call this my “germination phase.”
Notes:
- Peat moss
Holds moisture evenly, creates a soft/fine seed bed, slightly acidic (which many seedlings like), and helps prevent rapid drying in your dry climate.
- Perlite
Keeps the mix airy and prevents damping-off problems and compaction. Very important in peat-heavy mixes.
- Vermiculite
Holds both water and nutrients near the seed roots. Excellent for germination consistency.
- Worm castings
Adds biology, mild nutrition, humic substances, enzymes, and microbial activity without “burning” seedlings like stronger fertilizers can.
- Biochar (optional)
Can create a better microbial habitat, nutrient buffering, improved aeration, moisture moderation, pH buffering (from peat moss that tends to be a bit acidic), & long-term root conditioning improving transition to “up-potting”. If using biochar it has to be “pre-charged” and not used raw. I like to pre-charge it in diluted liquid organic fish fertilizer. Relax, “pre-charged” just means put the biochar in a small bucket or bowl of the diluted liquid organic fish fertilizer for a few days so it absorbs the liquid nutrients and microbes.
- I haven’t used coco coir myself but it can be used as a replacement for peat moss, and I’ve heard it can be better. It can be 50/50 peat moss / coco coir up to 100% coco coir. I will try some this year…for a test I will try 100% replacement of peat moss to see how I like it.
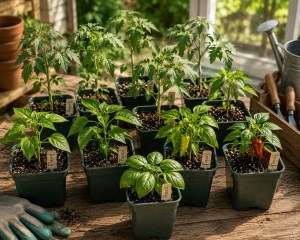
Next would be my first “up-potting” soil –
-
- 30% peat moss (coco coir for part or all)
- 30% high-quality compost
- 20% perlite
- 10% worm castings
- 5 – 10% charged fine biochar
- 5 – 10%vermiculite (optional)
- 30% peat moss (coco coir for part or all)

Goal for first up-potting: I usually up-pot multiple times depending on a number of factors. But, basically I am looking at this first transition moves seedlings from a ‘germination environment’ into a ‘growth environment. What I mean by that is more nutrition, more biology, stronger root structure, slightly less moisture saturation, more air exchange…but still not ready for a heavy garden soil. This mix is biologically active, structurally airy, moisture-buffering, and nutritionally gentle. But is also strong enough to push real vegetative growth in those new plants. I call this my “transition phase.”
Notes:
-
-
- The “high-quality compost” means no chunks at all, it has to be fine. It brings in microbes and nutrients.
- Charged biochar at this point helps level out the water retention/release, and pretty much the same for nutrients and microbes.
- Optionally, as needed, a small amount of mineral nutrition would help but not heavy fertilizer application…and only an organic fertilizer. At first up-potting seedlings begin needing trace minerals more consistently. Fertilizers such as kelp meal, azomite, basalt rock dust, fish bone meal, or humic acid. Apply very lightly.
-
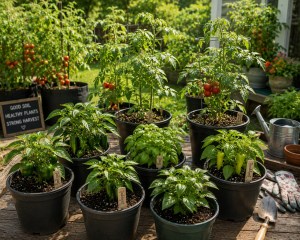
Final & subsequent up-potting –
-
- 30% peat moss and/or coco coir
- 30% regular mature compost
- 15–20% perlite
- 10% worm castings
- 10% charged biochar
- 5–10% mineral/native soil
- 30% peat moss and/or coco coir

Goal for final & subsequent up-potting: This soil mix will accomplish two things for me; 1) provides a quality soil that prepares the plant to transition to my raised beds or my well-amended in-ground garden area. 2) I also believe that I could up-pot a plant to a large enough container and just leave them in that container for growing all season long…if I put a layer of mulch on them. I call this my “production phase.”
Notes:
-
- Equal parts peat and mature compost provides moisture buffering, good root penetration, and soil structural softness. They also promote full microbial activity, fungal development, and balanced nutrient release.
- Regular mature compost is fine at this point and doesn’t need to be ultra-screened. But, I’d still avoid large wood chunks and any uncomposted material.
- Perlite is important to me at this point, it helps prevent soil collapse and compaction and from staying too wet. It also provides aeration for the roots keeping oxygen moving and microbes balanced.
- Pumice can be used in place of perlite.
- Charged biochar becomes very valuable at this stage.
- The “native soil” at this point honestly helps with the economic side. But it also lays the groundwork for a healthy transition if the plant is going into the ground.
- Also, at this stage a very light application of a balanced organic fertilizer is a good idea. The operative word being “light”.
- At this point I am trying to provide aeration for the roots, balance of water retention/release, healthy soil biology, just enough mineralization in the soil, and soil structure that will encourage growth…and lots of it.
A couple closing thoughts…
- Soil mixes can get expensive pretty quickly. If you have the money for it, fine. If not, adapt. Substitute your own fine
 high-quality compost that you have made. If you don’t have worm castings, you can still grow excellent plants without them. For the final up-potting use your soil from your existing raised bed. If you don’t have liquid fish fertilizer make “weed tea.” I would rather see seedlings →plants → food → plate than giving up for lack of a “perfect” soil mix.
 - If you have a seedling tray fail due to lack of water or neglect…I’m sorry. But, you can recycle that soil to save money. I would use it in place of “fine high-quality compost.”
- If you have annual flowers dying off at the end of the season I would not hesitate to save the soil for use in the garden the next year. I would view it as “fine high-quality compost.” You can leave the roots in the soil as well…it’s organic matter. Don’t leave the above-ground plant itself with the soil…you might get a lot of weird looking flowers next year.
- Just get out there and do it!!
Related Articles –
 2009 - 2026 Copyright © AHTrimble.com ~ All rights reserved
No reproduction or other use of this content
without expressed written permission from AHTrimble.com
No legal, economic, or financial advice is given, no expertise to be assumed.
I may receive compensation from advertised/mentioned products on this website.
See Content Use Policy for more information.
