Three days ago in Part #1 in this two-part series of articles I went into detail about Leader’s Intent and how to set SMART objectives. And yes, I explained why this subject was relevant. But, it will be up to you to decide how it applies to your prepping.
I can imagine some folks started reading the article a few days ago and became disinterested quickly. Or after a few paragraphs of reading some people may have become bored. And that is OK, this subject may not be for everyone. Or, some people may already know the material well enough. But, the information contained in the previous article coupled with today’s information is extremely valuable for group/team operations.
It is nice to have some cans of food stored, a gun or two, plenty of ammo, and other prepping gear. But, do you know how to bring a group together to accomplish life-saving goals or how to set priorities correctly?
Can you do so in a high-stress environment of an emergency, disaster, or grid-down? No fear! I explain how you can do just that…with confidence in your process and your decisions.
If you haven’t read the previous article three days ago you should before reading this one because today’s article builds on that one.
Recapping Part #1 –
- A leader must be clear in stating the “intent” of all missions/tasks.
- All mission and tasks must be realistic.
- When setting objectives use the SMART system.
Now let’s move on…
Setting Priorities –
There is a significant need for being able to set correct priorities in high-stress situations – which most emergencies,  disasters, and grid-down events are…high stress. Without being able to set priorities consistently and correctly, a mission or group is doomed to failure. Priorities are also based on a mutual belief foundation that the entire team has agreed to.
While possibly stating the obvious, different cultures do have different beliefs…hence, different priorities. The need for the team to share a common set of beliefs and priorities is paramount.
Without an agreed upon set of beliefs and priorities I propose that any team would struggle to make good decisions. And I propose that is especially true when it comes to high-stress, high-value decisions.
Upon what basis would/could/should common priorities be set?
Without a common set of priorities, how easy would it be to make decisions? I suggest it would be increasing difficult to make decisions that would be acceptable to everyone as the stress increases. Conflict would ensue, splits would emerge, and finally the fracturing of a group or team.
Now, we could get into a whole discussion of “morals” as it relates to beliefs and priorities but that is best left for a conversation around a campfire in your own camp. For the purposes of this article I will stick to a non-religious, non-cultural based concept that has proven to work in emergencies and disasters. Over my decades in emergency services I have seen a system that works every time, in every situation. Yup, it works every single time…it is that good of a system. It is called L.I.P.S.
Back in 2005 I was at the National Fire Academy in Fredricksberg, Maryland attending a week-long course to be an instructor of instructors for all levels of ICS (100 – 402). ICS was relatively new to the structure fire department world and I was there to acquire national certification to teach ICS to students and to be able to certify other instructors. During that class the head of the national ICS course development team asked us to peer review the new ICS training materials for FEMA/DHS. Now that was interesting!
One of the areas we spent a lot of time on was the L.I.P.S. system of priority setting. It was something new to just about every aspect of emergency services at the local level. Our class developed the “S” part. But it was too late to get it into the materials. Fortunately I have my notes from that review process.
The goal was to develop and refine a decision making system that would be consistent across every emergency situation that first responders would find themselves in. It had to be applicable to hurricanes, structure fires, HazMat scenes, wildfires, floods, building collapses, plane accidents, train wrecks, vehicle accidents, bridge collapses, etc. It had to be universally applicable in every conceivable emergency situation. The outcome was L.I.P.S.
L.I.P.S.. stand for –
- Life Safety
- Incident Stabilization
- Property Conservation
- Societal Restoration
Life Safety – The physical safety of people is always paramount. Stated again…People’s safety is always the number one priority. There are two areas of thought on this and they vary rather widely. I refer to them as; 1) traditional, 2) New Age.
The traditional view of “life safety” puts the safety of the person being served as the most important. The person’s life doing the act of service is secondary. Example…In my structure firefighting world we would risk our life to save the life of a person trapped in a house fire. No, we wouldn’t do it stupidly, but in the traditional view, the other person’s life (the victim) had great value and was worth taking a significant risk. Even to our own potential peril.
The New Age view of life safety says the value of the person providing the service (responder) carries far more value than the person needing the service (victim). The “risk” threshold was much lower, “reasonable risk.” In other words, the rescuer would take far less risk trying to save someone, placing a much higher value on their own life then that of the victim. The new fad of thought manifested itself when I saw the newer firefighters being hired (mid-1990’s) making statements such as, “Hey, I have go home at the end of the day.” Or, “My life is more important to me than theirs.” The New Age folks also use the justification that “If we get killed or injured doing our job, then who will take care of the victims?”
There is a middle-ground…mitigating risks. There is always risk in any high-stress dangerous situation such as emergencies and disasters. Actually, even the “stress” itself carries risk to a person’s health. So the key is mitigating the high-risk actions down to “reasonable” or “acceptable” risk categories. And that is a decision, a standard, that each team must set for themselves.
Let me be clear, all emergencies, disasters, and grid-down events will have high-risk elements to them. It is impossible to avoid risk but a smart person will mitigate those risks. But, sometimes risks simply must be taken. Which ones? Well, how about rescuing your child from your burning house and risking your own life? How about saving your wife from an outlaw gang and risking your own life? Is that worth the risk, almost certainty that you might die trying?
That is the decision you must make…Is the act worth the risk?
Whichever philosophy you adhere to, traditional or new age, the common ground is life safety is the number one priority whether it be life safety or the person you are trying to save or yourself, the rescuer.
Incident Stabilization – This principle is pretty easy to understand when you realize that when an emergency or disaster has occurred, people are having a bad day. One of your primary goals is to ensure that you don’t make it worse. In other words…you want to stabilize what is happening so it doesn’t continue to escalate in terms of loss of life and property.
A good way to view this is through an example –

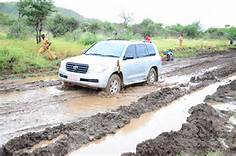
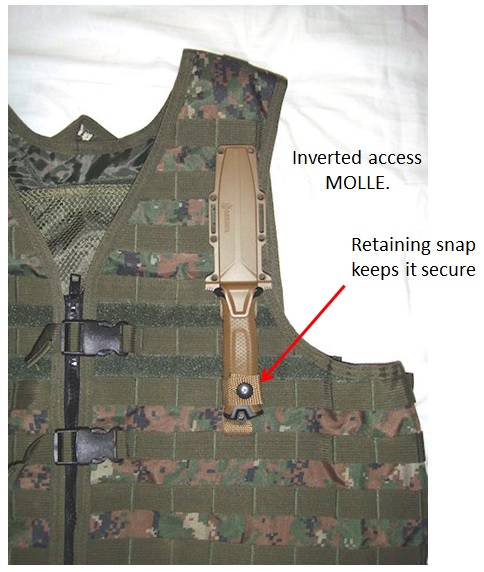
Incident Stabilization!
Notice how they stabilized the vehicle from rolling over while they worked he accident.
As a firefighting crew we would respond to a house fire. It was important that we arrive on scene as quickly as possible. Upon arrival we could then attempt to rescue people inside the structure or begin firefighting operations if no victim’s lives were at risk. However, none of that would be possible if the fire engine driver drove recklessly and had an accident on the way to the fire. If an accident occurred there could be multiple injuries, fatalities, property damage, and then tying up more emergency personnel that would need to respond to the accident vs. the house fire. In this situation…don’t make a bad day (house fire) worse by having an accident and not being able to get the fire engine and crew to the fire.
Another example would be a wildfire burning in industrial area with woods on three sides. On the fourth side was a large number of propane tanks in close proximity to a gas station. Where should the firefighters focus their actions? Of course, prevent the fire from affecting the propane tanks and gas station. If the wildfire spread to that facility the wildfire would transition to a structure fire and a HazMat situation, potentially on a large scale.
Your actions should help remedy a bad situation, not make it worse.
Property Conservation – This particular principle changed into “property/environment conservation” not long after the course material was released. I personally would rather it state “resource conservation” but LIRS wouldn’t sound as cool as LIPS. Regardless, the principle is…while responding to a problem don’t destroy anything you don’t have to.
The reasoning behind it is fairly straight forward. Everything has value; don’t destroy anything if you don’t have to. I will add to that, because you may need it later. Bottom line, don’t tear stuff up unless there is a really good reason to.
The perfect example of this comes to mind taking me back once again to my structure firefighting days. One of the early methods of fighting a house fire was to enter a house with the water flowing from the nozzle as you searched for the fire itself. The concept was to push the heat and smoke away from the firefighters. However, it also put thousands of gallons of water in the home doing tremendous damage.
That tactic was changed to not flowing water till you found the base of the fire. Then you put only enough water on the base of the fire to extinguish it. That saved 10’s of thousands of dollars of damage to the home. I remember clearly one day my crew rolled up on a house fire, the fire was located in the kitchen. My nozzleman and another firefighter pulled the 1-3/4” attack hose and headed for the kitchen. Before they could spray any water, and flood the kitchen, I had the driver run the 5 gallon pressurized water extinguisher to us. I used about 3 gallons of water/foam mixture from the portable extinguisher to put out the fire. Attacking the fire with the large hose would have probably dumped 500 – 750 gallons of water into that same kitchen. But, we put out the fire with only 3gals of water. Which tactic did less damage?
Don’t destroy or damage any resource you don’t need to, you may need it later.
Societal Restoration – This is a somewhat nebulous principle, even for emergency responders. Naturally, emergency personnel are trained to come into a bad situation and stop that situation from getting worse and not doing further damage. Once the immediate threat has been resolved the responders normally pack up and leave. But, what about the victims? Their problem is only half resolved, maybe the easiest half.
Once again take the example of the house fire. Firefighters come in and extinguish the flames, get the smoke out of the house, and even remove some of the water that they used to put out the fire. But they also did what’s called “overhaul” to ensure there is no more fire, so some of the walls and ceilings now have large holes in them. The last of the fire trucks drive away. Is the nightmare over?
Maybe the imminent threat to life and property is, but is that family immediately back to a normal life? Hardly!
The family now has to secure the home, find a place to live, contact the insurance company, deal with the adjuster, find home repair contractors, have the home repaired, replace damaged personal possessions, and try to salvage family treasures. The fire may have taken a couple of hours, or a couple of minutes, to put out…but it may take months for that family to live in their home again.
Now, take that same concept and expand it to an entire community, town, or state. The idea is to return society, family, or community, to the same condition it was before the incident occurred.
Now let’s restate LIPS this way –
- The #1 priority is to protect people from death and injury.
- The #2 priority is to not make a bad situation worse.
- The #3 priority is not to destroy resources you don’t have to.
- The #4 priority is to restore the situation back to normal, or better.
Let’s go back to the wildfire jeopardizing the propane tanks and gas station. You are the Captain of the first fire engine to arrive on the scene. What are your priorities?
Here are my suggestions according to LIPS:
- Make sure that my crew and fire engine aren’t going to be blown up.
- Evacuate anyone from the gas station and propane tank area.
- Take action to prevent the wildfire from reaching the propane tanks and the gas station infrastructure.
Notice I took care of my crew, we have to be functional to be effective, and there were no other lives as risk so I didn’t have to put my crew in jeopardy trying to save someone else. Next we had to ensure that no one would be hurt if the fire reached the gas station or propane tanks so we just had them leave the area. Then we got to work stopping the fire.
Does that priority-based action make sense? I protected life, then attempted to stabilize the incident by not letting the fire turn into a major explosion.
Let me do a little hypothetical to make my next point, please indulge me. I have a fence between my engine and the fire. To effectively suppress the fire mentioned above I have to get to the other side of the fire…with the fence preventing free movement. There are a few options –
- I could drive the engine across the field and right through the fence. Although doing so would destroy the section of the fence and potentially do an unknown amount of damage to the fire engine. We might even get stuck.
- I could drive down the dirt road to the gate about 100 yards away and cut the lock. The gate access would take me about 3 additional minutes during which the fire would spread.
Which is the better decision? I hope you picked #2.
OK, we just pulled up to the fence, it’s locked. We could –
- Drive through the gate without opening it, the fire engine could easily do that.
- Hook a chain to the gate and the front tow hooks on the engine, then back up the fire engine pulling the gate off.
- The nozzleman can get off the engine, retrieve the large bolt cutters, cut the lock, open the gate while we drive through. It will take more time than Option #1, about the same amount of time as Option #2.
Which is the better decision? I hope you picked #3.
Assuming we are cutting the lock on the gate…where do you cut it? Don’t worry, that is a trick question. You actually don’t cut the lock, you cut the link of chain right next to the lock. What you have left over is a lock that still works and a chain that is probably still long enough to secure the gate.
So far, we protected the safety of the civilians in the gas station, and didn’t destroy the fence, the gate, or the lock; and we haven’t damaged the fire engine. Now we can go about the business of preventing the fire from creating an explosion at the propane tanks and gas station.
Next step in our scenario…We’ve been fighting the fire for 5 minutes and have made no headway, the fire is growing and we haven’t had much success in stopping the movement of the fire towards the propane tanks. We are almost out of water, maybe another minute or two of waster is all we have left. The next fire engine is 5 minutes away. What do we do?
But, before you answer that, let’s review LIPS one more time –
- Life Safety
- Incident Stabilization
- Property Conservation
- Societal Restoration
OK, now go ahead, what do we do?
There could be a number of right answers, but I hope you were thinking that we needed to load up the crew and drive to a safety zone. Since we weren’t being effective in stopping the fire and we were running out of water, it was too much of a risk to the crew and potential damage to the fire engine as well. We had little choice but to leave.
I hope these examples have helped show you how to use LIPS to set priorities and then make decisions based on those priorities. But how does that tie SMART and LIPS together?
Using the same wildfire approaching the propane tanks and gas station scenario, knowing that he only has about 20 minutes before the fire reaches the gas station and propane tanks, the leader does this…
Using SMART he made the decision on what actions to take:
- LIFE SAFETY – Evacuate all civilians in the vicinity of immediate danger before the fire can cause an explosion.
- S – Evacuate all civilians in the vicinity of immediate danger within 10 minutes.
- M – Evacuate all civilians in the vicinity of immediate within 10 minutes.
- A – Evacuate all civilians in the vicinity of immediate danger within 10 minutes.
- R – Evacuate all civilians in the vicinity of immediate danger within 10 minutes. (The fire won’t reach the area for 20 minutes. All things being equal, this is “realistic” and evacuation is “relevant.”)
- T – Evacuate all civilians in the vicinity of immediate danger within 10 minutes.
- STABILIZE THE INCIDENT – Stop the fire from reaching the propane tanks and gas station.
- S – Suppress the fire on the other side of the fence, closest to the fire, before it can reach the propane tanks.
- M – Suppress the fire on the other side of the fence, closest to the fire, before it can reach the propane tanks.
- A – Suppress the fire on the other side of the fence, closest to the fire, before it can reach the propane tanks.
- R – Suppress the fire on the other side of the fence, closest to the fire, before it can reach the propane tanks. (This would be based on the Captain evaluating the probability of success based on his resources.)
- T –Suppress the fire on the other side of the fence, closest to the fire, before it can reach the propane tanks.
- PROPERTY CONSERVATION –Don’t damage the fence, the gate, the lock, or the fire truck while approaching the fire..
- S – While approaching the fire on the other side of the fence don’t cause damage to the fence, the gate, the lock, or the fire truck.
- M – While approaching the fire on the other side of the fence don’t cause damage to the fence, the gate, the lock, or the fire truck.
- A – While approaching the fire on the other side of the fence don’t cause damage to the fence, the gate, the lock, or the fire truck.
- R – While approaching the fire on the other side of the fence don’t cause damage to the fence, the gate, the lock, or the fire truck. (It is realistic to not cause damage by following fire department policy.)
- T – While approaching the fire on the other side of the fence don’t cause damage to the fence, the gate, the lock, or the fire truck.
You can see that following the LIPS priority guidance and implementing SMART objectives you can accomplish quite a bit, even in a high-risk, high-stress environment.
Let’s see you put LIPS into action. Answer the following questions –
- Would you fight fire first, prior to evacuating the civilians in the immediate area? Why?
- Would you have your firefighters climb over the chain link fence and hand them the hose to fight the fire instead of going through the gate? Why?
- Would you leave the area and not worry about the fire because it was close to the propane tanks and the gas station? Why?
- Would you take the time to write down each objective using the SMART template? Why?
Since this is a time-sensitive operation the Captain wouldn’t lead the crew through writing down, discussing/reviewing, and then implementing the plan according to SMART. However, the Captain and his crew would surely be making decisions on what will be done using the SMART principles of objective setting. But they would be doing rather informally and quickly. When time is less critical you can use the full formal SMART process and actually write everything down, documenting each step and task.
As leaders develop and grow into the LIPS and SMART systems to priority setting, decision making and objective setting become second nature and virtually automatic. But, it takes learning, training, and practice to acquire those skills to be able to do that. You can learn it now, or you can learn in when the high-stress, high-risk emergency or disaster hits. Your choice.
I hope I have helped you learn a proven way to set priorities and make decisions on what actions to take. When you experience an emergency, disaster, or grid-down the ability to set priorities and make decisions quickly in high-stress and high-risk environments will be common place. I hope and pray you are a little more ready now.

<- Part #1
2009 - 2019 Copyright © AHTrimble.com ~ All rights reserved
No reproduction or other use of this content
without expressed written permission from AHTrimble.com
See Content Use Policy for more information.

 Every once in a while a product comes along that is so obviously bad that I just can’t contain myself. I am talking about a couple of knives that will probably hurt you more than any potential attacker. But let me digress for a minute…
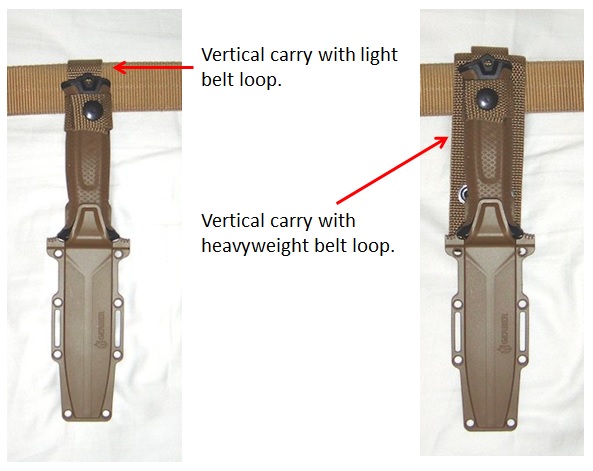
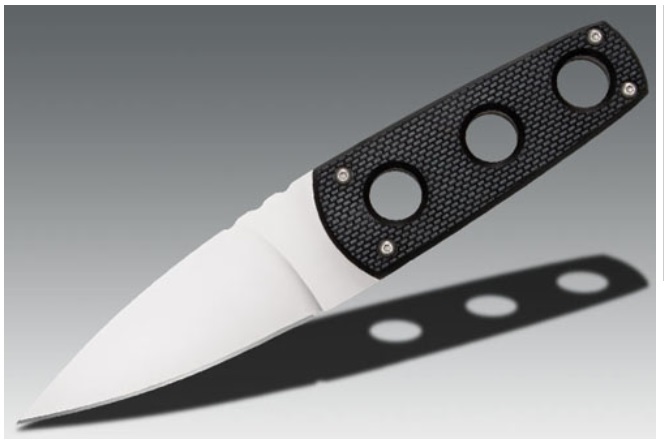 Fantastic little Kydex sheath for it. And that is the last of the “pros” for this knife, everything else is a “con”, literally I believe. The steel is a very bright and shinny, and the Japanese AUS 8A stainless steel just doesn’t feel as if it is a good steel for this knife. It was extremely awkward and difficult to get out of the sheath. The size of the handle was extremely small and I could never get anywhere near a decent grip on it. But here is the worst part… Everything I tried my hand wanted to slip onto the blade. And while I might not like the steel it would slice the crap out of my fingers the first time I tried to penetrate anything.
 on the market. The cheap little clip on the back of the sheath would last about 10 minutes under harsh conditions. But the sheath does have some slots for paracord to be used.