Hey, wanna date?

You wanna datenote: article first appeared October 2015

Yeah, I bet that got your attention! Yeah, and I know what the answer is…”No!”  Well, at least that would be (or should be) the answer for those of you that know me 😉

But let’s get back to the article and the real intent of the headline

A few weeks ago my prepper buddy & battle buddy made a statement to me that I thought was interesting. Not the exact words, but he said something along the lines of, “If it doesn’t fall apart by the end of September I am done with being prepared!”

I remember at the time I was a little taken back and I really didn’t respond to that statement, I just continued on to another subject. But, another interesting thing I’ve noticed the last couple of weeks is his interests shifting towards things other than prepping. He doesn’t even really bring up any negative news items like he used to. No, he has not abandoned prepping, he is just taking a little break and focusing more on other things such as family, work, music, his cars, etc. And that is fine with me.

OK, set that little tidbit of information aside…on to the next item I want to share. I frequent another prepper website, mostly Christian folks, patriots, conservative, etc. What has been interesting over the last 6 – 8 months is the shift in their collective attitude. There has been and is much more focus on things other than true prepping. A lot of dreams, visions, conspiracies, and books about the same subjects. And, a whole lot of projection of hard dates for the economy to fall apart, for martial law to be declared, for the stock market to crash, for earthquakes to split the continent, a meteor to strike the earth, etc. What I find interesting is not the event itself, but the fact they were actually setting firm dates for these things to happen. And of course when none of those events occurred you can imagine what came next.

There is/was a mix of responses. Everything from “we got the year wrong” to “they must be a false prophet” to “oh, disappointed prepperswe didn’t read it right,” etc. A few faced the fact that those people that were prophesying those dates just didn’t know what the heck they were talking about.

Now, let me change it up again for a minute and then come back to tie it all together.

In September I was a guest on a Fox radio station in St. George, UT. I was on for an hour-long live segment. One of the questions that Kate Dalley asked me was, “what would happen between now and the end of the year and when did I expect it all to fall apart?”

But, that was not the first time I’ve been asked that question and I will share my answer now.

Why share it now? Because I think it is important to think about this and talk it through. Why? Because I think there are a lot of new preppers out there that are preparing for a cataclysmic event that is imminent. I also think that there a lot of vintage preppers that are looking for some validation to what they have been doing over the years. And, I think there are folks that are looking at the world today and wonder how long we can keep going on like this before it all explodes/implodes into TEOTWAWKI.

Generally speaking I like the idea that people are prepping, I don’t really care what their motivation is, for the most part. As long as they are preparing for emergencies, disasters, and grid-down I am good with it. However, there is a Unrealistic Expectations Dangercliff looming up ahead for some, maybe many, preppers if they are not careful.

Unrealistic expectations.

Yeah, an ugly thing just by itself, but even worse in relation to what I am talking about…prepping.

So normally what happens to people when they get their heart set on something and it doesn’t happen?

What happens to those folks who get all worked up about something they “know” will happen and then it doesn’t?

What happens when good, dedicated people take actions that their family and friends think are maybe just a bit bizarre? And while doing so might have spent money that wasn’t really part of the “extra” category?

My fear is some folks set unrealistic expectations for what they saw coming, wanted to have happen, or worked towards making happen…and then it didn’t happen at all. What will those folks do now?

A well-grounded prepper will be just that…well-grounded, realistic, sensible, and have realistic expectations of what might happen, what will happen, and no calendar for all of the above. Are you well-grounded?

Forty years ago if you would have described an America in the condition it is today, I would have called you politicians todayinsane. Back then if you would have projected a world like we have now I would have wondered which mental hospital you escaped from.

And that would be true for thirty years ago, twenty years ago, and even ten years ago. I never, ever thought we would have the crap police state in americasandwich that we have today in the United States or world-wide. Yup, never in my wildest dreams would I have ever imagined us being in the horrible condition that we have in every aspect of modern society.

Yet, here we are.

What am I getting at? Let me answer you with the same info that I gave during the radio show…

The world can fall apart tomorrow. I fully expect that I could wake up in the morning and the grid would be down, the government would be in full-on martial law, no utilities, no food, and violence everywhere.

Date-004aOr, ten years from now I am looking back and wonder how we could have fallen so far in the last ten years.

Yup, a cop-out answer for sure:

  1. The “fall” could happen any day, especially by the end of the year.
  2. We could continue the slide even further into the sewage pit, and do so for the next 20 years.

My point is…DO NOT SET A DATE!

Don’t fall into the trap of getting caught up in blood moons, some vision, some dream, some prophecy, some panel of experts projection, some Mayan calendar, or any other male cow dung junk like that. Don’t buy into some Rabbi’s interpretation of a Bishop’s vision based on a long-dead guy’s 5th-century dream.

types of disasters, emergencies, grid-downPreppers have to stick with the basics…we are preparing for emergencies, disasters, and grid-down events. When they will happen we don’t know. How bad they will be we don’t know. We just know that they will come and we are better off being prepared for them when they do occur.

Do not think for a minute I am saying the world around us is in no danger of collapsing. I said clearly I think it could happen tomorrow. And, don’t think I am not belittling people who claim dreams, visions, and prophecy. I believe in those things as well, to one extent or another.

What I don’t buy into is date setting by people who have no real authority or special gift to do so. Seriously, who are they to “know” some date when something will happen? And who are you to think they have some validity in what they are saying?

Think about it…Why would you believe someone who says the economy will collapse on November 15, 2020? Or, why would you believe someone who would say the stock market will crash next Monday?

Really? Who the heck are they to make such wild and unsubstantiated claims? And, why would you even want to listen to them, let alone believe them?

I don’t!! Period…I don’t.

Why? Because I think that someone, with authority, can be prophetic in that way. And, it’s because that every Date-005day, normal, average folks have been making these wild prophetic claims for years, decades, centuries, and none of it has really came true. They had no authority to make those prophecies.

OK, before some of you want to blast me with examples, don’t. A person can take a Nostradamus thing and turn it into pretty much whatever they want to make it out to be…and call it true. Don’t go there.

What I am asking you to do is be realistic. Go with what you know. Don’t buy into all of these predictions that involve specific dates. If you buy in to the date thing you are likely to be pretty disappointed.

Prepping is a life-long endeavor.

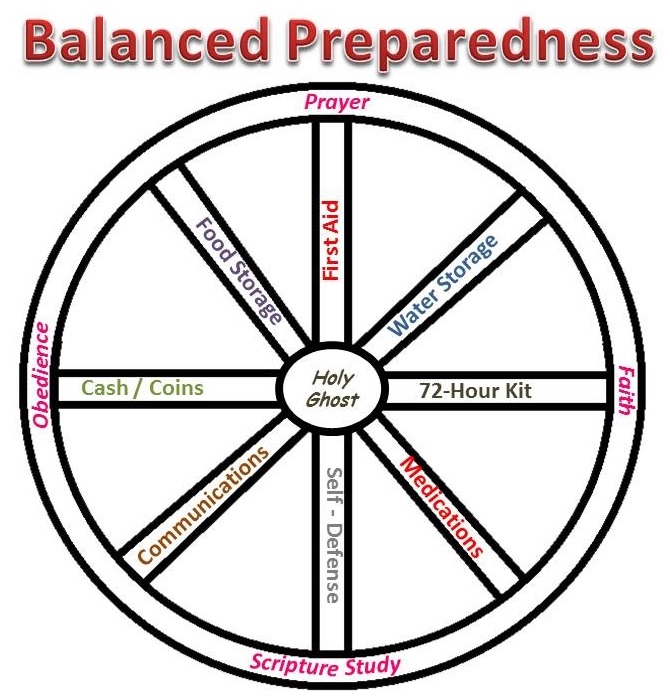
Emergency preparedness is using common sense principles to prepare yourself and your family for the Preppers Waiting for Instructions SHTF ICStypes of events that would/could prove devastating. Well, devastating if you are not prepared. Look at prepping as “insurance” against emergencies, disasters, and grid-down. You pay your premium each month and sleep well at night knowing you are covered.

Wrapping this article up, I am asking you to be balanced and enjoy your life. Be a prepper and allow that prepping to enhance your life that much more, not take it over, and consume you and your family. Be happy, enjoy sunsets, love sunrises, go for great walks with your spouse, throw the football with your kids, and then work on your solar project or build your radio GoBox as time permits.

And, finally, sorry to disappoint you that I wasn’t really looking for a date. I know, I am such a tease…right?

Balanced Prepper life


2009 - 2019 Copyright © AHTrimble.com ~ All rights reserved
No reproduction or other use of this content 
without expressed written permission from AHTrimble.com
See Content Use Policy for more information.

MFJ-4416B Battery Booster

MFJ-4416B BATTERY VOLTAGE BOOSTERMFJ-4416B battery voltage boosterI really have mixed emotions and opinions on this piece of equipment. In one aspect this is a great piece of equipment that can play an important part of a prepper’s power equipment inventory. On the other hand, it can destroy perfectly good batteries that are expensive to replace. That left me in a tug-of-war on the overall recommendation on this piece of equipment. So I will leave my “buy or no-buy” recommendation till the very end of the article.

First let me describe what this this gem does. The whole concept of this “battery booster’ is to do just that…boost low battery voltage levels to more operational levels for your electronic needs. Specifically, your radio operational needs. Here are the specifics on how it does that.

Your radio has voltage needs for power. My Yeasu FT-8900R needs a little over 10 vDC to continue to operate. MFJ-4416B battery voltage boosterBelow that and it will automatically shut down. That can be a bad thing if you need to stay on the air. So the MFJ-4416B steps in to handle that situation.

The 4416B is designed to take DC voltage as low as 9 vDC and boost it to the level that is required by your equipment. So take the example of my Yaesu FT-8900R, it needs 10+ vDC but the battery is only putting out 9.2vDC. The MJF-4416B boosts that voltage up to a usable level, 11 or 12 vDC (user selectable).

The two most basic elements of this unit are; 1) available voltage going into the unit, and 2) the level of voltage the unit can output. The 4416B can accept voltages as low as 9vDC. It can also be set to output voltages between 11 and 13.8 vDC. If you set the output voltage at 12, any voltage greater than 12v will pass though vs. being stepped-down.

But here is an interesting twist…there is an RF sensor built into the unit. Let me back-track for a minute. Your radio draws a fraction of the power when in receive mode vs. transmit mode. So you really don’t need to “boost” voltage/power when receiving. The RF sensor allows the unit’s regulator to be by-passed unless you are transmitting when the most voltage/power is needed the most. The RF sensor connection is nothing more than a “T” placed inline with your antenna coax and hooked to the 4416B.

There is also a built-in user adjustable feature of a LVD (low voltage disconnect). The LVD option can be set at 9, 10, or 11 volts. I like this added feature. A stand-alone LVD can easily run $50 – $90.

Here is the downside, if you run a SLA AGM battery down to even 11 volts you have damaged the battery and reduced the lifespan of that battery (reduced recharge cycles). If you run down a regular lead acid battery to 10 or 11 volts you are probably OK. You run them down to 9 volts and you’ve just shorted their life considerably.

Here is the upside, if you are running alkaline batteries the 9v input capability (LVD) just gained you a MFJ-4416B battery voltage boostersignificant additional amount of life out of your battery. Who cares how low you run an alkaline battery down to. The alkaline battery only has one life anyways, you might as well squeeze every last minute of operating time out it while you can.

And there is another upside as well, if you are really, really needing the operational time from your radio and you just have to keep it up and running, the booster will allow you to do that. So you will get additional operational time out of your batteries; albeit, you may destroy them in the process. But, it might be worth it.

While doing my research I did find some not-so-complimentary issues with “noise” going out, especially when using the RF sensor. However, those issues were all over 6 years old or more. And from what I can tell it was all with the original version of the 4416 not the 4416B version which is what I tested. I did a quick search and couldn’t find any vendor still selling the original version. Although you might see one come up on eBay, I doubt anything other than the “B” version is being sold.

An interesting side-benefit to using this booster is kind of interesting. Radios generate heat based on incoming voltage among other things. If a radio can operate on 12v it will generally run cooler at 12v vs. 13.8v. With the 4416B you can use your batteries at 12v, the 4416 booster set at 13.8v in conjunction with the RF sensor. So anything 12v or over passes through while in non-transmitting mode. But at 12v your radio is in receive mode at 12v, it is not being automatically being boosted to 13.8v. Well, not being boosted to 13.8v until you hit the PTT key. While transmitting the 4416 will boost to 13.8v to give you maximum output wattage and then return to whatever your battery is putting out (12v or greater). Nice way to keep your radio a bit cooler.

MFJ-4416B-remoteThere is a remote control option available for this battery booster. Sweet little set-up for convenience sake should you choose to go with this battery booster. MFJ-4416BRC gives you full remote control of your MFJ-4416B Super Battery Booster plus it allows you to monitor battery voltage and battery booster output voltage.

You can place the battery booster near your battery or other convenient location close to your radio. The MFJ-4416BRC lets you turn booster and low battery alert on and off. It has boosting and low battery LEDs to let you know what is going on with the booster.

It requires a Cat-5 cable to connect the remote to the battery booster. It measures a compact 5″w x 2″d x 3″h and mounts with 4 screws. I think this is an absolute “must-have” if you are using the booster for your primary rig. Just makes sense to monitor what is going on with your power. If you are using the 4416B to begin with, you obviously have a serious need. Why not be able to monitor exactly what is going on with your batteries and your booster; performance monitoring.

So here is where I would use the MFJ-4416B battery booster:

  1. When my rechargeable batteries wouldn’t be harmed running down to 9, 10 or 11 volts (user selectable).
  2. When I was boosting alkaline batteries and they were throw-a-ways once I was done with them.
  3. If I had to keep my radio up and running, even when battery voltage was running low. This would be an emergency operations type of situation.
  4. I was in procession of a decent supply of 12v rechargeable batteries, car batteries or similar.

Here is where I would not use the MFJ-4416B battery booster:

  1. I was running AGM, SLA batteries that would be harmed by over-discharging them.
  2. I would not use this booster in any other situation or application other than to keep a radio up and running. I can’t think of any other piece of electronic gear that would be worth potentially destroying 12v rechargeable batteries.

I like the product and own it. Obviously, or I wouldn’t be able to do a review on it. But, the usage of a battery booster is limited in scope and focus. Using it in the wrong application can cause you to spend a whole lot of money replacing your AGM, SLA batteries. And in disaster, emergencies and during “grid-down” batteries might be a bit hard to come by.

Technical Information –
  • Battery Booster Width: 7.750 in.
  • Battery Booster Height: 4.000 in.
  • Battery Booster Depth: 2.125 in.
  • Battery Booster Weight: 1.30 lbs.
Sales Pitch (straight from the website) –

Keeps your transceiver operating at full efficiency and performance by eliminating low or marginal voltages in the mobile environment.  MFJ 4416B super battery boosters keep your transceiver operating at full efficiency and performance by eliminating low or marginal voltages in the mobile environment. They accomplish this by boosting input voltages as low as 9 V up to the desired 13.8 V at 25 amps peak with a typical efficiency of close to 90 percent. Even at their compact, lightweight 1.3 lbs., they are designed to be rugged, reliable, and easy to use. The MFJ 4416B super battery boosters include Anderson PowerPole connectors and high-current, 5-way binding posts for both the DC input and regulated output. An internal 30 amp input fuse protects them from excess output current demands. There are also selectable limits on the minimum voltage that can be accepted, protecting you from over-discharging a battery and possibly damaging it. They also include output over-voltage crowbar protection, should regulation be lost. An RF sampling port can be connected to your transceiver’s transmission line with a UHF-T connector, which is sold separately. An additional efficiency enhancement feature is a user-adjustable output voltage control, which lets you set the output voltage anywhere between 12 and 13.8 V. When setting the output at 12 V, input voltages greater than 12 V will pass through, but the efficiency of the regulator is higher, and lower input voltage means that your transceiver will run cooler. They typically save over 30 watts in heat dissipation during transmit, and even 3-4 watts during receive.


2009 - 2019 Copyright © AHTrimble.com ~ All rights reserved
No reproduction or other use of this content 
without expressed written permission from AHTrimble.com
See Content Use Policy for more information.

Connecting Batteries in Series or Parallel

hooking batteries together in parallel or seriesWhy connect batteries together at all?  There are times when you need power for a longer period of time. Or, you need double the voltage that you get from a single battery.

Here’s the rule – series doubles the voltage, parallel provides longer power.

“But how am I supposed to connect my battery if I want to double the capacity but not the voltage?”

It can be confusing if you’ve never done it, but hopefully this will make it easier. Let’s give you a picture to show how it is done –

Connecting in Series

When connecting your batteries in series you are doubling the voltage while maintaining the same capacity rating (amp hours). Just use a jumper wire of sufficient gauge (usually 2 – 8) between the negative of the first battery and the positive of the second battery. Run your negative wire off of the open connector from the first battery and your positive off of the open connector on your second battery.

Connecting Battery in series

Connecting in Parallel

When connecting in parallel you are doubling the capacity (amp hours) of the battery while maintaining the same voltage individual batteries. Just use a jumper wire of sufficient gauge (usually 2 – 8) between the positives of both batteries and another jumper wire between the negatives of both batteries. Connect your positive and negative wires to the same battery to run to your application.

Connecting Battery in ParallelNotes:

  1. Try to use the same brand and model batteries whenever possible.
  2. Don’t put more power to your equipment than is stated by the manufacturer. You could easily blow your equipment up.
  3. Use heavy enough wire for connections.
2009 - 2019 Copyright © AHTrimble.com ~ All rights reserved
No reproduction or other use of this content 
without expressed written permission from AHTrimble.com
See Content Use Policy for more information.

Antenna: Portable Dual Band (70cm & 2m) Radio Antenna

Antennanote: article first appeared in February 2015

One of the reasons I got into the Ham radio scene was to increase the effectiveness of handheld radios.  In my day job I use handheld radios a lot and they are critical to our wildland firefighting mission.  At work I can talk on a handheld for hundreds of miles across six counties.  I wanted similar capabilities in private life during emergencies, disasters or especially during “grid-down” when it comes.Desert

So I built a repeater using a Yaesu FT-8800r dual band mobile radio.  Along with a great repeater is a need for a great antenna.  And that antenna has to be proven reliable, sturdy, portable and something you can depend your life on.  So that was my next challenge, build an antenna to meet the repeater need but go beyond that as well.  This article covers that quest.  So let’s get going…

Mission –

General – To allow maximum performance on 70cm & 2m frequencies in the field via a highly portable, easily set-up, and sturdy antenna.

Primary – Use in conjunction with a Yaesu FT-8800R as a portable cross-band repeater (70cm & 2m).

Summary –

This portable dual-band antenna allows a user to attach the antenna to a handheld (via adapter cable) or directly to a mobile Ham radio. The antenna itself is a purchased wire antenna which is then mounted internally in ¾” PVC pipe. That section is then configurable with or without two (2) additional sections of 3” PVC pipe to vary the antenna height from 5’ – 15’ from the base.

Materials List –

DBJ-1 Designed by Dr. Ed Fong WB6IQN of UC Berkeley

DBJ-1 Antenna

  • The antenna, DBJ-1 J-Pole dual-band, designed by Dr. Ed Fong WB6IQN of UC Berkeley.
  • 1 section (10’) of Class 200 3” PVC pipe
  • 1 section (5’) of Class 200 ¾” PVC pipe
  • 1 3” threaded Class 200 PVC clean-out adapter, the inside diameter of the non-threaded end is 3”. See the picture in Step #7 for a better idea.
  • 1 threaded cap for the Class 200 PVC clean-out adapter. See Step #2 for a better idea.
  • 1  2” x 1-1/4” Class 200 PVC bushing. The 2” is male; the 1-1/4” is female.
  • 1   3” x 2” Class 200 PVC reducer. Both ends are female.
  • 3 or 4 swivel bales. See Step #15 for a better idea.
  • 30   1-1/4” wood screws with washers.
  • 1   ¼” carriage bolt, star lock washer, nut.
  • 2   2’ x 2’ pieces of ¾” marine plywood.
DBJ-1 Antenna Info –

SWR:  Less than 1.3 to 1 on both bands.
Gain:   +6dB over a rubber duck antenna

Steps –

Step #1 – The base is cut from 3/4″ marine plywood.  You want two pieces 24″ x 24″.

Step #2 – Take your 3” threaded drain clean-out plug. Cut square hole in the center of one piece of base material. It should look something like this…

Antenna-DBJ1build1

Step #3 – Place cap through hole so it looks like this…

Antenna-DBJ1build2Looks like this from the backside…Antenna-DBJ1build3

Step #4 – Now line it up and chisel out a small indent in the second board for the cap to sit in. Do not cut the hole all of the way through. Using the indent for the cap to sit in will give the base added strength and prevent the cap from turning. It should look something like this…

Antenna-DBJ1build4Step #5 –  Line the two boards up, make sure everything lines up correctly, put a generous amount of construction grade adhesive (i.e. Liquid Nails) between boards, clamp, then using outdoor screws, screw boards together.

Step #6 –  Using wood screws and washers secure the cap to the board. I used 1-1/4” wood screws. It is a good idea to pre-drill the cap where the wood screws will pass through to avoid accidental cracking of the plastic cap. The washers ensure that the screws, when tightened, will not crack the plastic cap.

Antenna-DBJ1build5Step #7 –  When the boards are securely “sandwiched” then use a ¼” bolt (I used a carriage bolt), star lock washer, and locknut. Drill a hole for the bolt through the cap bottom (centered) and through the lower board. Install bolt from the bottom through the boards, through the cap and secure with lock washer and nut. Be careful to not tighten the bolt/nut too much; you don’t want to chance breaking/cracking the plastic cap.

Step #8 –  Now you have the base ready for priming and panting. I suggest a high quality primer and then multiple coats of a high quality paint to seal the wood against moisture. I suggest you tape off the threads with painter’s tape prior to painting.

Step #9 – Using the 10’ section of Class 200 PVC pipe, cut the 3” PVC pipe in half. Cement a double-female joint to each section of pipe. Use a plastic primer spray paint; paint the pipe any color you wish. It is not necessary to paint the pipe, I just think it looks cooler painted. Allow for the paint to fully dry before installing the swivel bales.

Step #10 – In the 5’ section of ¾” Class 200 PVC pipe install the wire DBJ-1 antenna according to the instructions included with the antenna.

Step #11 –  Using the 3” x 2” PVC reducer connection cut a ¾” hole in the side of the reducer as shown.

Antenna-DBJ1build6Step #12 –  Using the 2” x 1-1/4” PVC bushing cement the antenna cap (with the PL-259 connector installed) into the 1-1/4” opening in the bushing. Then cement the 2” end of the PVC bushing into the 2” opening on the 3” x 2” PVC reducer. (When ready to use the cap will fit over the male end of the PVC base.)

Step #13 –  Paint the 5’ antenna section any color you wish. Painting is not necessary but it looks cooler if it is painted. Make sure you use a plastic primer prior to painting with the finish coat.

Step #14 –  After the paint is dry on the 3” x 5’ sections of PVC pipe secure 3 or 4 of the swivel bales to one section. You will install the swivel bales on the end that does not have the joint installed. Make sure you are sufficiently lower from the end of the pipe to allow the 5’ antenna section to fit securely and snugly onto this section.

Antenna-DBJ1build6Step #15 – Allow all painted surfaces to completely dry prior to initial use.

Installation Options –

You have three installation options:

Starting with the base…

Antenna-DBJ1build7

Option #1 – Install the 5’ antenna section directly onto the base.

Antenna-DBJ1build8Option #2 – Install the 5’ antenna section on one of the 3” x 5’ sections, and then install the 3” x 5’ section on to the base.

Antenna-DBJ1build9Option #3 – Install the 5’ antenna section onto the 3” x 5’ section with the swivel bales, and then that section on the remaining 3” x 5’ section. Then install the entire configured pipe/antenna onto the base.

Antenna-DBJ1build10Note #1: If you are going to be securing the antenna with Para cord, tie the Para cord onto the swivel bales prior to raising the pipes and installing onto the base.

Note #2: If you are concerned about the unit’s stability you can place sandbags or large rocks on the base to improve stability.

Note #3: I painted my antenna a combination of colors and textures that will help it blend in with the desert environment where I will be using it.


2009 - 2019 Copyright © AHTrimble.com ~ All rights reserved
No reproduction or other use of this content 
without expressed written permission from AHTrimble.com
See Content Use Policy for more information.

The humble flash-bang grenade pouch…

Military surplus flashbang grenade pouchnote: article first appeared in August 2015

I am always looking for really good gear. Especially really good and inexpensive gear. The flashbang grenade pouch is one of those pieces of gear. I have come up with a number of good uses for this sized pouch. But I think I am only scratching the surface. I will leave it up to your imagination to come up with more ideas.

The flashbang grenade pouch I am talking about is this one…

military surplus flashbang grenade pouch NSN 8465-01-515-7581The approximate dimensions are:

  • 2.5″ wide
  • 2″ deep
  • 5″ – 6″ tall (adjustable)

The pouch is made from hevy-duty Cordura nylon, has a strong nylon stealth buckle, and heavy-webbing and MOLLE II compatible straps. The pouch also has a drainage grommet in the bottom of the pouch.

These pouches can be purchased online for $4.25 – $7.95 depending on the website you buy from. Shop around!  I got the best deal on eBay for a bulk purchase of them.

Here are some examples of what you can use it for…

UV-5RA with regular/standard battery (L) and the option 3800mAh (R).

UV-5RA with regular/standard battery (L) and the option 3800mAh (R).

Standard UV-5RA fits with perfectly with the pouch flap covering the entire top of the radio.

Standard UV-5RA fits with perfectly with the pouch flap covering the entire top of the radio.

UV-5RA with the larger, 3800mAh battery. Pouch flap doesn't cover quite as much of the top of the radio. But it is still a great fit and the radio is very secure.

UV-5RA with the larger, 3800mAh battery. Pouch flap doesn’t cover quite as much of the top of the radio. But it is still a great fit and the radio is very secure.


CAT - Combat Application Tourniquet

CAT – Combat Application Tourniquet

CAT - Combat Application Tourniquet

CAT – Combat Application Tourniquet


Yaesu FT-60R

Yaesu FT-60R

Yaesu FT-60R

Yaesu FT-60R


Garmin GPS (60 series)

Garmin GPS (60 series)

Garmin GPS (60 series)

Garmin GPS (60 series)


I got you started…now figure out how you can use this great piece of gear!


2009 - 2019 Copyright © AHTrimble.com ~ All rights reserved
No reproduction or other use of this content 
without expressed written permission from AHTrimble.com
See Content Use Policy for more information.

Yaesu FT-897D Ham Radio : Storing and Cases

Yaesu FT-897Dnote: article first appeared in March 2015

In this post I will go over how I store my 897D and what I store with it.

In two previous articles I went over the Yaesu FT-897D radio and accessories. Both articles are worth the read. They appeared yesterday and the day before.

So let’s go over my standard format, what is the mission for all of this?


Mission –

To safely store the radio and all components with which to operate the radio.

Requirements & Restrictions –
  1. Cases must be sturdy, at least to military specifications.
  2. Cases musty protect against dust, dirt, and water impingement.
  3. Cases should protect the contents against damage due to reasonable heights and rough handling.
  4. Cases should be low profile and not draw attention to them.

SKB i-series 3I-1711--68-C.The case I chose was the SKB i-series 3I-1711–68-C.. These cases are waterproof and as sturdy, if not more so, that Pelican cases. And they are cheaper that Pelican cases. They come with “cubed” foam ready to be cut to size for your equipment.


So this is what my pair of cases looks like for my Yaesu FT-897D –

SKB i-series 3I-1711--68-CYes, there are two cases for my 897D. One for the radio and equipment, and the other I call “support.” Each case is clearly labeled for easy identification.

Yaesu FT-897D Radio Case –SKB i-series 3I-1711--68-C Yaesu FT-897D layer 1

Bottom Level:

  • 1 x 6′ Cable, power harness with 25amp auto fuzes, radio connector on one end, Anderson Power Poles on the other end.


SKB i-series 3I-1711--68-C Yaesu FT-897D layer 2

Top Level:

  • 1 x Yaesu FT-897D radio with AT897 Autotuner attached
  • 1 x Microphone, Yaesu MH-31
  • 1 x Cable, Data, 14″
  • 1 x Cable, Antenna, 12″
  • 1 x Cable, power, 35amp auto fuze, battery clamps on one end, Anderson Power Poles on the other end.


On top of the radio I place a 897D user’s manual in a 1-gallon Ziplock bag and in an other 1-gallon Ziplock bag I place a user’s manual for the autotuner and the power switch as well as a latest copy of the US Amateur Radio Bands chart.

Yaesu FT-897D Support Case –Yaesu FT-897D support hardcase contents

Bottom Level:

  • 1 x Wire antenna, 4:1 Balum, Buxcomm B2KC41
  • 1 x Lead PL-239, 50′


Yaesu FT-897D support hardcase contentsMiddle Level:

  • 1 x PL-259 male/male connector
  • 1 x PL-259 male/female connector with ground connector
  • 1 x ground wire pipe/stake clamp


Yaesu FT-897D support hardcase contentsTop Level:

  • 1 x Power Supply, AC, 30amp, MFJ-1230MV
  • 1 x Power Supply, AC power cord
  • 1 x Screwdriver, phillips head
  • 1 x Headphones, Yaesu YH-77sta with adaptor
  • 1 x RT Systems Programming CD
  • 1 x RT Systems Programming cable
  • 1 x power cable, 6″, Anderson Power Poles to eyelets


I have given you a list of the equipment needed to run the Yaesu FT-897D Ham radio. Is it everything you might need? No, it isn’t. I didn’t include the little things like some 550 Paracord to string up the antenna. I didn’t include the battery or solar panels. This was meant strictly for the radio equipment itself.

Take this list and use it as a starting point for your specific need and mission.


2009 - 2019 Copyright © AHTrimble.com ~ All rights reserved
No reproduction or other use of this content 
without expressed written permission from AHTrimble.com
See Content Use Policy for more information.

Yaesu FT-897D Ham Radio – Part #2

Yaesu FT-897Dnote: article first appeared in February 2015

As mentioned in Part #1 of this series that posted yesterday, I really love this mobile unit!  The Yaesu FT-897D is an amazing piece of Ham radio technology wrapped up in a very compact and sturdy package for HF and UHF/VHF operations in the field or as a base station.  This thing does it all and exceeds my mission requirements and expectations.

In yesterday’s post I covered the specifics of the Yaesu FT-897D itself.  In this post I will go over the accessories, installation info and some other tidbits.


LDG AT-897 Plus auto-tuner

LDG-AT-897 Plus : The AT-897Plus Autotuner mounts on the side of your FT-897 just like it is original equipment. They even added the ability to mount the “feet” on the side of the tuner so when you are transporting your rig by the handle, you can safely and securely set it down and not worry about scratching the case.

The AT-897Plus is microprocessor controlled. The tuner has a front panel button to initiate the tuning sequence while lowering the RF power to 25 watts and will bypass the tuner if pressed momentarily. The red LED lights during while the tuner is active.  The AT-897Plus takes control and power directly from the CAT port of the FT-897 (at 4800 baud) and provides a second CAT port on the back of the tuner so if you are using another CAT device, hooking it up couldn’t be easier.  The AT-897Plus does not need a fan, let alone one that is constantly running. Current consumption when it is tuned is in the micro-amp range.

Autotuner specifications –

  •     Microprocessor controlled
  •     2000 fast memories arranged by frequency
  •     Switched L tuning network
  •     Mounts on the side of the Yaesu FT-897 with four M3-0.5×10 screws (included)
  •     Dual function tune control button
  •     Continuous coverage 1.8 to 54 MHz
  •     Power rating HF: 0.1 to 100 Watts, 30W on PSK
  •     Latching Relays
  •     CAT control at 4800 baud with extra CAT Port
  •     Tuning time: 1 to 7 seconds, 4 average
  •     Antenna impedance: 6 to 800 Ohms (Approximately up to 10:1 SWR, 3:1 on 6M)
  •     Tunes nearly any coax fed antenna. Use optional Balun for long wires.
  •     Power requirements: 11 to 14 volts DC @ 300 milliamps during tune
  •     Operating voltage supplied via the CAT Port (cable supplied with tuner)
  •     Enclosure sizes: 11.5D x 3.25H x 1.5W (measured in inches)
  •     Weight: 2 pounds

BUXCOMM WINDOM dipole antennaDipole Antenna :  Buxcomm Windoms (Includes 4:1 BALUN PoweRated @ 2000 watts PEP).  SuperFlex PVC covered wire, and covered connections to the BALUNs and end insulators. BALUNs use multiple cores, and are power-rated to handle 2000 watts PEP, and the hardware is designed to withstand harsh weather conditions.

The BUXCOMM Windom (OCFD) is well known for its 4 to 9dbi gain over the common dipole.  Field gain test has shown, when the BUXCOMM OCFD is chosen for the lowest band of operation, each harmonic related HF band above it will exhibit 2.0 to 3.75dbi greater than the next lower neighbor band.  All this great performance is achieved through the use of specially selected toroids we use in the manufacture of our BALUNs.  They use a uniquely designed BALUN that exceeds the bandwidth of any of the competitors matching device. Pick the model best for your operations:  160 – 2m  (268′) #166265, 80 – 2m  (137′) #802134, 40 – 2m  (70′) #40270.

Buxcomm Coaxial in-Line isolator B2KLISO

Isolator :  Buxcomm Coaxial in-Line isolator B2KLISO.  The BUXCOMM LISO (line isolator) inhibits undesired RFI by preventing feedline currents and re-radiation. In turn, the LISO forces all the RF energy from the transceiver, tuner, or amplifier, into the antenna.


Yaesu FNB-78 BatteryYaesu FT-897D

Internal Battery :  (Radio can accommodate 2 batteries internally) Yaesu FNB-78 Battery


Yaesu CD-24 Battery Charger Adaptor

Internal Battery Charger Adapter : Yaesu CD-24 Battery Charger Adapter


RadioAntennaCar

Vehicle external antenna for temporary dual band (2m & 70cm) operations : This antenna is a must have for temporary vehicle operations.  It is not a permanent antenna, it is a magnetic mount antenna.  You can move the antenna to other vehicles if needed.  You can also use it in a non-vehicle setting as well by placing the antenna higher than the radio.  This antenna can only be used for the UHF/VHF bands but it does have its own UHF/VHF band antenna connection on the back of the 897D.


Yaesu MLS100 external speakerExternal Speaker :  I had to go with a Yaesu MLS-100.  You can buy other speakers but I like the idea of a speaker that is matched to the radio by the manufacturer. The Yaesu Vertex MLS-100 external loudspeaker is a high performance communications speaker matching the impedance and output requirements of most Yaesu transceivers. It mounts on a swivel stand that is supplied along with mounting screws and bolts. A 6.5 foot (2m) audio cable that terminates in a 3.5 mm mono mini plug is also supplied. Black plastic cased speaker and black metal mount. Impedance is 4 ohms and the maximum power input is 12 watts. Yes, the FT-8900r has an internal speaker, but for vehicle operations and the associated noise I think an external speaker is really needed.  Dimensions: Height: 3.75 in., Width: 5.5 in., Depth 1.75 in.

Heil Sound - PMS-6 & Headset Adapter for YaesuHeadset with Boom Mic :  Heil Sound – PMS-6 & Headset Adapter.  Why?  Because I believe that there are times when you want, or need, more privacy or the ability to hear/speak under adverse conditions.  A headset with boom mic is the right answer.  The Pro Micro Single Side is a very unique high performance single sided headset.  This headset is outfitted with the HC-6 element and is designed for commercial broadcast applications, the -3dB points are fixed at 100 Hz and 12 kHz with sensitivity of -57 dB at 600 ohms output impedance (centered at 1 kHz.).  The microphone audio for the Pro Micro series terminates into a 1/8” male plug while the head phone terminates into a 1/8” stereo with adapter. To adjust the headset simply bend the stainless steel piece that is inside the black padded headband.

Mic Gain
Adjust the mic gain while watching the ALC meter. Adjust so that the audio peaks just fill out the ALC scale and do not go beyond the ALC scale.

Speaker
The 706 speaker works all the time. To turn that off simply plug an empty 1/8” plug into the front headphone jack.

Vox  (voice activated transmission)
Set the Vox gain controls for proper activation.

Carrier Balance
If your rig has carrier balance it acts as a type of mic tone control. It is best to listen to yourself in another receiver as you transmit into a dummy load. You are actually moving the carrier + or – 200 Hz above or below the center of the filter network, which causes your microphone audio to change its tonal quality.  The use of the AD-1 series mic adapters allow simple interface with popular transceiver inputs. The adapter is 6” long and has a 1/8” female input jack for the boomset microphone and a 1/4” female that is for the PTT (push to talk) line for the Heil foot switch or hand switch. The 1/4” stereo plug goes into the headphone jack on the transceiver front panel.  All Heil Pro Micro Boomsets are shipped with foam windscreen that fits over the microphone. The windscreen does not change the frequency response, just the breath blasts directly into the microphone.

RT Systems programming software for the FT-897DProgramming Software w/cable :  RT Systems FT-899D Radio Software.  While the radio is fully programmable from the front panel that is not the way you want to try and program this radio. I tried several different “free” programming software program; had problems with all of them.  RT Systems puts out a superb product that can’t be beat in my opinion. FYI – You can use the files from any of the RT Systems software to transfer to any other radio that you are programming.  So I can use all programming I did for my FT-60r for my Yaesu 8900 radio with a simple click of a software button.


NOTE: I will be posting programming files for different parts of the country as well as different repeater systems.

MFJ-4230MV COMPACT SWITCHAC Power Supply : MFJ Enterprises Inc. MFJ-4230MV COMPACT SWITCH (COMPACT SWITCH PS, METER, 4-16V ADJ. 110/220VAC).  This is a great AC power transformer, high quality and very reliable.

This is the world’s most compact switching power supply that also has a meter and adjustable voltage control. Just 5″ W x 2 ½” H x 6″ D, it weighs only 3 lbs. — it is the perfect pack-n-go power supply for field day, DXpeditions, camping, hiking or to pack for your next business trip or vacation to some far away place. MFJ-4230MV gives you 25 Amps continuously or 30 Amps surge at 13.8 VDC. The voltage is front-panel adjustable from 4 to 16 Volts. MFJ-4230MV also has a selectable input voltage: choose from 120 or 240 VAC at 47 – 63 Hz.

A simple front-panel push-button switch lets you choose either Ampmeter or Voltmeter — allows you to select Amps or Volts as you wish to read them. MFJ-4230MV has an excellent 75% efficiency and extra low ripple and noise, < 100 mV. Awhisper-quiet fan cools by convection and forced air cooling. Normal air-flow around the power supply is continuous and a heat sensor increases the fan speed when the temperature rises above 70 degrees Celsius. DC output is five way binding posts on the back of the MFJ-4230MV so you can power your dedicated HF, VHF or UHF transceiver with ease.

Charge Guard CG-MP

TIP – Battery protection when installed in a vehicle :  I also use Charge Guard CG-MP timer for my truck’s power installation.  This ensures that I won’t inadvertently run my battery dead using my Ham radio without the engine running.  Well worth the $’s.


Anderson Power PolesTIP – Power connectors :  I use Anderson Power Poles for all my power connections.  This makes hooking up my power “brainless” and quick.  Plus it gives me the added advantage of using power cables, fuses, etc. for more than one radio.  Basically allows for flexibility.  I chose Anderson Power Poles because there are essentially the standard for Ham radio operators.


So this concludes my review of the Yaesu FT-897D radio.  It is a solid “Buy!”  You will not be disappointed and it will serve you for a very long time, especially when the grid goes down and you need the ultimate Ham radio.

Would I own this radio, or suggest you own it, even if you didn’t have a Ham license to operate it? Yes! You can still listen to what is happening whenever you want. Plus, during emergencies, to save a life, you can use it without a license. During a “grid-down”…well, whose going to come check your Ham license?

Tomorrow I will be posting an article ideas on keeping your radio rig up and running plus what my 897 “go kit” looks like along with a list of its contents.  Look for it!


2009 - 2019 Copyright © AHTrimble.com ~ All rights reserved
No reproduction or other use of this content 
without expressed written permission from AHTrimble.com
See Content Use Policy for more information.

Yaesu FT-897D Ham Radio – Part #1

Yaesu FT-897Dnote: article first appeared in February 2015

Yaesu has been putting out high quality products for a very long time.  The FT-897R is no exception. This is the HF radio I purchased and I am extremely glad I did. It meets or exceeds every expectation I have for a quality HF rig, then it throws in an added bonus – UHF/VHF.

I will go through my standard outline of reviewing this radio based on its designated mission and requirements.  But before I move on I want to tell you the best feature of this HF rig – it also handles my

Yaesu FT-897D with LDG AT-897 auto-tunerfavorite bands 2m & 70cm as well!  The 6m band coverage is built-in as well.  Way more bang for the buck than I imagined.  Let’s get started on the rest of the info…


Mission –

Provide reliable clear communications over the HF Ham frequency band for both disaster and ”grid-down” situations in the field or function as a base station.

Requirements & Limitations –
  1. Must be able to access all HF (High Frequency) band frequencies.
  2. Must be a sturdy radio fully capable of hard field use.
  3. Must be 12vDC compatible.
  4. Must be easy to computer program.
  5. Must have headset jack.
  6. Should have internal batteries
The Good & Less Good
  1. Absolutely great to have the added bonus of 6m, 2m, and 70cm bands in the 897!!  This unit is the ultimate “grid-down” radio.Yaesu FT-897D dual antenna hook-up.
  2. You can hook up two antennas to this unit.  One for the UHF/VHF bands, the other is for HF & 6m bands.  Really a sweet option if you are going for an “all-in-one” radio.
  3. Mic is a mini-remote control unit for the radio.  It can step through the menus on the mic just like using the front panel.
  4. Very solid and reliable.
  5. Easy to program via the RT Systems programming software.
  6. Read the manual and use on-line resources to understand the full capability and operation of this radio.
  7. Use an automatic tuner and this radio rocks!
There are some minor, very minor, drawbacks:
  1. I have heard of, but not experienced, some minor RF interference on the mic from being too close to an antenna.  My antenna is nowhere near my mic so I have not had this problem.
  2. The manual doesn’t cover everything this radio is capable of.  Use on-line resources for additional information.
  3. If HF is crowded and busy, the radio is not the best out there.  But it doesn’t cost $5000 either.
  4. The internal speaker is adequate but not the best quality.  Use an external speaker or headset for high-quality listening.
The Details –Yaesu FT-897D in the field

The FT-897D is a rugged, innovative, multi-band, multi-mode portable transceiver for the amateur radio MF/HF/VHF/UHF bands. Providing coverage of the 160-10 meter bands plus the 6m, 2m, and 70cm bands, the FT-897 includes operation on the SSB, CW, AM, FM, and Digital modes. And it’s capable of 20-Watt portable operation using internal batteries, or up to 100 Watts when using an external 13.8-volt DC power source (standard 12vDC operation).

The new FT-897 ″D” version includes coverage of the U.S. 60-meter (5 MHz) band, along with the 0.5 ppm TCXO Unit, at no additional charge. The coverage is HF 160 to 10 meters (including 60 meters) plus 50/144/430 MHz VHF/UHF. Receive coverage is:  0.1-56, 76-108, 118-164 and 420-470 MHz.

  • TX Frequency Coverage: 160-10 Meters, 50 MHz, 144 MHz, 430-450 MHz, plus Alaska Emergency Chan. (5167.5 kHz).
  • RX Frequency Coverage: 100 kHz-56 MHz; 76-154 MHz; 420 – 470 MHz. (Exact frequency range may be slightly different)
  • Power Output: 100 watts HF-6M, 50 watts 2 M, 20 watts 70 cm. (20 watts on battery)
  • Operating Modes: USB, LSB, CW, AM, FM, W-FM, Digital (AFSK), Packet (1200/9600 FM).
  • Digital Modes: RTTY, PSK31-U, PSK31-L, and User defined USB/LSB (SSTV, Pactor, etc.).
  • S. Weather Band reception.
  • Built-in 3-Message Memory Keyer.
  • Multi-Color LCD Multi-function Display.
  • Bar-Graph Metering of Power Output, ALC, SWR, Modulation.
  • Optional Narrow CW and SSB Filters.
  • AGC Fast-Slow-Auto-Off Selection.
  • RF Gain/Squelch Control/IF Control.
  • Built-in Noise Blanker.
  • AM and FM broadcast reception.
  • Dual VFOs, Split Capability, IF Shift, and R.I.T. (“Clarifier”).
  • Wide/Narrow FM Selection.
  • AM Aircraft Reception.
  • Dedicated SSB-based Digital Mode for PSK31 on USB/LSB, AFSK RTTY, etc.
  • Built-in CW Electronic Keyer and Semi-Break-In.
  • Transverter Interface Jack.
  • Built-in VOX.
  • Carry Handle.
  • Built-in CTCSS and DCS.
  • ARTS™ (Auto-Range Transponder System).
  • Smart Search™ Automatic Memory Loading System.
  • Spectrum Scope.
  • 200 Regular Memories, plus Home Channels and Band-Limit (PMS) Memories.
  • Alpha-Numeric Labeling of Memory Channels.
  • Automatic Power-Off (APO) and Tx Time-Out Timer (TOT) Features.
  • CAT System Computer Control Capability Cloning Capability.
  • Battery-Powered Field Operation
  • Base Station Operation
  • Rugged, High-Output Power Amplifier
  • Built-in Digital Signal Processing
  • Outstanding Features for the CW Expert

Battery-Powered Field Operation

The bottom side of the FT-897 contains a “power source tray” which can accommodate up to two of the optional 13.2 Volt, 4500 mAh FNB-78 Ni-MH Battery Packs. This gives it completely portable operation without any external power source. Maximum power output is 20 Watts (all bands) during battery operation, and with two FNB-78s you may expect up to eight hours of operating time (TX 5%, RX 5%, standby 90%). What’s more, you can charge one of the FNB-78 Battery Packs while operating the FT-897 off the other pack—ideal for situations where solar or other power sources are available.

The optional CD-24 Charge Adapter provides the necessary voltage for charging, and it may be used in conjunction with an external 13.8 Volt source, or the optional PA-26 AC Adapter may be used to power the CD-24.

DC 13.8V Mobile Operation

Using the FT-897D in mobile operations is pure joy! The combination of the FT-897 and the ATAS-120 Auto-Tune Antenna System provides automated operation from HF through the UHF spectrum!

Using an external 13.8 Volt power source, you get a full 100 Watts of power output on HF and six meters (144 MHz: 50 W, 430 MHz: 20 W).

Base Station Operation

The FT-897’s outstanding fundamental performance invites expansion into a full-featured base station. The optional FP-30 Internal Power Supply provides operation from AC sources, and the clamp-on FC-30 Automatic Antenna Tuner option expands the impedance range of the transceiver. Round out your station with the MD-200A8X Deluxe Desk Microphone and the VL-1000 Quadra System Linear Amplifier for world-class performance at home!

The power source tray of the FT-897 is designed to accommodate the optional FP-30 Internal Power Supply, allowing full-power operation from 100-120 V or 200-240 V AC power sources. The quiet switching-regulator design of the FP-30 is tolerant of AC input voltage variations, making it ideal for DX-pedition use! And to extend the impedance bandwidth of your antenna system, the innovative FC-30 Automatic Antenna Tuner option clamps onto the left side of the FT-897 in seconds!

Rugged, High-Output Power Amplifier

Achieving 100 Watts of power output from such a compact package is a difficult mechanical and electrical engineering task. On HF, push-pull 2SC5125 Bipolar transistors driven by push-pull 2SK2975s provide the 100-Watt power capability, while on VHF maximum efficiency during battery operation is yielded by 2SC3102 bipolar PA transistors. The rugged aluminum die-cast chassis provides a solid foundation for the heat sink for the power amplifier, with a total of almost 40 cubic inches of heat sink surface area available. With its thermostatically-controlled twin cooling fans, the FT-897 will stand up to the rigors of DX-pedition or home contest use, with dissipation capability to spare!

Built-in Digital Signal Processing

The FT-897 includes a wide array of analog and DSP filters to help you dig out those weak DX signals on a crowded band! One-touch activation of the DSP filters, plus a convenient “DSP” LED on the front panel, enhance the ease of using the DSP. DSP Bandpass Filters, Noise Reduction, and Auto-Notch Filter circuits are included.

Look for Part #2 in this review of the 897 tomorrow for information on antenna, accessories, etc.

This is a “BUY!”


2009 - 2019 Copyright © AHTrimble.com ~ All rights reserved
No reproduction or other use of this content 
without expressed written permission from AHTrimble.com
See Content Use Policy for more information.

Yesterday & Today : Pain !

Physical fitness and exercising for grid-down and emergencies, stay in shape for grid-down

note: first appeared April 2015

Wow! Normally I have my articles ready days in advance to be published each morning. This morning I held off on it because I wanted to share with you something that came to light yesterday. Health & Physical Fitness.

I am 59, great health, and good physical condition. I do physical training 3 – 6 times a week. My normal workout consists of jogging, walking, push-ups, sit-ups and occasionally weight lifting. When I jog I go for 2 – 3 miles at a stretch. I have a specific routine that I worked on for years to meet the physical demands of my job. Annually I am tested to ensure I am field-ready. I have to walk 3 miles in 45 minutes or less wearing a wildland firefighter pack test45lb weight vest. That is a 4mph pace.

Now, before you roll your eyes and think how easy it is, try it yourself. If you are sub-30 years of age you should be able to do it easily if you maintained a healthy life-style and stayed active. If you are 30 – 40 it shouldn’t be much of a stretch for you if you are in good shape and play sports, hike, bike, etc. If you are over 50 you probably can’t do it, period…unless you have trained and work-out for it. As I turn 60 next week I can easily do it but my hips hurt like crazy during the last mile and for the next day. Yesterday was that test.

My hip hurt more than normal yesterday but I still had a very respectable time. I even beat a number of the 40-somethings. Physical fitness and exercising for grid-down and emergencies, stay in shape for grid-downBut we had a work project to do yesterday as well. So immediately after the test I changed clothes and we headed off to the mountains to work on a thinning project. There were large piles of cut limbs and tree trunks waiting for us to chip. Thank means we pull the piles apart, drag the stuff to the chipper. and repeat until the pile is gone. Then go on to the next pile.

Some of you might be wondering why a US government firefighter supervisor is doing such manual labor. Well, when we are not fighting fire we do “project work” to help maintain federal lands to make them more resistant to wildfire. And, if I am going to ask my guys to do it, then I am going to do it as well. I don’t go on all the projects but enough of them to show that I only ask them to do what I am willing to do as well. And to remember what I am asking of them.

So the average age of these guys is in the 28 – 32 age range. And they are all in very impressive physical shape. And the only thing I have going for me is my ego. I won’t be out-done!

So we wrapped it up yesterday about 3:00pm and headed in, cleaned up and went home. Yeah, and then it started…the pain.

I took an Aleve. Then I laid down. Then I got up to eat dinner and took two Ibuprofens. Then I laid back down. I went to bed at 8:00pm.

I got up this morning at 5:30am which is usual for me. But…and that is a serious “but” that I speak of. I was hurting. My hips hurt a lot, my back hurts some, as does my arms. And I am worn out.

So why in the heck am I sharing this with you? Simple…at least it’s simple to me.

During times of emergencies, disasters, but most assuredly during a “grid-down” it will be very physically demanding. Probably far exceeding whatever you might normally be used to. So I make the following suggestions, have an exercise routine that is right for you:Physical fitness and exercising for grid-down and emergencies, stay in shape for grid-down

1 – The #1 thing to do is walk. I would suggest you make a target of walking a minimum of 10-miles per week, in a minimum of 2-mile increments. Walking might well be the #1 thing you will do during rough times, and a lot of it.

2 – Lift weights. No, I am not talking about body-building weight lifting. I am talking about Physical fitness and exercising for grid-down and emergencies, stay in shape for grid-downcommon-sense kind of weight lifting. Start with maybe 5lb dumb-bells and doing regular curls, French curls, then overhead press, then tricep lift, etc. Work up to maybe 5 reps of 10 curls each. Do that for a maximum of 90-days and move to the next higher 5lb increment. It’s really up to you, but weight lifting can really improve your health, mental and physical, while improving your core strength.


3 – Physical fitness and exercising for grid-down and emergencies, stay in shape for grid-downPush-ups. Yeah, good old fashion push-ups are great for you. You don’t have to be some one-armed or one-legged push up crazy person but just do them at your own pace. For me I do mine inclined. I broke my back in three places over 25 years ago in a house fire. Since then I have to do my push-ups with my shoulders at about 2’ higher than my feet to take some of the stress off of my back. Or I can do push-ups from my knees vs. my toes (called a woman’s push-up in the old days). When I am at the track doing my jogging I stop on every lap and do a set of push-ups. So when I am done with my 3 mile jog I have done 90 – 180 push-ups as well.

4 – !!!Stretch!!! This is the single most important part of exercising! I spend about 6 minutes stretching before I do my Physical fitness and exercising for grid-down and emergencies, stay in shape for grid-downjog with push-ups. I do the following:

  • Arm windmills.
  • Arm stretching to the front and then to the rear.
  • Next I do toe touches with my feet together.
  • Then ground touches with my feet about should width apart.
  • Then ground touches with my feet spread as far as they will comfortably go.
  • Physical fitness and exercising for grid-down and emergencies, stay in shape for grid-downThen 12” from the ground touches with my feet crossed over each other (outside of one foot laid alongside of the other foot). I do each foot twice.

5 – When I am done jogging and the push-ups I do the same stretch routine and add:

  • Holding a 3” fence post with one hand I swing each leg forward/up and backward/up as far they will go.
  • Holding a 3” fence post with both hands I swing each leg left/up and right/up as far they will go.

This exercise routine has done wonders for me! Since doing it passionately week after week my lung capacity has significantly improved. My blood pressure is now 108/68. And my stamina is far better than when I was lazy and wasn’t committed to an exercise program.

So back to yesterday and this morning – If I wasn’t into a good exercise program I can’t imagine what would have happened to me yesterday. Maybe a heart attack. This morning might even be worse. But most importantly it reminded me how important it is to be “prepared” physically and not just have food storage, water filtration and a closet full of guns/ammo.

I will be stepping up my physical training, pushing myself just a little more. Not sure what to do about the hip pain, growing old can do that to you.

Family hiking, bugging out, during grid-downHow does this all affect you? I want you to think about this and see where you are. Is this an area of preparedness that you need to work on a little bit more? Maybe just a little?

Maybe just start by taking a walk with your family a couple of evenings a week.


2009 - 2019 Copyright © AHTrimble.com ~ All rights reserved
No reproduction or other use of this content 
without expressed written permission from AHTrimble.com
See Content Use Policy for more information.

Let’s talk about “Crazy Don”…

Wildfire washington state 2015note: article first appeared in late September 2015

In August & September I was in the state of Washington on a wildland fire. It has been a bad year for fires, especially Washington. There were lots of homes threatened and the fire was growing rapidly.

I showed up on the fire and was given my assignment along with some minimal resources. We never really have enough it seems. I got to work and we were making a difference and saving homes but it was fast-paced and challenging.

I mentioned that there was a lack of resources and that included field operations folks like me as well. My duties Wildfire growing and burning at nightquickly expanded to cover an area of the fire that was almost directly at the head of the fire. We did a large burn-out one night that went textbook perfect.

Although very tired, we headed back out there the next morning to continue the “herding” of the fire into an area that was of low value, mostly scrub trees. Our intention was to “hook” the fire once we got it past the last ranch that was threatened. As we headed to the fire we went through a ranch on their road. The same person that met me yesterday came running out to meet me again that morning.

One of the “blessings” of being a supervisor/leader on a wildfire is going in first. At least that is my philosophy; first in, last out.

The day before “Don” had came running out to my truck and we chatted for awhile. I had explained to him why we Crazy Don conspiracy theorywere there, what we were going to be doing, and assured him that we would protect his ranch. Don was, let’s say, “excited” the day before. And he sounded like a burned out hippie about the age of late mid to late 50’s. But all went well, and as I said earlier, things went well for us.

But the second morning Don was insane. Yes, literally insane. He was screaming and yelling at me about everything we had done. He yelled at me that we had set everything on fire. He yelled at me that we had cut a fireline on his property. He yelled at me for being an agent of the government and being controlled by the cattle barons. He told me how he had gone up against the government three times before and beat them…and he would “show ’em again.” He then started trying to engage me about global warming. All the while he was very animated as in flailing his arms, moving around rapidly, and sometimes charging right up to my truck window.

All along I was using every technique that I knew to de-escalate the situation. Nothing I tried worked, his emotions were like a roller coaster, and getting worse by the minute. I suspected drug usage…past or present.

I had told my firefighters to not stop, they were to continue to their work locations/assignments and get started while I dealt with Don.

Then Don started talking about how he was the local thermal vent investigator. He investigated the local thermal CrazyDon002vents, the same types of vents that were underwater in the ocean around the world. But he went on to talk about how the government was lying to everyone about the thermal vents and it was all a big conspiracy cover-up.

Next up on his agenda…the local cattle barons were running the fire. And it got worse from there. But then it took a very bad turn.

Don started talking about knowing where our camp was. That he had dealt with this crap before. He knew where to go and what he was going to do. He was going f*-up some people just as soon as he got to camp, and that would be soon because he wasn’t going to take it anymore.

I rolled my window up the rest of the way and drove off, I wasn’t going to listen to his lunacy anymore. However, since he had made some not-so-thinly veiled threats I was obligated to report the incident to my supervisor, the Operations Section Chief.

Well, that conversation didn’t go too well. As soon as I related the conversation, and that it was the second incident with Don in two days, I was told to pull my guys out of the area. I reminded him that is would almost assure us of losing the fire in this area and the fire growing uncontrolled once again. The order stood, I was to abandon the area immediately.

To shorten the story, we left. Remember, I am the last one out. But I am also not stupid. I talked to my 2nd in command and told him to drive out in front of me but to hold up about 50 yards past the gate while I closed the gate behind me. He was to make sure I wasn’t left on my own with some crazy man headhunting Feds. We had also decided to drive out on a different two-track road to avoid the ranch house area all together…and maybe avoid Don altogether.

We almost made it.

All of our resources had driven out and it was just my 2nd and myself. As we drove up to the last gate we had to close here comes Crazy Don driving like a bat out of hell. He pulled up and blocked the road to prevent us driving out. As he came back to start screaming at me, my 2nd drove around Don’s truck, through the gate and then watched for me.

Crazy Don was screaming at me through my window accusing me of abandoning his ranch because it was on state Crazy Don screaming at meprotected lands and I was a federal resource and hated state citizens. He kept lunging at my truck door and acting like he was high on PCP or Meth. He was threatening me and trying to…well, let’s just say I had my door locked and window cracked open only about an 1”.

When I saw my 2nd had cleared the gate I simply drove off leaving Crazy Don yelling and screaming at my tailgate.

After I got through the gate and around the corner in the road I blocked the two-track while my resources finished traveling to the blacktop road. I followed them out. Low and behold the OpsChief had called Johnny Law who wanted to meet with me. Evidently threatening a Federal employee can be a fairly serious crime.

Now, let me shorten the story a whole lot…

We didn’t return and engage the fire that day, we were told not to be there or anywhere close by. Overnight the fire out of control wildfiremoved a whole lot and we were able to re-engage the next morning. But it was too late, we lost that part of the fire entirely.

Law enforcement had a conversation with Don. Evidently it went well, he was not arrested and no firefighters were assaulted. But the damage was done. Our lack of ability to engage the fire that day probably cost a couple hundred thousand dollars, and burned up another 30,000 acres, maybe more. But that is not the point to this article.

So, what is the point?

Crazy Don is the point. He is the whole point to this article.

Don’t be a Crazy Don!

There is a time and place for everything, but not every time and place it the right time for everything.

Roughly translated that means…whatever your beliefs are, know the right time and place to talk about them. Better yet, know the right people to talk to about them.

If you are a “birther”, a “turther”, “chem-trailer”, “blood-mooner” or whatever else you might be; even a thermal vent inspector, know when is the right time to talk about it. Better yet, know when the wrong time to talk about is…and don’t talk about it if the time isn’t right.

Why?

Do you want to be the next Crazy Don?

Crazy Don conspiracy nutWhat did all of Don’s ranting and ravings accomplish? Did anything positive get accomplished?

Or did he just make a name for himself as a crazy, burned-out hippie? And did he get on LEO’s radar? Could he have found himself in serious legal or criminal trouble?

Just think about it. I am not saying to not have sincere beliefs and advocate for certain issues. But just use common sense and be practical about it. Use good judgment in when and where you talk about it. And most importantly, be careful “who” you talk about it with.

It was obvious that Don was fairly anti-government. Did he have a kindred spirit in me?

Let’s say he did for this conversation. Did him going off the deep end in my face help him or hurt him? Was it worth it?

As you well know I want you to stand up, I want you to take action for those righteous things you believe in. However, you have to be intelligent in the way you go about it.

If you don’t…you become just another Crazy Don.


2009 - 2019 Copyright © AHTrimble.com ~ All rights reserved
No reproduction or other use of this content 
without expressed written permission from AHTrimble.com
See Content Use Policy for more information.