Wireless Float Switch Review

Introduction –

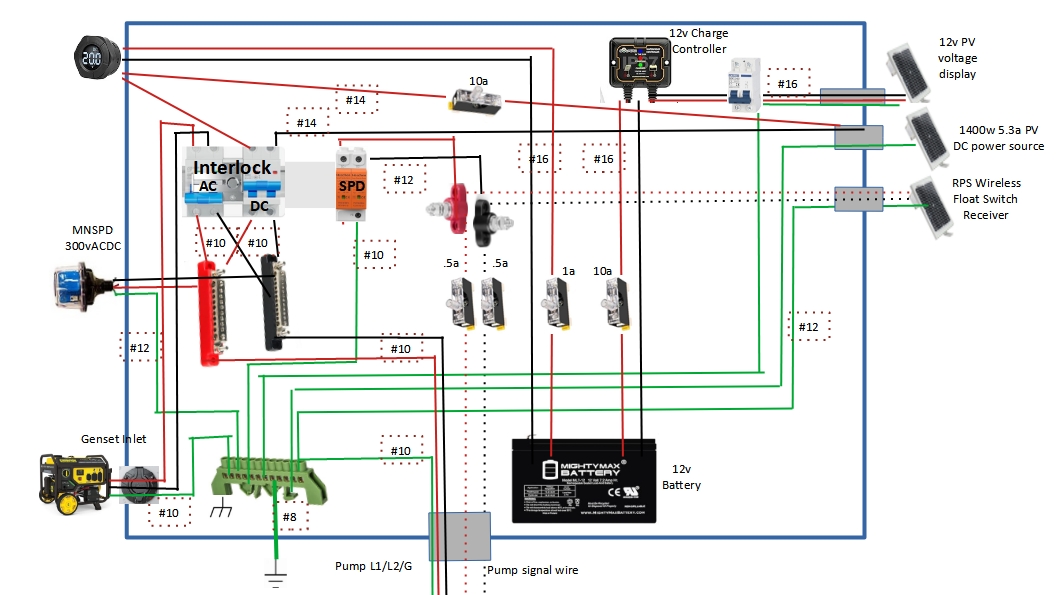
Okay, I’ve written a whole lot about our solar well and lightening problems; some here, some on a DIY solar website/forum. Bottom line…twice in 4 years we were hit with lightening transient voltage that blew up our control module for the solar powered well. Yeah, $600 for the first one $500 for the second control module. Simply put…unacceptable!

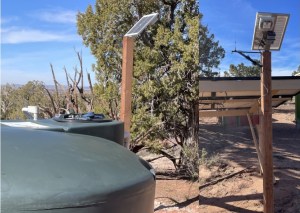
Yes, I installed all the appropriate grounding and surge devices but it turns out that it was the 700’ of signal wire between the water storage tanks and the wellhead that was acting like a giant antenna absorbing very small amounts of voltage (in the ground, from lightening) and sending it into the control module’s computer circuit board. Zap!

AND!!!! Along the way I found out that I didn’t need the control module to begin with!! Yup, that really ticked me off…$1,100 down the drain. So much for retailers selling customers what they need vs higher profit.

The “fix” turned out to be 2-stages; 1) get rid of the signal wire problem, 2) replace the control module including the very sensitive electronic circuit board with something more stable and safer. This review/article will be only about the signal wire issue.

I first tried to figure out how to protect the signal wire from the transient voltage. Long story…very long story…made short, I couldn’t do it in a manner that I felt was safe, reliable, and realistic. Plan B turned out to be simple…eliminate the signal wire altogether. And that turned out to be a wireless float switch system.

The float switch itself is a simple device that monitors the water level in the storage tank. When the water level drops it sends a signal to the well pump to turn on. When the tank is filled it sends a signal to the well pump to turn off. My problem was the 700’ of buried signal wire between tanks and well. A wireless system is just that…wireless…no wire buried in the ground to pick-up the transient voltage.

The signal is transmitted via a radio signal between a transmitter and a receiver. Everything else pretty much operates the same. Problem solved…installed it last week.

Summary –

Let’s make this easy for you. I will give you the bottom line right here and then you can read the rest if you want to…or if you need some reading material to fall asleep by.

After weeks of research and searching there was only one real option: RPS Solar Pumps’ Wireless Water Tank Sensor for Remote Pump Shutoff, the 24-hour version. Price $729 (on sale), about $800 all in with shipping and tax.


So here is the bottom, bottom line…It Works!

Unpacking & Problem –

You know, after getting sold the wrong pump by a retailer that didn’t really know what they were doing, and getting sold a control module that was 100% not needed…and then buying another control module that was 100% not needed I was very skeptical about the actual ability of this unit to do what it was advertised to do…and the price it was being sold for…and the ease of installation that the company was touting. I think you can understand that.

So the box arrives in decent time and apparently undamaged. I set-up for a video to show the unboxing as the first step in a longer video covering the install. “Action!” The box was packed well with plenty of protection around each solar panel and the attached transmitter/receiver units. Out comes the transmitter unit…nice. Next comes the receiver unit…nice. Ahhhhhh…that’s it…nothing else in the box. First thought that ran through my head…here we go…scammed again!

I double checked what was supposed to be in the box vs what was actually in the box. I was missing the float sensor, the antennas, the hardware, etc. More defeatist thoughts start rolling around in my head.

I checked to make sure I saved the video, pulled up the company website, and called customer support. Now this is where it could have been the end of the last of my faith in humanity. Thankfully I couldn’t have been more wrong. The CS rep was incredibly friendly and helpful. She listened and verified the missing equipment. She said she would get an order placed immediately for the missing parts. Then the other shoe dropped…”Do you have any pictures of what was in the box?”

Yup, first thought…they want verification that stuff was actually missing, thinking I was scamming them. But, thankfully, “Mam I took a video from the time I set the unopened box down on the deck through pulling out each piece that was there and then showing the empty box.” I guess that sealed the deal…order placed.

So on with the results of the unpacking…

Issue #1 – Safety : Exposed terminals on both batteries. Yeah, not a good thing. On both solar panels there was an attached battery. The battery had both the positive and negative terminals fully and completely exposed. Meaning…had a piece of metal touched both terminals it would cause a dead short in the battery…and that cold cause a fire. Very, very bad thing when shipping. All rechargeable batteries come with terminal protection when shipped. Someone at the RPS plant didn’t put the terminal protectors back on after assembly. And, the folks in the shipping department missed it as well. Not a good thing at all.

Issue #1.5 – Incompetence : Yeah, kinda harsh but factual. The order should never have left the warehouse without all the parts in the box. It is not hard to ensure all the parts are there in the box…not hard at all. But, RPS does get a compliment for their customer service and quick response to get the missing parts to me.

Received Missing Parts –

About 4-days later the missing parts showed up. Yes, I was skeptical all over again. Video rolling, box opened, all missing parts were no longer missing…all was good. Too bad they weren’t in the original box in the original shipment. The shipping department seems to have a bit of a problem. Solution: Have a pre-printed list for each different unit, the shipping guy goes down the list, the part goes in the box, it gets checked off the list, when complete, take a picture of the signed-off list, put the original list in the box, seal & ship. Problem solved.

Installation –

The installation was straight up and pretty simple. However, the installation video put out by the company is completely unrealistic in terms of time it takes to do the installation. Plan on 20 – 30 minutes per each unit, potentially more depending on your situation.

Issue #2 – Installation : The battery is located poorly. The battery adds weight in the wrong place, it is unbalanced. The battery should be closer to the base of the mounting bracket lowering its center of balance and gravity.

Issue #3 – Installation : The battery is located poorly #2. The battery is located too closely to the plastic box containing the circuit board. It makes it difficult for a person with large hands to get the antenna screwed in. Locating the battery closer to the mounting base would give more room to attach the antenna.

Issue #4 – Installation : The battery is semi-permanently attached to the mounting bracket. Trying to fix issues #3 & #4 I attempted to move the battery. Ah, no. It appears there is a large zip-tie holding the battery to the mounting bracket making it simple…slid the battery closer to the base of the mounting bracket…two problems solved. It did dawn on me that it seemed pretty lame to have the battery held on by nothing more than a zip-tie. When the battery wouldn’t slid down I noticed a double-sided foam piece of tape between the battery and the mounting bracket frame. No moving it. So, it is nice to have a little better mounting system for the battery…too bad the battery is located in a poor location and can’t be moved without major effort.

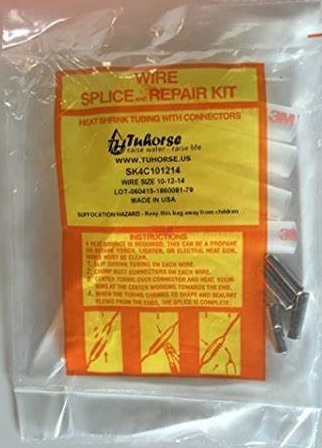
Issue #5 – Installation : There is a signal wire “pig tail” on both the transmitter and receiver units. RPS also includes a splice kit to attach the float switch signal wire to the transmitter unit and a signal wire between the receiver unit and the well pump. Why? Any splice is a potential point of failure of the system. Also, adds considerable time to the installation process. I simply opened the circuit board box, removed the pigtail wire, and then place the signal wire directly into the connection ports on the circuit board. Poof! Problem/issue solved…no more potential source of failure and time saved.

Issue #6 – Battery : Yeah, this is a fairly minor issue, but one that should not exist. Attaching the wire terminals to the battery “blade” style terminals wasn’t any fun. The first couple of attempts by hand were unsuccessful. And the battery being so close to the circuit board box didn’t help any. I finally had to use my pocket knife, separate the wire terminals a little bit, then use needle nose pliers to get a solid connection on the battery. Seems a bit unneeded and easily addressed at the factory. And, to make matters worse, the battery terminals and wire connections/terminals are open to the weather.

Overall –

Pros –

      • The float switch is not a mechanical float switch at all, it is a sensor. That fact makes it much more useful and functional…and I am thinking it will also last longer.
      • Solar panel appears to be of good quality and plenty large enough to do the job.
      • Battery appears to be of more than sufficient capacity to do its job.
      • The plastic box holding the circuit board is top notch and appears to be plenty weather proof.
      • The circuit board itself looks to be quality and well built.
      • There are 3 status lights in each unit. “Tank Full”, “Power”, and “Com”. The last one shows the unit is transmitting or receiving a signal to ill the tank.
      • The angle of the mounting bracket places the solar panel at a good compromise angle for winter or summer sun.
      • The mounting bracket itself is stout enough to do the job pretty dang well. The base holes are sufficiently large enough to do the job accommodating lag screws/bolts.
      • The antenna appears to do the job. Good thing is, if the antenna is too short, the circuit board box has a universal antenna connection…simply buy a better/longer antenna and connect it if needed.
      • The signal wire on the tank float probe/switch is long…and I mean long. Supposedly 100′, but I didn’t measure it. Great to have so much wire to work with.
      • Overall, it was easy to get up and running within a reasonable amount of time.
      • 2-year warranty and lifetime support.

Cons –

      • The wires connecting the circuit board box to the battery are really, really lame. While they are of sufficient size for volts/amps, their quality appears to be used on an interior space, not sufficient quality to be exposed to weather. It would have been very simple to use a weather rated wire.
      • The terminals on the wires that connect to the battery are even more lame than the wires themselves. The wires, while crimped, are not sealed against weather, dust, etc. A simple solution would be to use a heat-shrink terminal. Or, use a short piece of heat shrink after crimping the terminal.
      • The terminal on the battery and the terminal connections on the wire are completely exposed to the weather. Any weather can easily infiltrate the connection…potential point of failure.
      • The magnetic base on the antenna sucks. Yeah, meaning the magnet used is super weak. I mounted the antenna base on a 1-1/4” wide piece of steel…we’ll see how long it lasts once the windy season starts.
      • The included screws for the mounting bracket base appear to be adequate for mounting on metal. But, if mounting it on a the top of a post, such as a 4”x4”, those screws are wholly/totally inadequate.
      • Last but not least…mislabeled or missing part…again? So here is a picture of the water level sensor. Read the label…again. “Yes, two sensors are included and interchangeable.” Yeah, I unrolled the 100′ of wire and saw the sensor, the silver probe. So where is the other “sensor”? Notice the other wording…”Tank Full / Low Well” Ah, how do they know that my well has low water level?
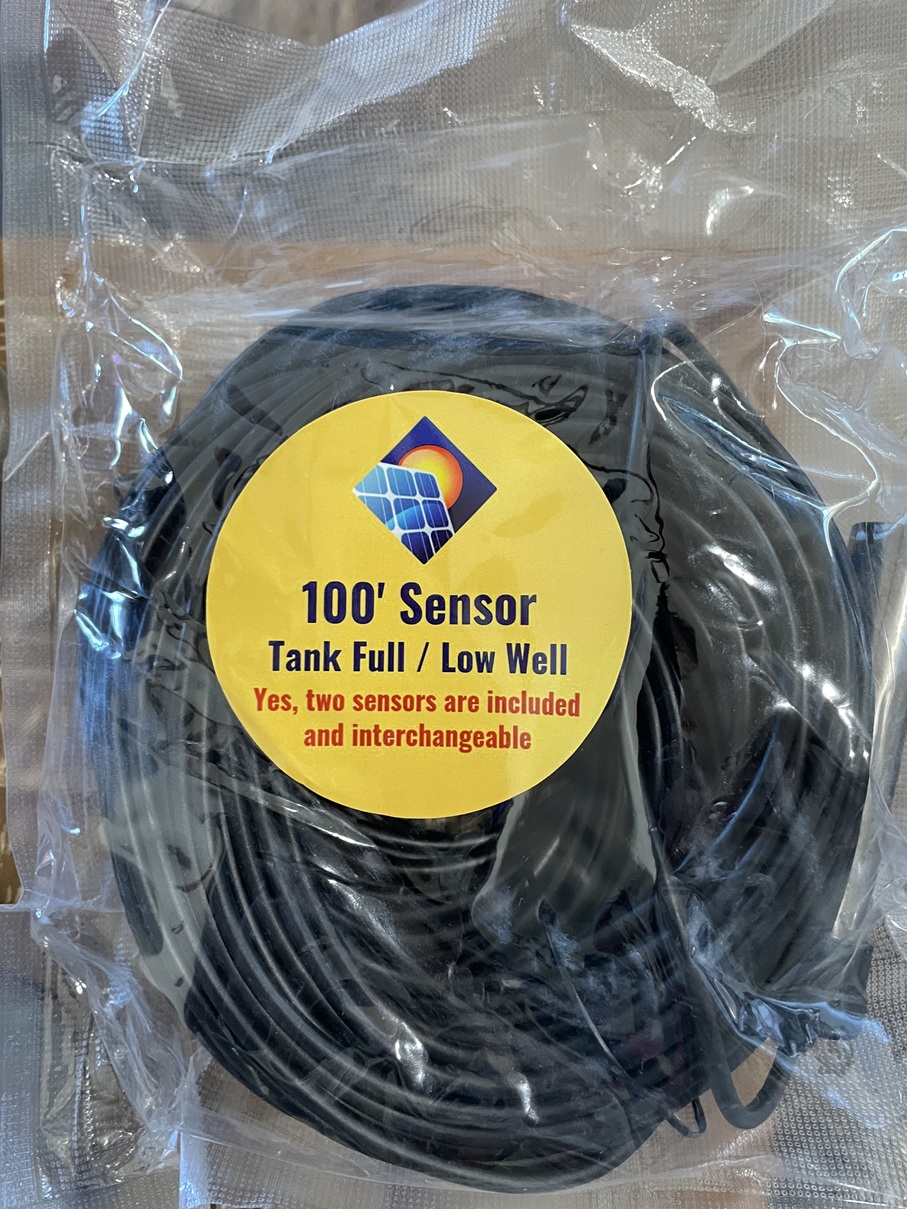
click to enlarge

        • The two sensors are located in the silver probe; 1 sensor is “tank full“, the other sensor is “tank fill“. There are not two separate sensor unit, they are both located in the probe.
        • Low Well“??? How in the heck could they know my well is low on water when the sensor is located in the storage tank!?! So a bad case of mislabeling. A bit weird if you ask me.
Kinda Weird –

So I bought the unit on rpssolarpumps.com. If you read everything on their website it sounds as if they make, or at least assemble, the unit themselves. Ah, no. When the unit showed up the instruction manual was from “Back 40 Solar”. And the overall instruction manual left a lot to desired.

The unit is actually made by a company called Back 40 Solar (https://www.back40-solar.com/). So RPS is just the distributor not the manufacturer. But don’t try to buy direct from Back 40 Solar…they apparently only sell through their distributors.

And “rpssolarpumps” is actually Rural Power Systems (ruralpowersystems.com). So there appears to be a bit of an identity crisis going on here. But, I am not particularly worried…the unit worked even if RPS was a little dysfunctional fulfilling the purchase.

Yeah, I have no idea why I thought the Back 40 Solar vs RPS issue was “weird”. I think it just caught me by surprise that RPS was selling a Back 40 product. But hey, why not. Now I just have to figure out how to get this review to Back 40. Yeah, another interesting little tidbit…Try to find a way to contact Back 40 Solar. On their website I couldn’t find any email address, no phone number, no physical address, no mailing address, no contact form, nothing. Okay, there was a form you could fill out if you wanted to become a dealer. No, I don’t want to become a dealer. I did find an email address embedded in the html code of one of the pages so I will send them this review at that email address.

Anyone else find this weird or is just me? It appears that Back 40 Solar wants to stay hidden for some reason; they want no contact with actual customers. I wonder why. The distributor, RPS, does seem to be responsive so maybe it is no big deal…we’ll see.

Recap –

As I stated at the beginning…it works. Yup, that was the main goal…it needed to work which in turn eliminates 700’ of signal wire. And that hopefully eliminates the stray transient voltage that was frying my controllers. And it appears it will do just that…mission accomplished.

Here is a big whine on my part…price. Yeah, this thing ain’t cheap…retail is $949…and that is some serious coin. In October they were running a sale…$729 until 10/30. I bit the bullet and bought it a couple days before the end of the sale. Yeah, well, a week later I went back to the website page to get some info and it was on sale once again for $729 until11/30. Gee…perpetual sale. Just kinda throws up a red flag for me. Yeah, not sure why…just does.

Did I mention that the unit worked? Yup, sure does…mission accomplished…I’m happy…so far.

Sad part is, if they increased the quality of materials and construction just a bit, it would be a great unit vs a good unit. The total cost of the improvements would probably be less than $5…at most. And then add in the shipping department fix…BINGO! A great product and a better purchase experience.

I won’t, or at least shouldn’t, complain about the price. If I figured the cost of 700’ of shielded signal wire plus trenching cost/time the $729 would probably be right in the ballpark of a good deal. Throw in the cost of two burned up controllers and even the $949 price would be reasonable…staggering, but reasonable all things considered.

Now for a reality check…whether $729, but especially for $949, it is not acceptable to have half the parts missing. It just ain’t right. But, they did step up and make it right…but, there should not have been such an egregious/simple mistake to begin with. But, well done on fixing the missing parts issue. And the RPS customer support person was amazing!

Once again…bottom line…It works! It spanned the 700’ distance between the storage tanks (float switch) and the wellhead (pump controller) with no issues. Now here is the real test…Would I buy it again? Absolutely!! Another test…would I pay the $949 full price vs the sale price? Yeah, probably, I would begrudgingly buy it…but clearly I would whine a lot more about it. But it works!! And that is what really, truly matters.

Side Note: I am wondering if I should start videoing all unpacking of purchases made online. You know, anything expensive to document exactly what is going on…damage, missing, etc.


Related Articles –


 2009 - 2025 Copyright © AHTrimble.com ~ All rights reserved
No reproduction or other use of this content
without expressed written permission from AHTrimble.com
No legal, economic, or financial advice is given, no expertise to be assumed.
See Content Use Policy for more information.</p

Well Control Box Schematic

I am including the well box schematic below. Anyone’s input would be greatly appreciated…ANY! Yup, that means questions, concerns, issues, warnings, safety problems…and even compliment 😉

I am actually in the process of building the box right now…hurry, feedback needed.

Thank you !

  ( click image to enlarge )


Related Articles –


 2009 - 2025 Copyright © AHTrimble.com ~ All rights reserved
No reproduction or other use of this content
without expressed written permission from AHTrimble.com
No legal, economic, or financial advice is given, no expertise to be assumed.
See Content Use Policy for more information.</p

Off-Grid Problems/Issues/Challenges…Part #1

I really want to write a little series of articles that, when combined, show a couple points that bug the crap out of me. But…I’m really not sure on where to start. Let me touch on the general points first, then maybe a starting point will manifest.


Points to Ponder –
  • You gotta know a bunch of stuff to go off-grid and/or work a homestead…or you need to be willing and able to learn.
  • Businesses are usually stupid…or don’t really care that much about their customers.
  • The simplest solution is usually the best/right solution.
  • There are some really great products out there…but they are usually really well hidden.
  • Don’t ever trust salesmen.
  • Mother nature rules…and can trash mankind whenever she wants.
  • Trying to be self-sufficient is a pain in the a$$…and expen$sive.

Yeah, you kinda get an idea of just how frustrated I might be?

Let me start all the way back at the beginning…

We bought our place 10 years ago…and I can’t express how grateful we are for God bringing us here. Fortunately for us it already had a well on it. Yup, that is an expensive necessity around these parts. Once we closed on the place I contacted a local well company to pull the pump and test the well…and refurb it if needed. We got lucky…the well was in great shape and needed no work on it.

There was no power at the well to run the pump and the pump, although working fine, was 30 years old and 220vAC. I went to a then local well supply house, outlined my situation, they recommended a new pump set-up, and we bought it. I installed it myself a couple years later and all was fine…till we needed to irrigate the garden, yard, and small orchard.

So we found out…not enough storage, not enough pump flow, WAY inconvenient to use a generator to run the pump…just not the right way to supply our water needs. So again, I contacted a now local solar business guy that I was friends with for advice. “Solar pump!!!” was his suggestion and he supplied me a quote. More money than we wanted to spend…but it “would cure our problems.”

I installed it myself and all was good…kinda. We weren’t getting the flow we needed (amount of water pumped out of the well) and we could only run the well during the day when the sun was shinning. And then disaster struck…a thunderstorm. “ZAP!!” A nearby lightening strike took out the well control module. It was under warranty but we had to send it in. Ahhhhhh…it would take at least a week, probably two, to get it back. Solution from the company…”buy a back-up controller”. Another $500 down the drain…but we kept on pumping.

Turns out that when the nearby lightening strike hit there was transient voltage that spread out towards our place and was absorbed by the signal wire between the well control module and the storage tank’s float switch…700’ in between. The hit wasn’t bad enough to show any damage on the controller’s circuit board…but enough voltage to kill the display board which in-turn killed the operational ability of the module.

Transient voltage refers to quick and very temporary spikes in electrical voltage, 
typically lasting only a few milliseconds. The spikes can be caused by near-by lightning strikes, 
switching operations, or electrical faults. And they can potentially damage sensitive electronic 
equipment such as circuit boards.

Float switch is a unit that floats in the water tank and tells the well pump 
when to turn on and send water to the tank and when to turn the well pump off
so the tank doesn’t overflow. 
Basically, and on/off switch controlled by the water level.

So a little time goes on and we expanded the orchard and garden and yard…now way too little water to irrigate. So, another storage tank. Fortunately a decent and reputable local company gave us a deal, installed the tank myself, back in business with plenty of water to irrigate.

Another thunderstorm…we noticed tanks overflowing sometimes. Three months of troubleshooting later…problems with the new well control module. Yeah, from you know what. Fixed it ourselves…back in business. Well, kinda. (no pun intended). We still had a problem getting enough water to irrigate the orchard, garden, berry patches, grass, and the new pine trees. Began a slow process to think about a better solution.

Another thunderstorm with a near-by lightening strike…a dead well control module…the new module now dead. No problem, I had a back-up on the shelf (the original control module), installed it, contacted the company, they said send in the dead unit. Turns out the unit was dead as a door nail…completely bricked. $500 down the drain. And the control module now on the well was the “repaired” unit from the first lightening strike and was/is limping along on borrowed time.

Fed up with the situation I decided I better get thoroughly educated on all aspects of the solar well set-ups and what exactly was causing our problems. Two months later I finally had a handle on it. The problems:

  • The well control modules were getting zapped by transient voltage from nearby lightening strikes.
  • That transient voltage was coming in through the 700’ of buried signal wire between the storage tanks’ float switch and the well. Basically the wire was acting as an antenna collecting the voltage and shooting it into the electronic circuit board inside the well control module.
  • No off-the-shelf solution was available that wasn’t cost prohibitive. Meaning…at a least couple thousand dollars to install an applicable and reliable solution.

But…here is the ugly part(s)…

  • The original local dealer sold us a pump that didn’t meet our water supply needs when he could have if he had simply listened to us when we talked about the well depth, water needs, etc.
  • AND…the same dealer sold us that control module that was completely unneeded. There was a much less expensive and far simpler way to control the well pump.
  • When we worked directly with the pump manufacturer, who sold us the 2nd control module directly, they sold it when it was completely unneeded. Again, there was a much less expensive and far simpler way to control the well pump.
  • Neither the local dealer or the manufacturer had any solution for our situation.

But is gets worse. I accepted the situation for what is was and knew I had to figure out a solution myself…so the research began. I found a wireless float switch that would eliminate the 700’ of signal wire that was collecting the lightening transient voltage…$800. But there still a problem with the well control module and it was going to breakdown at some point. Along with that bad news was some really good news…the pump itself was very high quality and had really great options. However, the control module we had/have couldn’t access those truly useful options.

Yes, I ordered the wireless float switch. Wanna hear some irony? 
The box with the new equipment arrived, a week after I made the purchase. 
I made time to start work installing it on the existing module for a test run. 
I set-up my camera to video the unboxing to post later. 
I pulled out the first two pieces of equipment...ah, that was all there was. 
The antennas, the tank probe, and some hardware were all missing!

Fortunately, I had the video. 
I called the company, explained the situation, told them about the video, 
and the really great customer service person created an order for the missing parts.
 They shipped the next morning.

A very awesome and needed option for the pump was…for basic operation the pump could run off solar panels or a generator very easily with nothing special needing to be done. The current well control module had no ability to implement that option. But, the well control module had options that meant absolutely nothing to me and were completely unneeded. After weeks of research, and a dozen emails back and forth to the “manufacturer” (turns out they were a distributor) I now understood how the pump worked, options for operation, and basically how it functioned overall. Interestingly enough…the pump itself was not “made” by the manufacturer, it actually was made in Italy and then private labeled by this company in Arizona.

The part that ticked me off the most…I could have had more than twice the pump/flow rate with the same type and quality of pump if the local guy had known what he was doing. He sold us a pump for a 750’ deep well vs. a pump for a 220’ well. Another model of that pump provides more than twice the flow rate for the same money for a 300’ well. Nothing I can do about that now…just move on.

So here is what I needed/wanted to control my well:

  1. Earlier in the day pumping and more water in the storage tanks during the summer months.
  2. A safe and reliable way to control the pump.
  3. An easy way to be able to run the well from the solar panels or a generator.
  4. A reasonable and realistic way to protect a control module and the well pump from lightening strikes.

Obviously there is no way to protect from a direct lightening strike, at least one that is affordable, but I could expect protection from the transient voltage issues that was burning out the existing control modules.

PROBLEM!!!! I couldn’t find anything to fit those requirements…nothing!

Come on…was I being unreasonable? I can’t be the first guy to run into this. And, it isn’t complicated. One limiting factor was my existing pump…I was stuck with it and its limiting flow rate. To replace it was simply too expensive. So I had to figure this out on my own. And I did!

I will write another article on what I am building for a solution…but, that isn’t the point of this article. Here I just want to point out the back-story and the lessons learned. I will do a “Part #2” that will be the lessons learned. Part #3 will be the overall solution to the problems/issues/challenges.


Related Articles –


 2009 - 2025 Copyright © AHTrimble.com ~ All rights reserved
No reproduction or other use of this content
without expressed written permission from AHTrimble.com
No legal, economic, or financial advice is given, no expertise to be assumed.
See Content Use Policy for more information.</p

> > Running out of water !

> > This is a first ever kind of a post here on AHTrimble.com ! !

I have been wanting to toy around with doing videos for quite awhile, just never could get enough time to learn an editor and everything that goes along with producing videos. Well, today is the day!!

For the better part of 2 weeks we were running out of water when irrigating the fruit trees, the gardens, and the newly planted grass. Let me clarify…we have a great well, 1-year old solar pump set-up, and well planned/installed plumbing system. The problem was we were using a lot of water to irrigate during the day, the storage tank not being full at the end of the day, and then the need to starting watering before the sun was too high in the sky with its associated heat (think ‘heat lamp’).

After much thought and exploring different ideas/solutions it became real clear that we didn’t have enough water ‘stored’ by the end of the day. We need about 600 – 800 gallons of water to start the day irrigating before the solar pump kicks on to pump water up to the storage tank. The only viable solution was a second water tank…and some minor adjustment to the float switch to turn on when there was still more water in the tank and fill the tank to its limit.

So here is the video…our first video on AHTrimble.com…hopefully not our last. I would appreciate hearing from you on what you think of the video and how we did installing the tank.

There is a cool story on how we got both the first and second water tanks…other stories for another time.

If you have any questions feel free to ask me.


Q & A Time…Ask me a question or send me a message…

Go back

Your message has been sent


Warning

Warning

Warning

Warning.


 2009 - 2024 Copyright © AHTrimble.com ~ All rights reserved
No reproduction or other use of this content 
without expressed written permission from AHTrimble.com
No legal, economic, or financial advice is given, no expertise to be assumed.
See Content Use Policy for more information.

What exactly should you do to prepare for 2024?

There are really two parts to what I am thinking, this post is Part #1 and won’t be that long relative to many, actually most, of my posts/articles. I am not sure when Part #2 will be ready…it will be an abridgment of my views, my perspective on the world today, and my assessment of where it is all heading…mostly in 2024, or at least starting in 2024. I guess it will be a manifesto of sorts; I will keep you posted.

This is the post where I will just be to the point and blunt about what I think a person should prepare for. And no, I am not being a hypocrite, I am preparing the same things for my particular situation…as should anyone.

The background to this is two-fold; 1) my assessment of where the world and the USA is today. Number 2 comes from multiple conversations with my wife over the last 3 months.

As for #1, if you have been coming to the site for awhile, or have researched my articles, you know my feelings of where the world and the USA is today…the status of it all. So no need to regurgitate that here in this post. I think the coming article will probably summarize a lot of that. For now let’s concentrate on the conversations with my dear wife which brought about this specific post.

Periodically my wife and I will discuss where we are in our lives, pretty much all aspects of it. We will talk finances, home projects, spirituality status, where our community and church is in relation to the rest of the country/world, and what are the biggest threats she & I face, etc.. Then we talk about what we should and/or could do in each of those areas to help mitigate those realistic threats/issues/problems/deficiencies.

As we recently reviewed those areas where we could/should improve on, it was clear that we should improve our food production and preservation capability. Yes, that means mostly improved gardening stuff. I will post something on that soon, but that project is going very well.

However, as I started contemplating what I should/could suggest to all website visitors I was stumped a little…until this morning (Monday, 1/9). This morning I felt a huge and serious ‘shift’ in my world. I am not sure if it was the world in general or just my world making a very substantial shift. Part of that shift event was knowing exactly what I needed to put out there as the #1 prep item to suggest to all my website visitors/users for 2024.

What I am not going to do is tell you ‘why’ I am suggesting this…I am just suggesting, strongly suggesting, this for you to consider. How you do it…or even ‘if’ you do it…is entirely up to you. But, I think you would be wise to give this some consideration…maybe a lot of consideration…a lot of serious consideration.

So here it is…

Part A (food) –

Store as much food as you can, and then store it as safely as you can against all threats of losing it…or having it taken.

If you want to know my thoughts on food acquisition and storage…my ‘layering’ method…then simply < click here >

Part B (water) –

Store as much potable water as you can, acquire multiple ways to harvest water, and acquire the ability to purify water for drinking and cooking.

You can only realistically store a certain amount of water, max that out. More importantly acquire multiple ways to harvest and then create safe (i.e. purified) drinking water…including highly-portable methods. Remember, you can only carry so much water…but something as simple as a LifeStraw is highly portable and a very good method of providing safe drinking water.

If you want to know my thoughts on water storage and purification…my layering method…the simply < click here >

Summary –

That’s it…nothing more to add. I feel strongly that I should suggest this to you. My reasoning is private and I won’t share it on this website. If I know you personally you can ask me directly.

Food & Water in 2024…early in 2024…as early as you possibly can. Please get to work on this.

Part #2 is now out “the collpase” < click here to read it >


Related Articles –


 2009 - 2024 Copyright © AHTrimble.com ~ All rights reserved
No reproduction or other use of this content 
without expressed written permission from AHTrimble.com
No legal, economic, or financial advice is given, no expertise to be assumed.
See Content Use Policy for more information.

Changing Water Filters in our Water System

There are some jobs around the house I am not real crazy about…and not entirely motivated to do with a smile on my face. Changing/cleaning water filters is one of those jobs.

Yes, yes, yes…I know it is important to keep the water clean and to keep us healthy…I just find it tedious.

And since I posted what our water system looks like I thought I would share my program of cleaning and/or changing our system’s water filters.

Now, I want to do the disclaimer thing…I am no expert, I am not a doctor, I am not a plumber, I am not a water quality specialist, I am not a chemical engineer, I am not an EPA water scientist. So do what is best for you and your system…I am simply sharing what works for us. Is that enough or should I grovel more?

Here is an interesting note…Our system is an open system, meaning our water goes from well to storage tank, then into the house system. So the water sits there and the storage tank does accumulate some very limited amount of fine sand that settles in the tank. And since there is a vent in the tank we find the occasional small insect. Hence, the filter system we have. Our neighbor has a closed system, meaning it goes straight from the well into their household pressure tank. You would think that it would be just fine from there. But he tells me that he does find some very fine sand in his water as well…albeit very, very little. So he is putting a single 1micron filter on his system to remove even that.

So now on with our process…


< click here to download the entire Glamstead Water System PDF file >

Original article (8/30/2022) on our water system: Household Water System

 2009 - 2022 Copyright © AHTrimble.com ~ All rights reserved
No reproduction or other use of this content 
without expressed written permission from AHTrimble.com
See Content Use Policy for more information.

I am a dummy…Household Water System PDF File

OK, I am a dummy!

I was trying too hard and working too fast on a couple of posts…and I screwed up.

The water system document that described the waster system for our place had to be updated. And I ended up updating it several times before I got it right. However, while I was doing the updating the “old” files were downloaded by a bunch of ya’ll. Which means you got incorrect and out of date information.

Sorry about that.

Here is the complete and correct (at least for now) document describing the water system:

< click here to download the entire Glamstead Water System PDF file >

If you want to check and see if you already have the most up to date file it should be named “GlamsteadWaterSystem-20220919c.pdf”  The “c” is the important part to look for.

I apologize for any confusion, consternation, or constipation over this dummy mistake of mine.

Later today I will be sending out the filter cartridge changing/cleaning information.

Household Water System – IMPORTANT UPDATE!

On Saturday morning I did my annual filter maintenance. And while I did I realized I had made a change last time I did the maintenance I changed the filters, and the .5 (point 5) filter is no longer available.

So I changed the “System Notes” in the Glamstead Water System PDF file.The changes reflect what I am doing now and what filters are available.

For your quick reference the changes are as follows…

12.  I labeled the housings #1, #2, #3 with a Sharpie. The filters are sized as:

  1. Filter Cartridge, 5 Micron, washable (Hydronix SPC-45-2005).
  2. Filter Cartridge, 1 Micron, washable (Hydronix SPC-45-2001).
  3. Hydronix CB-45-2001 Whole House, Commercial & Industrial NSF Coconut Carbon Block Water Filter, 1 Micron

13.  The reasoning behind the filters is this:

  • Larger micron filters are less expensive to purchase.
  • 1 micron #2 filters the same size particles as #3. This keeps #3, the most expensive filter cleaner, saving money.
  • #3 is a 1 micron carbon block filter for removing tastes, odors, impurities, and contaminants such as microscopic cysts, lead, volatile organic chemicals (VOCs) from water. Carbon block is a better technology and higher efficiency than a GAC carbon filter.

< click here to download the entire Glamstead Water System PDF file >

Original article (8/30/2022) on our water system: Household Water System


 2009 - 2022 Copyright © AHTrimble.com ~ All rights reserved
No reproduction or other use of this content 
without expressed written permission from AHTrimble.com
See Content Use Policy for more information.

Household Water System

Filtering & purifying water for children to drinkThis is a companion article to the Our Solar Well Pump System.

This is the system set-up at the house itself. It includes the filter system as well. It also shows the entire plumbing layout for the water delivery/filtration system.

I hope you enjoy the information!

< click here to download the entire Glamstead Water System PDF file >

Related Articles –


 2009 - 2022 Copyright © AHTrimble.com ~ All rights reserved
No reproduction or other use of this content 
without expressed written permission from AHTrimble.com
See Content Use Policy for more information.

Our Solar Well Pump System

OK, let’s talk water, solar power, splicing, planning, plan changes, and gasoline prices…

Back when we bought our place in 2016 we were lucky enough to buy a piece of property that already had a well on it. After we bought the place we had the well tested…all was good. We also had them pull the pump at the same time, we wanted to put in a new pump, pipe, etc. Little did I know how much we would eventually change it.

I knew a guy who owned a plumping supply house that specialized in wells, pumps, etc. so I thought he was the logical choice to talk to. After a few minutes of discussion I found out he lived kinda off-grid and knew a lot about off-grid well systems and such. I explained our situation to him, including our usage projections, budget, my skills/experience, and asked him for his recommendation.

He laid it out in very economical terms; 1) 120v AC 1/2hp pump, 2) 10/3 w/ground submersible wire, 3) QB control box, 4) circuit breaker box, 5) connection box with outlet, 6) 3000watt generator, 7) 1” Yellow Bimodal MDPE (Medium Density Polyethylene) Gas Pipe. That was the pump set-up, still had to get it from the wellhead to the house.

The system to move the water from the wellhead to the house was a separate operation and I was a little unclear how it would work out. I had to clarify the house side first and figure out how much storage capacity, redundancy, and reserve would be adequate. I wanted a 2500gal storage tank and choked at the price tag. While on multiple visits to a local plumbing supply house I kept seeing a storage tank sitting in their yard. It was 1100gal and really high quality (Snyder Industries). I eventually bought it for $500 out the door…a real steal. Today you would pay nearly $1,400 for the tank…then shipping charges on top of that.

Next I designed our utility room (100sqft addition on the rear of the house) which would contain the filter system. I also decided I wanted a 330gal reserve tank in the utility room as well.

I measured it out and it was almost 900’ from the wellhead to the house…at the same altitude/elevation. My pump guy said the well pump he recommended would have no issues moving the water from the wellhead to the house since there was no gain in head (no additional height to pump water above the wellhead). But, he did recommend that I use 1-1/4” – 1-1/2” pipe to move the water from the wellhead to the house (lowers the pressure and increases the GPM flow rate). I bought 750’ of 1-1/4” Yellow Bimodal MDPE (Medium Density Polyethylene) gas pipe that had been marked way down due to some minor nicks. The nicks meant any government agency would no longer purchase the pipe…it was considered “damaged” but perfectly suitable for moving water.

I found a good location for the storage tank that sits about 15’ above the house, and that gives me about 7.5psi going into the house…helps prime the house pressure pump. I ran just about 725’ of the 1-1/4” MDPE pipe underground from the wellhead to the storage tank. From the tank I ran 1-1/2” PVC underground into the utility room that houses the house system.

Our water usage required me to fill our storage tank meant I ran the generator every week during the summer and about every 2 weeks during the winter. That was about 2 gals of gasoline each time. At the old gas price it meant about $2.50 – $5 each week.

Then we changed it up a bit. Our largish backyard was nothing more than dirt, dust, or mud depending on the weather. So I wanted to plant some dry pasture grass to hold the soil in place and make it a bit more human-friendly…but not a lawn. Then my neighbor heard about my “yard project” and offered a bunch of grass seed he had in his barn that he was never going to use. Then I found about 5# of grass seed in my garage/barn. A new, more complicated project was born!

See, to get grass seed to germinate you have to keep it wet for two weeks…that means watering 2 – 3 times a day for two weeks. That is about 500 – 600 gals each watering. I was running the generator up to 4 hours a day. We were now spending about $12 – $15 per day and hauling more gas home than I wanted to. Yeah, I am a bit lazy. But it got worse…the grass started looking really good. So now it went from soil retention pasture project to a suburban backyard project requiring regular watering. Yeah, our water usage went through the roof…along with the gasoline bill.

So we have no issues with water supply…it is the largest aquifer in the country…meaning trillions and trillions of gallons…probably more. Moving it from the aquifer to the yard was a whole other story.

From the beginning I had a plan in the back of my mind to build a stand-alone solar system in the well house located at the wellhead to power the well pump. I had the solar panels, charge controller, and most of the little bits & pieces. I had a modified sine wave 3000watt inverter lined up. I just needed the batteries to put it all together. I was going to purchase 4 used 6v lead acid solar batteries from a buddy of mine that owns a solar shop/store.

I invited him to lunch and 1-1/2 hours later he had convinced me that a solar pump system was the right way to go. Easier to maintain, longer lifespan, no manual effort, etc. $3,000 later I had the pump and controller. My solar panels on hand would be plenty of power. Another $900 in wire, bits and pieces I was ready to go.

Total time to install was:

  • 1/2 day to run signal wire from the tank to the wellhead.
  • 1-1/2 days to build the array rack, paint it, and install the PVs onto the rack and wire them together in series.
  • Another 1/2 day to wire the PVs to the combiner, install ground rods, wire it all, and test everything.
  • 1 day to pull the old pump, install, wire splice the new pump into the system, and putting the pump back down the well.
  • 1/4 day testing the new pump and it failed…bad wire splice at the pump.
  • 1 day to pull the new pump, resplice the wire connection, run the pump back down the well, and test…it was a success.
  • 1/2 to install the storage tank float switch, wire it in the controller, and test the entire system…success.

Now we have an automated system that refills the storage tank when it hits 50% capacity (500gal). We don’t have to do anything manually. The old well house gets torn down. The concrete wellhead structure is 24” tall with a berm of dirt that protects it and conceals it. It is amazing!!!

The problem we had was the splice that we did at the well pump. We used a standard submersible splice kit. It didn’t work right but we thought we had compensated for it. We didn’t, and it failed.

When I did the splice again the next day I used Ace Hardware 30986 Self-Fusing Splicing Tape and then Scotch 2242 electric tape to protect from abrasion. When I did the splice I used a standard 10g yellow butt connector. Then I wrapped a layer of the 30986 tape covering the butt connector ends really well by about 2”. Then going the opposite direction I used another layer of the 30986 ensuring that I covered the ends of the first layer by 2”. Once that was done I used the 2242 in a heavy layer (2” overlap on the ends) to protect the first layers from any abrasion issues going up or down the casing. It worked just fine.

If I was to do it again I would:

  • Use a 10g butt connector.
  • Using Gardner Bender LTB-400 I would force it into the ends of the butt connector until they were full. Then I would cover the entire butt connector with LTB-400 to ensure that no part of the connector was exposed. But I would also make sure it was smooth. Let it dry and cure completely for 24 hours.
  • Then I would spray two coats of Gardner Bender LTS-400 allowing 30 minutes between coats, and then allow 24 hours for it to cure.
  • Then I would wrap two layers of Ace 30986, each going in a different direction (wrap direction). The first layer would cover the butt connector and extend 2” past the ends. The second layer would go in the opposite wrap direction and extend 2” past the ends of the first layer.
  • Finally I would use a single layer of Scotch 2242 wrapped over the entire splice, covering the ends of the splice by 2” for abrasion protection.

I absolutely love the pump and controller made by Sun Pumps!!! At their tech support was nothing short of amazing!!!  I highly suggest you look at them if you are embarking on such a product.

Next comes a schematic of my water system from ground to storage tank.

General Overview
( click to enlarge )

Wellhead Plumbing
( click to enlarge )

Power & Wiring
( click to enlarge )

Water Tank Plumbing & Wiring
( click to enlarge )

You can download a PDF of my water system by <clicking here>

Equipment –

You can download Pump Installation and Operations Information PDF file

You can download Control Module Installation and Operations PDF file

Sun Pumps website <click here>

Sun Pump Dealer locator <click here>

If you have any questions please ask. And of course, as always, I would love to hear your thoughts, comments, and recommendations.

Go back

Your message has been sent

Warning
Warning

Warning.


Related Articles –


 2009 - 2022 Copyright © AHTrimble.com ~ All rights reserved
No reproduction or other use of this content 
without expressed written permission from AHTrimble.com
See Content Use Policy for more information.