Grid-Down House Security : Strengthen your door…

Home Invasion during grid down - protecting your homeWhen criminals want into your house, they will get in if they are committed enough. The best you can hope for is to delay their entry. If you can delay their entry long enough, they may lose their commitment to enter or you can be better prepared to use lethal force if needed to protect your family.

This article is the first posting of a series that will deal with home security during grid-down. I will be providing some thoughts and suggestions to you regarding the security of your home and your family. I am no expert in home security by any stretch of the imagination. However, I have provided personal security to a few folks over the years. If you are LDS, then you would instantly recognize a couple of those twelve special people. I have coordinated event security in a number of venues and never had a breach. So, I will just go about this using common sense, my personal experience, and some expert’s advice I picked up along the way from very knowledgeable people.

These articles will tie directly into my “Layers” philosophy in case you are interested, specifically protecting yourself from the threat of violence.

OK, back to strengthening your door…

Step #1 –

The first thing I feel you need to do is to keep the “bad guys” away from your door.

If they can’t reach your door, they can’t breach your door.

Here are some passive preventatives –

    • Have a a fence around your yard, the bigger, taller, and more intimidating the better. When the SHTF SHTF Home Invasion fenceput some barbed wire inside the fence but secured to the fence with wire. This is known as “tangle foot.” It won’t stop people but might deter them. If it doesn’t deter them, then it will slow them down. So buy a roll or two of barbed wire from your local hardware or farm supply store and keep it in your shed until needed. It is fairly inexpensive and a great add-on after the grid goes down. If someone jumps your fence they instantly become entangled in the barbed wire.
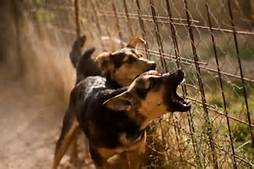
    • Have a dog that barks real loud when someone approaches your house. They don’t have to be particularly mean, just as loud as Barking Dogs in fenced yard is good securitypossible. Your dog sees your home as part of their domain. And as a dog they realize that their ranking in the pack requires them to act as a warning system for the rest of the pack. Dogs are really great at that. No bad guy wants their victims warned in advance of their presence. And most folks don’t want to deal with a 100lbs of snarling teeth.
    • Driveway alarms will help announce that someone is approaching the house. Same thing can be shtf Home Invasion - driveway alarmdone on the sidewalk that approaches the front porch. Along with the audible alert there must be a protocol of action that the family uses. Its one thing to be alerted, it’s a whole other thing as to what is done about it. You can also place these devices inside the fence line so when a bad guy jumps or cuts through a fence he trips an alarm.
    • If you have a garager, don’t leave the door open. That may be a little challenging to some family’s lifestyle. They may like having it open to make it easy to get and out during the day. They may also like the “openness” and “inviting” feeling it projects to the neighbors…your family is approachable. That is all fine and well, but it projects the same messages to bad guys. And when you are living grid-down…you are should be worried about being inviting or approachable.
    • If you have an alarm system, great! Post signs that you have an alarm system. The meaner looking the sign, the better. If you don’t have an alarm system put up the signs anyways. It might make the lesser committed bad guys walk on to the next house.
    • Go to Lowes or Home Depot and purchase a couple of the non-functional outdoor video cameras. They are small and inexpensive but make it look as if the house is under video surveillance. Better yet, if you can afford it, get an actual high-definition video system to record what is happening around your house. Even better yet if you can view what is happening in real-time on your computer and/or cell phone.
    • Consider putting up a fence or courtyard type wall around the front of your house in proximity of your front door. While it won’t prevent people from reaching the door, it can aid in slowing them down.NightVision-001
    • Install motion sensitive high-intensity LED lights in the immediate vicinity to your door…facing outward. If someone approaches at night the lights will automatically kick on. Criminals don’t like light. One added benefit is ruining night vision. If they are not wearing night vision devices the high-intensity light will greatly reduce their ability to see well in the dark by ruining their night vision. If they are using actual night vision devices the sudden bright light will washout their night vision devices ruining that advantage.
Step #2 –

In the information above I provided some suggestions on slowing people down or dissuading them from Home Invasion - man braking inapproaching your front door. Now, we assume they have reached your front door. At this point they want to get in, your job is to once again is to slow them down. Remember, if they want in and they are committed to doing so, they will get in. What you are trying to do is to challenge that commitment. And by challenging their commitment you are forcing them to decide on what price they are willing to pay to get through that door. Low-level creeps will not want to pay too high of a price. Professional criminals will pay a somewhat higher price in terms of time and skill requirements. The hardcore insane or hardcore criminal, especially organized crime family members, are willing to pay almost any price, including losing their life, to gain entry. It is now your job to decide how far you are willing to go.

This is your home, your family, and your responsibility…How committed are you to protecting your family?

Here are some suggestions –

    • LOCK THE DOOR(S) AND KEEP IT LOCKED!!   As silly as this sounds, you would be surprised how many doors are left unlocked. As a firefighter we were trained in a dozen different ways to force open a door. But, we trained to always first try to simply turn the knob before forcing a door open. Establish a family policy on keeping the doors locked, especially the front door.
    • Don’t open the door to answer it. Yup, keep the door closed when answering it. OK, if you know the person really well then it is your call. But leave that door shut when answering the door. Have a peephole or a window you can look out and see who it is. And remember, peepholes have a whole lot of blind spots. I don’t like peepholes…too restrictive in seeing what is going on.
    • If you have a wood door, replace it with a high quality steel clad door.hurricane window file for security
    • If you have windows in your door, replace your door with one that doesn’t have any windows. Or, make sure the window is too small for a person to climb through…including a small child. Or, ensure that the windows are resistant to breakage. One way to make windows virtually impenetrable is to apply hurricane/security film to the windows. The stuff is amazingly strong and will go a long ways towards keeping the bad guys out.
    • There are two weak points to a door; 1) door sets, and 2) hinges. The weakest of these is the door set (a.k.a. handle & lock).

To strengthen the lock-set I would suggest –

  • Add a deadbolt to the regular door latch. The deeper the deadbolt goes HomeInvasion-07ainto the door frame the more strength it will have against breaching by kicking or with a weight. Same would be true if someone was trying to pry open the door with a tool such as a Haligan.
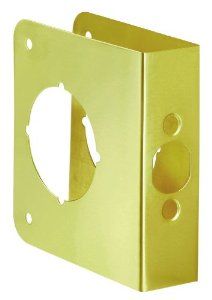
  • Along with adding a deadbolt I suggest you strengthen the door frame that the deadbolt and latch are secured with. There are a number of ways to do that. First, you can use 3-1/2” – 4” long screws to secure the strike plate to the door frame. And additional 3-1/2” – 4” screws inserted through the door frame every 6” apart to secure the door frame to the framing studs.HomeInvasion-07bHomeInvasion-07c
  • There are also commercial products on the market that are essentially long metal plates that are secured to the door frame to help prevent the door frame from splintering when force (kicking or mechanical) is applied.
  • There are also products that can be attached to the door itself around the lockset and deadbolt to keep the door from splintering and failing.

To strengthen the hinges I would suggest –

  • Ensure that your steel entry door has three hinges at a minimum.HomeInvasion-08
  • Replace the short screws in your hinges with 3” screws to more securely attach those hinges to the door frame studs.
  • Add a commercial product to the door frame that runs the length of the hinge area of your door frame.
  • A trained criminal trying to enter your home may understand that hinges are the second weakest point. They may come prepared to use a shotgun and place three shots in the vicinity of each hinge to blow away enough door and frame material to weaken the structure enough that it is easy to breach the door. You, or a handyman, can easily add two additional hinges in between the existing hinges for significant additional strength.

So we’ve touched on how to strengthen your door. In the next post I will go into some really serious ways to strengthen that door of yours!

 < click here to read Part #2 >


Articles in this Series –
Related Articles –


2009 - 2019 Copyright © AHTrimble.com ~ All rights reserved
No reproduction or other use of this content 
without expressed written permission from AHTrimble.com
See Content Use Policy for more information.

I’ve been thinking… (February 2016)

What IsFor over a month now I’ve been working extra hard on writing preparedness articles. I love the way they are coming along. But, one question keeps coming back to me…

“What is the most important skill or trait for a prepper?”

Then it changed into…

“What is the most important thing for prepping?”

Either way you look at it, I was trying really hard to answer both of those questions. But, I kept coming up empty handed.

Well, that’s not entirely true…I kept coming up with a long list of “most important.”  I had a hard time accepting that I couldn’t identify the most important anything for preppers. I still don’t have a good single answer.

I could always fall back on Situational Awareness (SA). I mean the case for SA is so easy to make. You have to be aware of what is going on around you…before and during an incident. Otherwise, you will either miss that an incident is about to happen, thus failing to properly prepare and respond. Or, you will miss something important during an incident and respond incorrectly or not at all. And of course, missing something important can easily be fatal, especially in the most dangerous, complex, and stressful of incidents.

Then I could make a case that without the skill(s) to deal with the “something important” it doesn’t matter how easily you recognized that something was happening. So, skill is just as important, maybe more so, than SA.

But what about gear? If you see an incident about to occur, that means you have good SA. If you then know what you should do, and are trained to do it, even better. That shows you have a good skill base. But, what if you don’t have any gear or equipment to make good on all your great skills and training?

You know what I am talking about. What if you need to defend yourself against a mob and have no weapon? What about if you need a fire for warmth but have no way to start one? What if you know you need water, know how to find it, and have absolutely nothing to use to filter the water? So, equipment and gear is also vital.

But, if you don’t have the “will” to survive you are just as defeated. Yeah, if you have the skills and gear but not the will to survive…then you are doomed.What Is most important for preppers

Then I could always reach for “community” to be most important thing because no one person or family can provide all the manpower, skills, gear, and equipment for success long term in a grid-down. That may well be true for a simple disaster as well.

So what is most important to preppers?

Humility is the most important thing for preppersWell, I think I might have figured it out this morning while was meditating on just this very subject…it is “humility.”

Are you completely let down?

I hope not, give me a chance to explain why this simple answer to an apparently complex question is the right answer.

Before I give you my definition of what humility is, let me share with you what I feel it is not.

I am sure we’ve all met that person, maybe in the mirror, they are the one that really knows-it-all…and let’s you know they know it all. They feel ultimately qualified to do just about everything. They can build a fire with toothpaste, shoot the eye out of a flea at 2000 yards, skin a deer in 20 seconds with only a dull rock, hike with a 100lb pack at 6mph for 2-weeks and no sleep, been a Navy SEAL, got bored then became a Delta operator, can predict the future about anything because they dream, and can heal anyone of any disease with only an oak leaf. And all that…before lunch!

So, we all know that person and I see them as arrogant.

When someone tries to teach them something…they already know it…and more…and better…and for longer. They want to teach the teacher. In other words…they are not teachable. And they normally “on up” anyone else’s story.

So, if that is my impression of the opposite of humility, then what exactly is humility?

To me, humility means a person is teachable. And if you are teachable, then that means whatever you don’t know, you are willing to listen and learn. And that is the most important thing for preppers…humility…the ability to be taught…to listen…to learn.

Before you go off the deep end on me thinking me some raving lunatic, give me a chance to throw a couple of other things at you.

Don’t confuse humility with weakness. Weakness means you can’t or won’t do something. You can be humble and still be very strong, in mind, body, spirit, and will. Weakness usually manifests itself in character. Any ability-based weakness can be overcome through training and experience. Weakness in “character” is tough, although not impossible, to overcome. In my opinion to overcome weakness in character you have to have both a strong desire, or motivation, to overcome that character weakness plus a mentor/example to lead you through it.

Being humble opens the door to many more opportunities. How many people do you know that actually like arrogant people? How many people do you know that enjoy being around arrogant people?

Most of the people that do enjoy the company of arrogant people are themselves arrogant as well. Politicians and their groupies come to mind. Watch how politicians treat each other, watch how their staff members fawn over them. So we know at least two groups of people who enjoy arrogance…politicians and their groupie flunkies.

I have had the opportunity to know some Special Forces guys, most of them were pretty humble on the outside as far as I could tell. Sure, they enjoyed cutting up and razing each other…and me. But, they were not arrogant in-your-face kind of guys bragging and whatnot. I could say the same thing for some of the best firefighters I have ever known…quiet, humble guys. But when the bell sounded, they were some of the best of the best in a fire situation.

Also, don’t confuse humility with lack of competency. Humble people can be very competent in many areas. But, they will also know where they can improve, or learn something entirely new. Just because you are good at hunting, doesn’t mean you are good at explosives. A humble person will know that, and they are more than willing to sit down and be taught what they previously didn’t know.

I guess a good way to look at it…they know that they don’t knowand they are willing to be taught.

What? Yeah, an arrogant person is more like…they don’t know that they don’t know...because they think they already know it all.

Hence, if you know that you don’t know…then you can learn what you don’t know. An arrogant person is more interested in impressing you with what they do know vs. admitting that they don’t know something. Especially if you know what they don’t know.

That was fun!!! I hope you followed me through all of that…I had fun writing it.

OK, back to “humility.”

Don’t confuse meekness with humility. A humble person will tend to not bloviate just for its own sake. When a subject comes up that they don’t know anything about they will usually sit there and learn. And they will ask questions and/or try to apply it to life’s situations to get advice. You try to feed them BS and they will call you out on it. And true, if they get lost they will almost assuredly speak up and ask for an explanation. This is especially true in a tactical situation. They are not meek…they want to know what is going on and they want to figure out their own knowledge gaps. That way they can learn, fill in the gaps, and help ensure mission success. A meek person simply fades away into the background, stays there, and is perfectly content with that condition. A humble person will work to learn and participate to their fullest.

By now you should have a really clear picture of what I feel is the most important “thing” for a prepper…humility. 

Humility in terms of a person willing to be taught. And that takes a great deal of confidence in knowing who you are, what you do know, and what you don’t know…but need to learn. You have to be willing to say to yourself, “I don’t know enough about that.” Once you can do that, you are then you are open to being taught and learning the very thing that was holding you back. As a prepper you can’t afford to be held back…that could be fatal to you and/or your family.

My friends, I encourage you to be teachable…to be humble. We can’t know everything, but we can learn anything. Don’t let your ego make you arrogant and unteachable. You can do anything, I am sure of that, and together we can surely handle any problem. Arrogance will only get in the way. Humility will pave the way for success.

Let us all be teachable…humble.

Humility-002

Wilderness Instructor Belt – Best freaking belt!

Wilderness Instructor BeltThis is one of those articles I write because I have a special affinity for the item itself. Yes, I like writing, sometimes it is because I feel that I need to test, evaluate, report on a piece of gear. This article is not one of those…I am writing this out of pure appreciation for the piece of gear. On with it already…

It wasn’t until I started the whole conceal carry thing about seven years ago that I really paid attention to belts. Before then a belt was a belt was a belt. I wore one because I was supposed to, and it kept my pants in place to a point. But, that isn’t entirely true.

In 2001 I really started doing the wildfire part of my job in a big way. I was totally into it and loved it immensely. The protective clothing and gear we wore fore wildland firefighting was completely different than the gear we wore for structure firefighting. One aspect of wildland gear was the Nomex pants. Amazing technology that is almost the stuff of fantasy novels. Nomex cloth provides an unreal amount of protection from fire and heat. Just a thin piece of Nomex has saved my bacon a number of times. So, you really, really want to keep that clothing in place (shirt included).

I don’t have to learn everything by experience, sometimes I learn from others. Don’t get too carried away, the #1 learning tool for me is a 2×4 board about 8’ long strategically placed on my cranium…sometimes repeatedly. Not the case with the belt. In 2001 I noticed that these experienced wildland firefighters had on a completely different style of belt that I had never seen before. Actually a couple different styles. Naturally, alright, maybe not so naturally, I started asking folks about their belts. Felt a little creepy after awhile.

The belt that kept getting my attention the most became evident. It was also theWilderness Instructor Belt belt that kept getting the best compliments from users…Wilderness Instructor Belt.

So of course I had to buy one to try it out. Simply put…the best belt I’ve ever owned!  Period!

I purchased the 1.5” 5-Stitch model. When I got it I was immediately concerned about the metal buckle. The buckle is solid steel and weighs more than I expected. But, more on that later.

I tried the belt on and the first thing I noticed was the ability to fit it exactly to my waist size and comfortable fit. No, I won’t go into details about waist size…TMI.

There is 2-stage securing to the belt. First, the belt passes through the through the buckle and around the “floating lock bar.” Then the “end flap” of the belt is secure via Velcro to the belt itself. The lock bar buckle takes the majority of the tension to prevent the belt from coming undone. The Velcro secures the end of the belt, keeps it in-place- and adds an additional measure of security that the belt won’t fail and slip through the buckle.

Wilderness Instructor BeltAnd why is that so important?

The belt is primary designed for weapons carry, but, it also has the capability to aid in an evacuation. The buckle Wilderness Instructor Belt with carabineer has an integrated “v-ring” that a carabineer can be attached to aiding in the evacuation process using a rope as an assist. In order for the Wilderness Instructor Belt carabineerbelt to be used in this manner the buckle has to be failsafe. The lock bar and Velcro systems work together to ensure that the belt won’t slip through the buckle if it is properly secured.

But, at the time I bought the belt I was not thinking about weapons carry, I was thinking about firefighting in the middle of nowhere. And the reason that this belt was the preferred belt was the “v-ring.” In an emergency, if you had to be hauled out via a helicopter in a big hurry, you could hook a helicopter rescue line, or standard hoist line, to the belt via the “v-ring” and be hauled out.

Would it be the safest way to go? Nope. Would it be without safety concerns? Nope. Would you be without any potential of injury? Nope. But, you wouldn’t burn to death in a raging wildfire either.

Now, back to me and my primary mission…to hold my pants up…and do so securely. Yup, that was my primary mission. The belt does an amazing job in two ways; 1) it will adjust exactly to the fit you need it to, 2) it does a really good job of staying in-place and keeping your pants up. Yeah, not a very sexy or amazing recommendation for a belt, eh?

Then about seven years ago I started to conceal carry. My leather belts are good enough, but I find myself “hitching-up” my pants pretty regularly. Part of it is due to merging my waist and hips into a cylinder appearing body shape. But, some of it due to the leather belts just not being designed for weapons carrying. Especially true if I have my double-mag pouch on as well.

( click to enlarge )

( click to enlarge )

Enter the Wilderness Instructor Belt…and I simply love this belt!!

When I wear that belt I do not, let me repeat myself –I do not– have a problem. It adjusts to the rights size, holds my weapon securely, and doesn’t slide down my heretofore mentioned cylinder body.

When the belt really shined even more so was when I tested it with my Blackhawk drop-leg pistol platform. It is simply amazing!

Summary –

Unless you are just born on the light side of a 60 IQ, you have figured out by now that I highly recommend the Wilderness Instructor Belt. It will serve you well…and keep your pants where they belong. And if you think the belt is only for men…WRONG!  I bought my wife one for Christmas a couple of years ago and she loves it also.

Buy the belt !


2009 - 2019 Copyright © AHTrimble.com ~ All rights reserved
No reproduction or other use of this content 
without expressed written permission from AHTrimble.com
See Content Use Policy for more information.

TIP – 550 Paracord

550 Paracordnote: first appeared in January 2015

550 Paracord earned its name because the working strength of the small diameter rope is 550 pounds.

Let’s make something really clear first…not all paracord can be called 550 paracord. And technically you would have to refer to it as Type III Paracord. There are multiple types of paracord, Type III being the most commonly linked to military use. So when someone is talking about, or more importantly selling you, paracord make sure it is 550 paracord or Type III rated paracord. Otherwise, you will think that those great little ropes will support you. Use the good stuff, you won’t be disappointed.Paracord1

The strands of paracord can also be used as well.  Simply separate them from the man rope and use as smaller strands.  Or separate them again to use the resulting thread.  Look for a coming post on all the uses of paracord.


2009 - 2019 Copyright © AHTrimble.com ~ All rights reserved
No reproduction or other use of this content 
without expressed written permission from AHTrimble.com
See Content Use Policy for more information.

Work Sharp Knife & Tool Sharpener

WorkSarpSystem-010I’ve got a lot of knives…I mean a lot of knives. I also like them sharp…I mean really sharp. I have been using a Smith’s diamond stone and I am pleased with it. I actually like the coarse side a lot better than the fine side. I know it may sound crazy but it feels as if it puts a bunch of micro-serrations on the blade which makes cutting easier. But, that is not the object of this review…The Work Sharp system is. And I am going to post more than my usual number of pictures to give you a flavor of what this puppy can really do.

I was going through a lot of testing of knives a few months back and I was getting really tired of hand sharpening every knife every time I completed a test. So I started doing some research and found the Work Sharp system. Boy, am I glad I did!

WorkSarpSystem-005To get an idea of what this tool does, imagine in your mind a small belt sander. And attached to the belt sander are a number of inter-changeable guides that allows you to sharpen just about any kind of blade on just about any kind of knife, scissor, garden tool etc. It comes with coarse, medium, and fine premium abrasive belts. And with those belts you can put an edge on any kind of steel that you might have in your shop.

And don’t worry about changing belts…it is easy and fast. I can WorkSarpSystem-003change a belt in under a minute. And belts last a pretty dang long time, even when doing heavy duty sharpening. But the heavier the use, the quicker the belt gets used up. One thing you will want to do is buy extra belts. Several of each kind of belt comes in the box but you will want more on-hand just in case the supply might dry up.

What’s in the Box
• (1) Original Knife & Tool Sharpener
• (1) 40° Kitchen Knife Guide
• (1) 50° Outdoor Knife Guide
• (2) P80 Coarse Abrasive Belts
• (2) P220 Medium Abrasive Belts
• (2) 6000 Extra-Fine Abrasive Belts
• (1) Instructional DVD
• (1) User’s Guide

Good stuff –
  • WorkSarpSystem-001Sharpens any steel blade I’ve tried so far, on any tool or knife.
  • Guides make keeping the right angle really easy.
  • Even lawnmower blades…Work Sharp can handle them.
  • Yes, you can even sharpen kitchen knives, even the good stuff. Be careful, the blades come out extremely sharp when using the fine belts.
  • Yes, it can even sharpen food processor blades.
  • It can handle a 1/4” flat steel blade and put an edge on it starting from scratch.
Less good stuff –

WorkSarpSystem-008

  • Takes a little practice to get the “draw” right for the right kind of blade tip. “Dry fire” it a little for practice, it will get you use to the right draw without jeopardizing a blade tip.
  • For serrated knives it won’t do the “curved’ side of the blade, only the flat side. But, a good diamond rat tail can handle the little curves in the blade after the flat side is done.
  • I hope you’re not left-handed. It looks like this thing is set up only for right-handed people.
  • If you don’t practice and follow the directions, you might find yourself WorkSarpSystem-009disappointed.
  • Don’t run it for longer than about 15 – 20 minute without giving it time to cool off.
  • If you want to sharpen scissors, then buy the scissor guide…you’ll appreciate it a lot!


.

Buy It !

Bottom line…this gadget is a real time-saver and worth every dime I paid for it. I can sharpen 20 knives easily in an hour. This is a “Buy!”


Amazon Work Sharp sharpening system


Note #1 – Send in your warranty card, they will send you some new belts.


2009 - 2019 Copyright © AHTrimble.com ~ All rights reserved
No reproduction or other use of this content 
without expressed written permission from AHTrimble.com
See Content Use Policy for more information.

Ka-Bar BK-2 Knife (Becker Companion) – Follow-Up – Update

Ka-Bar BK-2 Becker CompanionMan, I kind of hate writing this follow-up to the review I did on the KaBar BK-2 Becker Companion knife. I would suggest you read the first part of the review before reading this follow-up, everything will make more sense. That post appeared on 8/15, two days ago.

Well, let’s get the good news out there first. I was able to put a pretty decent edge on the knife. I was even able to get a decent point on it as well. It will never equal my CRKT Hissatsu. Then again, the BK-2 isn’t meant to be a high quality knife like the Hissatsu. The downside is…I had to use my new WorkSharp to get the edge on the BK-2. I can probably keep the edge on it now with just my stone but I am not sure.

Here’s the downside, remember I mentioned that the cheap plastic grips/handle on the BK-2 really, really suck? But, I was willing to keep the faith that I could turn this into a “keeper” knife with a little work and a little more money. So I ordered a pair of Micarta grips for the knife.

When they came in I loved the color, very sharp looking. But as I looked at them closely I started to be less and less impressed with their quality. But, I was going to keep an open mind.

I tested the new Micarta grips for fit and quickly realized they didn’t really fit all that well. The grips were a slightly under-sized allowing for the tine to be felt all around the edge of the grips. Now, if they had been slightly over-sized then I could have taken a very fine file and smoothed it all out to a precision fit. But that wasn’t possible, I wasn’t going to start grinding away on the tine to make it match the grips.

I was impressed with the “nut holes” on the grips, they fit the nuts perfectly and held the nuts securely in-place with no slop as I tightened the screws down.

Once I had the grips on there I felt encouraged that I was going to really like this knife. Sadly, that is just not the case. Here’s why:

  1. I don’t like the grips being undersized. I don’t like feeling the tine in my hand when I should be feeling the grips.
  2. The grips cover the glass pummel on the end of the tine. I imagine it will still work, but why cover-up a working piece of the knife.
  3. The knife still doesn’t feel balanced in my hand. It feels awkward in my hand.
  4. While the edge is sharp and the point is plenty good enough for piercing, I am not sure how long that will last.
  5. The knife is still the Jack of No Trades, and Master of None. In other words –
    • It’s not a fighting knife at all.
    • It doesn’t feel like a combat knife either.
    • It simply isn’t a good hunting knife.

So, is it a good survival knife since it is none of the above? No. Plain and simple “no.”

To me a survival knife has to be a combination of a fighting knife, a combat knife, a hunting knife, as well as having solid bushcraft characteristics. The KaBar BK-2 Becker Companion is a good bushcraft knife. But, in my opinion, it lacks any of the qualities of the other three kinds of knives. So, no, it is not a good survival knife.

If you wanted a knife to replace the KaBar BK-2 Becker Companion with extreme quality and perfection of manufacturing it would be the ESEE 5 knife. The ESEE is a little more expensive. But then again, you get a knife that is at least three times as good as the BK-2…probably more when you really look at it.

Bottom line…”Do NOT buy” the KaBar BK-2 Becker Companion knife!


Thumbs Down Review


2009 - 2019 Copyright © AHTrimble.com ~ All rights reserved
No reproduction or other use of this content 
without expressed written permission from AHTrimble.com
See Content Use Policy for more information.

Emergency Radio Cache

Radio Cache for emergencies, disasters, and grid-down baofeng radio cachenote: first appeared in November 2015

I’ve been asked many times, “What kind of radios should I buy?” Or, “How many radios do I need?” And, “Where can I find radios that set-up ready-to-go?” And, “What accessories do I need to get the most performance out of my radio?”

I’ve written extensively on the Baofeng UV-5RA radio. I think it is simply the best value for the most people who are looking for a good alternative communications capability. And not only that, it really makes a great radio for a variety of purposes. Some of those are:

  • Family emergency radios.
  • Hunters & campers.
  • Church service groups.Ham Radios being used by Family
  • Neighborhood Watch
  • Emergency response teams.
  • Prepper groups.
  • The list could go on and on…

One of the situations that keeps coming up is buying a number of radios for a “cache” to be used as needed, properly and safely stored when not being used. Best possible answer to that is what I do right now for the group I am responsible for. If you have read my bio you know I am responsible for emergency preparedness for a 13-congregation church group; we call that group a “Stake” in our church. The 13 congregations are spread out over a three-county area.

In a perfect world each congregation would have their own cache of radios ready to go. But the world is rarely perfect. So the alternative is for me to maintain a radio cache that is ready to deploy when, where, and as needed. I thought the best way provide an answer is to show you a working example..the “8-Radio Cache”.

The mission for the radio cache is –

“Provide sufficient communications gear for two teams of four people to communicate while on the ground or traveling, and to provide that capability for a minimum of five days without the need to recharge any batteries.”

Requirements & Restrictions –

  1. Radio must be proven dependable.
  2. Radio must be able to operate on dual bands (2m & 70cm) simultaneously for use with a cross-band repeater.
  3. Radio must be able to programmable and cloned.
  4. Radio should be able to be programmed with NOAA, FRS, GMRS, and MURS frequencies.
  5. Radio should be able to receive FM band commercial and government broadcasts.
  6. Radio operations must be sustainable for five days with fully charged batteries.
  7. Radios must be operational from inside a moving vehicle by two separate teams.
  8. Radio operation must have “privacy” capabilities where no communication sounds can be heard by anyone but the user.
  9. Radio cache must have secure and protected storage capability that easily moved and transported.
  10. Radio operations must be easy to understand and easy to operate with minimal training.

The concept for our use is along the lines of the Incident Command System principle of operational teams. In this case two teams consisting of four people for a total of eight people. Each of the two teams would travel in separate vehicles. This ensures that each team also has vehicle radio operational capability as well.

However, a smaller team, say 3 people, could utilize a leader who had a radio while the remaining team members do not have a radio. This would be acceptable if all team members worked in close proximity to each other.Handheld Radio used by Firefighter

The radio needed to be sufficiently rugged to handle most emergency operational environments but not be subjected to “submersion” capabilities, etc. The Baofeng UV-5RA is a sturdy radio but isn’t made to operate in harsh environments such as structure fires, wildland fires, or where the radio is excessively exposed to the elements.

.

To meet all these demands here is what the cache consists of –Baofeng UV-5RA radio for sale

  • 8 x Baofeng UV-5RA radio kits. Each kit contains:
    • 1 x Boafeng UV-5RA radio
    • 1 x charger cradle
    • 1 x AC charger adapter
    • 1 x Stubby antennaBattery - Powermall 3800mAh
    • 1 x 14.5” antenna
    • 1 x ear piece w/lapel mic
    • Baofeng UV-5RA antenna : ExpertPower XP-771 Elite 14.5-Inch Dual Band Antenna (144/430Mhz U/V SMA-F)2 x 1800mAh batteries
    • 1 x 3800mAh battery
    • 1 x 12vDC charger cradle adapter
    • 1 x Radio pouch
  • 1 x RT Systems Programming Software CD with cable
  • 2 x Tram 1185 Vehicle magnetic mount dual-band antennaTram 1185 Amateur Dual-Band Magnet Antenna Baofeng UV-5R antenna on car roof
  • 2 x MPD adapter cable
  • 2 x Tenq vehicle battery replacement adapter
  • 2 x Vehcile “4-to-1” cigarette adapter multiplier
  • 1 x Vaultz Secure Roller Case

Then there is the documentation –

  • Cache Inventory Sheet
  • Radio Check-Out/In Sheet
  • Quick Start User Guide
  • UV-5RA User Manual
  • UV-5RA Programming Guide
  • ARRL US Amateur Radio Bands chart

Then I custom programmed the radios using the RT Systems programming software. The programming meets all the requirements listed above in the “Requirements & Restrictions” section.

Here is each component in the cache –

♦  Baofeng UV-5r handheld radioBaofeng UV-5RA radio, stubby antenna, ear piece w/lapel mic, charging cradle, AC adapter, 1800mAh battery

  • Frequency Range: 136-174 / 400-479.995 MHz.
  • Full height two-color LED definition display. The screen has exquisite clarity.
  • Field programmable from keypad.
  • Programmable via computer software.

♦  ExpertPower XP-771 Elite 14.5-Inch Dual Band Antenna (144/430Mhz U/V SMA-F) Boafeng UV-5RExpertPower XP-771 Elite 14.5″ Dual Band Antenna.

  • Frequency Range: 144-146, 430-440 MHz
  • VSWR: less than 1.5
  • Gain: 2.15dBi (144-146 MHz), 3.5dBi (430-440 MHz)
  • Maximum Power Input-watts: 50 W
  • Height: 14.4 inches


♦  Battery - Powermall 3800mAhPowermall 3800mAh rechargeable battery. The 3800mAh battery will last about 3 – 5 days while the battery that comes with the radio will last 2 – 3 days. Of course that will depend on your actual usage, which is mostly predicated on how much time you spend transmitting.

.

Baofeng UV-5RA Radioshop888 12vDC vehicle adapter♦  Radioshop888 12vDC charger cradle adapter. Radioshop888 12vDC charger adapter you now have the ability to recharge your batteries from any 12vDC source. Examples would be; vehicle cigarette receptacle, solar charger unit, portable power pack, etc.

.

Military surplus flashbang grenade pouch used to carry a Motorola Family Radio♦  Flashbang Radio Pouch. The radio pouch is a really convenient way carry the Boafeng UV-5RA radio. It is a perfect fit and the pouch’s flap provides additional protection from rain. You won’t accidentally drop or lose your radio while it is secured in the pouch. The pouch is MOLLE II compatible and the same attachment can be used to secure it to your belt as well.

.

RTsystems3♦  RT Systems Software Programming CD with cable. to be used effectively it also requires the ability for you to program the radio. Programming is accomplished either manually through the keyboard or via a laptop computer/software. I far prefer the computer method, but it does require software.

.Tram 1185 Amateur Dual-Band Magnet Antenna Baofeng UV-5R

♦  Tram 1185 Vehicle magnetic mount dual-band antenna. The Tram antenna is the solution for radio operation in a vehicle. Even with the ExpertPower 14.5” Tram 1185 Amateur Dual-Band Magnet Antenna Baofeng UV-5R antenna on car roofantenna on the radio, the reception and transmission capabilities of a handheld radio are greatly diminished due to the vehicles metal body. Getting the antenna outside of the vehicle’s body makes a huge difference. And the vehicle’s roof is also usually higher than a normal person holds a radio so you get the increased antenna height as well.

♦  MPD Digital antenna adapter cable. The Tram antenna mentioned above comes with a cable that is long enough to reach inside the vehicle but you need to connect that cable to the radio. That takes a special adapter cable to connect the antenna cable to the RF coaxial cable SMA female to UHF SO239 PL259 female RG58 radio itself. There are other cables out there, some less expensive. But I like the MPD Digital cable (RF coaxial cable SMA female to UHF SO239 PL259 female RG58 20 inches). They are well-built, quality materials, and made in the USA.

.

♦  Tenq vehicle battery replacement adapter. Tenq® Baofeng Vps-001 Vehicle Power Supply Dual Band Car Battery Eliminator Simulator for BaofengThe Tenq power supply unit is a very handy piece of equipment. This option allows you to run the radio directly off of a 12vDC power supply. You remove the rechargeable battery from the radio, slide this unit into the radio where the battery normally goes. Then connect to a 12vDC power source via a cigarette adaptor and you are up and running. This type of operation would be very convenient for vehicle operations or while using the radio as part of the mini communications center.”

Cigarette Lighter Auto Socket Duplicator♦  Vehcile “4-to-1” cigarette adapter multiplier.

  • Plugs into car cigarette lighter! 1-into-4 12V DC auto adapter, charge all four team radio batteries at cone.
  • Includes adapter plug, 50″ cord.
  • One USB port with 5 Volt/ 1 Amp output to charge USB compatible devices.
  • Built in fuse for circuit protection.

♦  Vaultz Secure Roller Case. Baofeng radio cahce Vaultz Secure Roller Case radio cache

  • Highly mobile, with wheels and telescoping handle.
  • High-capacity locking chest.Vaultz Secure Roller Case radio cache
  • Double combination locks.
  • Rubber feet prevent skidding and surface scuffing.
  • Handles on the sides make carrying easy.
  • Large flat top is great for a working surface.

baofeng UV-5RA Radio CacheThis radio cache meets the needs of our emergency responders whether it is a small emergency or major disaster. And when a “grid-down” event occurs…we will be ready and able to communicate!

Now, let your thinking begin…design a radio cache that is right for you and your group.


2009 - 2019 Copyright © AHTrimble.com ~ All rights reserved
No reproduction or other use of this content 
without expressed written permission from AHTrimble.com
See Content Use Policy for more information.

Ka-Bar BK-2 Knife (Becker Companion)

Ka-Bar BK-2 Becker CompanionI was able to pick up this very heft, sturdy looking, nice profile Ka-Bar BK-2 Companion knife in used condition for a decent price. I thought it would be a great addition to my knife family and useful in one of my various bags. Or maybe just dumped into the camping supplies to be used as needed.

The specs on the knife are as follow –

Ka-Bar BK-2 Becker CampanionI finally had a little time to do some knife testing and put this in the group to tryout. Time came to pull it out and give it a try. Bummer!

Ka-Bar bk-2 becker companion is junkAs soon as I grabbed hold of it I noticed three things:

  1. The handle was loose. While it has screws that hold the handle on the tine, why was it loose to begin with? Any good knife should not end up with a loose handle period. And the screws should not back out unless you are working on the knife and unscrewing them. So this was strike one.
  2. Another thing I noticed about the handle was the handle material. It was one of the smoothest knife handles I ever held. Is that a bad thing? Of course it is. How are you going to maintain a grip on the knife it is really smooth. So I get the handle wet and it was a real pain to try and hang on to. If it was wet with body fluids from a deer or elk I can’t imagine this knife doing anything but being a slippery mess.
  3. Finally, the knife is way out of balance. It is very weighted to the cutting side of the knife. Just no offsetting weight in the handle portion.

Ka-Bar BK-2 becker companion cheap plastic handle with weak hollow spots

KaBar BK-2 low quality handle cheap plastic poor qualityI was going to say that the sheath is decent. But once I really started looking at it I noticed it is poorly designed for use on MOLLE gear but is usable enough for belt hanging. And the snap to hold it secure, redundancy, is nice. That plastic sheath material is thin and very cheap feeling. I would imagine that it will break with little effort. There are plenty of holes and slots down both sides which will make it easy to attach to gear. With all that being said, as I handle it I can’t help but get a feeling that the plastic sheath belongs more on a $19.95 knife at Walmart.

About the blade…I am not impressed with the tip, it just isn’t sharp. By my measurements the knife is almost 1-11/16″ wide. That is really wide! The first 7/8″ is the edge and then the bevel of the blade. I like the way it splits wood. I could really pound on the blade to drive it through the wood to split it. I never worried that the blade would break or bend. On the pounding side of the blade I never saw the first little ding from pounding on it. That is nice.

I am also not crazy about the edge on the knife. Yes, I bought it used but I worked on it with my diamond sharpener but never go it to a fine sharp edge. I will try to put a better edge on it with my “WorkSharp” and will let you know how that goes.

What amazes me is the 4-1/2 star rating it got on Amazon. I just don’t understand it. But something I did find interesting is the full retail price is $127. Amazon’s price is $65. almost 1/2 the full retail price. That has  to tell you something.

When I had the handles off the knife the full tine steel blade just felt like a big ole hunk of steel. There was no feel to it of being a great knife. But I am willing to see how it feels when I get some a new handle on it.

Also, due to the sheer size of the knife I don’t see it as a hunting knife. The knife is simply too large for most hunting applications. The dang knife is bigger than a squirrel and almost the weight of a rabbit. A little too much for prepping either. Also, I don’t see it as a camping knife. Again, it is simply too large and cumbersome for most camp chores, including cooking.

The only true application I see for this knife is in a survival situation. You can hack on trees and limbs all day long. You can split wood with ease. Some might refer to it as a “bushcraft” knife and I can see that as well.

So far the only really positive to this knife…I bought it used and I don’t have that much money into it. If I had bought it retail it would have been returned as soon as I got it out of the box.

I am going to try and salvage this knife. There is a knife maker in town and I am going to talk to him about fabricating a decent handle for it. I am also going to look online for a better sheath for it. I will update you if I get either of those things done.

I am pretty brutal with my expectations. This knife failed on two fronts and that earns it a “Do not buy!” I may change my opinion once I get a new handle on. I will let you know.


Thumbs Down Review


2009 - 2019 Copyright © AHTrimble.com ~ All rights reserved
No reproduction or other use of this content 
without expressed written permission from AHTrimble.com
See Content Use Policy for more information.

Out-Of-The-Loop

I am out of the loopnote: I think this is one of the single most valuable pieces of information you will ever read for a grid-down event. When the violence is knocking at your door you better understand this concept or you will get killed. Yes, it is that important and I am that serious.

I am sure everyone has heard the saying “I was out of the loop on that” or some variant. Generally it is meant that a person wasn’t aware of something that was going on. However, the origins of the saying is a fascinating story itself. It goes back to the early Col John Boyd OODA Loop air force jet planes fighterdays of the Air Force and man by the name of John Boyd, a Colonel.

Col. Boyd developed this model to assist the training of military pilots. Dogfights occur at a very high speed in a three-dimensional environment. A pilot must not only have lightning fast physical reflexes, he must be able to out-think his opponent as well. To win a dogfight a pilot must be able to get his plane inside the decision loop of his opponent to line-up a kill shot…and do so without himself being shot down. It is a daunting task in the best of circumstances. And the speeds at which is occurs is unrealistic and unfathomable to most of us mere mortals.

Any high-stress, high-risk environment tends to be high-speed as well, or at least at critical points in time. A person must be able to function in that environment to the point of success. Failure to function successfully in these types of situations can lead to injury or death of yourself or someone else. Boyd developed a system that trains a person Col John Boyd developed the OODA loopon success under stress, in high-risk environments. That system is all about acquiring information, processing that information, making a decision, and then acting on that decision.


The decision making model he developed is called OODA.

That is an acronym for; Observe, Orient, Decide, Act.


Broken down it means –

  • Observation of the raw information on which decisions and actions are based.
  • Orient the information to your situation and environment.
  • Decide a course of action.
  • Act quickly and decisively.

While it would be convenient to allow those brief explanations stand on their own, it is impossible if you want to truly understand how it all works together for success.

One of the best explanations of the complete OODA cycle was by Harry Hillaker –

“The key is to obscure your intentions and make them unpredictable to your opponent while you simultaneously clarify his intentions. That is, operate at a faster tempo to generate rapidly changing conditions that inhibit your opponent from adapting or reacting to those changes and that suppress or destroy his awareness. Thus, a hodgepodge of confusion and disorder occur to cause him to over- or under- react to conditions or activities that appear to be uncertain, ambiguous, or incomprehensible.”

What I am understanding Hillaker to say is fairly simple – Embrace the confusion and use it to your advantage to defeat your enemy. I think I have that understood pretty clearly but that explanation is purely for a military or tactical situation.

What about when there is no person as an enemy?

How do you even describe “enemy” is these terms?

For this discussion I will revert back to our discussion on “objectives” as the enemy. We must “win” in terms of meeting the objective. If we can’t claim a “win” then we “lose.” Losing means that our objective was not met. And success in this arena is based on achieving our objectives, hence “losing” is the enemy.

To review the 2-part series on “objectives and priorities” that appeared on August 8th and 11th.

Based on the foundation I just laid out where there is no person as an enemy, there is no option to turn confusion against our enemy. Confusion in this sense only hurts our team and hinders the successful accomplishment of our objective. However, we can easily state with certainty that seeing through, and/or eliminating, any confusion would make attaining our objective far easier. We can now agree that we only need to go half way on the confusion issue, remove it vs. install it on our non-person enemy.

In retrospect haven’t we already started down the path of confusion elimination?

Back in Objectives and Priorities (Part #2), when we were given Leader’s Intent we can/did ask for clarification to ensure a solid foundation of understanding. On the other hand, if we are the one delivering Leader’s Intent we used the SMART model to clarify the task. So exactly what confusion is left to clear-up?ColJohnBoydOODA-003If you look closely at the OODA Loop you will notice that there is a very close relationship between the “OO” and the Situational Awareness. In plain English the “Observe” and “Orient” matches perfectly with the concept of Situational Awareness (SA). If your SA is good, your OO functioning correctly as well.

Situational Awareness & OODASo why the need for both?

There is a vital need, the OODA loop outlines the entire process along with explaining the “why.” The “why” being defeating your enemy, or accomplishing your objective(s). I see the OODA loop as a bridge between two more detailed systems –

  1. Situational Awareness
  2. Risk Management

If you go back to Hillaker’s explanation there is a key part “…operate at a faster tempo to generate rapidly changing conditions…” That integrates a true sense of urgency into the overall process. The need to move at a sufficient pace to outperform your enemy. Is it not reasonable to assume that if you outperform your enemy that you win?

Col John Boyd OODA loop jet fightersBut, what about dealing with an objective as the enemy?

When you consider the different aspects of an inanimate foe, the process can be both more difficult, and yet easier. When dealing with a person as a foe you have to assume many things about that person and hope you are right. A smart foe can do things entirely unpredictable which subsequently disrupts your SA and hence, the outcome. However, an inanimate objective can be almost as unpredictable, but it is lacking the ability to purposely be unpredictable. The end result is there are pluses and minuses to both situations, animate vs. inanimate foe. For this discussion we will focus on the inanimate foe, an objective.

Let’s review what the Swiss Cheese model of risk management looks like –

Swiss Cheese Risk Management You have any number of opportunities to stop an incident from occurring. Plugging just a single hole in any slice of cheese prevents the incident from ever occurring.

If you were to chart the OODA Loop process as consisting of a combination of Situational Awareness and Risk Management it would something like this.

Adding in Situational Awareness

Adding in Situational Awareness

Then adding in calculating the probability & severity aspect of the risk.

Then adding in calculating the probability & severity aspect of the risk.

Here we see the OODA loop link two systems that were previously envisioned as “stand alone.” While both of those systems were valuable and applicable, they did form a complete picture for our purposes. However, there is a third system that is still missing that carries considerable influence, if not total control, over everything – Leader’s Intent.

While some could argue that Leader’s Intent would be one of the “filters” of the SA process I would disagree. I think Leader’s Intent drives all of the systems from the very beginning. Thus I propose the proper graphic representation of the system should look more like this.

Leaders Intent OODA Situational AwarenessNonetheless I still maintain that the graphic reorientation is still lacking a key piece. No doubt that you would accomplish the object, but in the graphic it is implied, not explicit. And, depending on the situation you may or may not be able to undertake planning process formally, it may have to be done “on the fly” and not in written form. I am of course referring to planning as a key element.

In my way of thinking Situational Awareness is a more complete system/process to define and accomplish the observe and orient of the OODA loop. And, Risk Management encompasses the decide and act aspect of the OODA loop. Clear Leaders’ Intent drives the whole loop in harmony. How does planning work into the process?

Planning is actually a combination of orient and act parts of the OODA loop with a heavy influence of leader’s general eisenhowerintent. Have no doubt that planning will be a key element of any success in accomplishment of an objective. However, General Eisenhower said, 

“In preparing for battle I have always found that plans are useless, but planning is indispensable.”

What he was trying to get across through that statement was the fact that though the planning process we find the weaknesses, strengths, and alternatives to the environment in which we will operate. A good example of that is “combat loading” of ships. If you loaded a ship for an invasion such as D-Day the same way you would load a normal cargo ship, you would be doomed to failure.

Why? All the ammo would be loaded together in one area, all the trucks parked in another, tanks in another, Humvees it yet another area, etc.

As the invasion takes place do you need all the Humvees at one time? No. How about needing all the trucks at one time? No. And the same is true for tanks, ammo, medical supplies, etc. The military loads ships in a manner that the supplies come off in the order in which they are needed. You may only need 20 trucks at first, but you need 10 tanks before that, and 15 Humvees along with the tanks and trucks. But a sufficient amount of fuel, ammo, and medical supplies need to off-loaded with the appropriate vehicles. The planning process allows for the discovery of such issues and making the appropriate adjustments.

Another example would be the same situation of the actual invasion. The leader’s intent would be to secure town “x.” While in the planning process it becomes obvious which beach in the best to land on due to any number of factors. But, good planning demands that you have multiple alternatives. The same would be true for routes to get off the beach and to the town you are supposed to secure. Once again, in the planning process you are looking at maps that show the best/fastest way to reach the town. And yet again, you must have multiple alternatives in case your run into resistance or other obstacles with the primary route.

As the invasion unfolds different invading units run into problems getting off the beach for any number of reasons. However, since the planning process revealed multiple routes to the town, the local unit leaders can pick alternative routes as the battle unfolds. And, those choices can be made without running it up the chain of command because the optional routes are already in the plan…and approved. Hence, the local leader on the ground is still operating within the authorization given through leader’s intent.

Had there been no formal planning, the alternative routes would not have been identified ahead of time. The leader on the ground would have to discover the optional routes causing loss of time and jeopardizing successful completion of the objective.

Yet another revision of the entire process would look something like this…

LeadersIntent-004Do I have you confused by now?

How about…do I have your eyes glazed over yet?

That is obviously not my intention or objective.

What I do what you to think about is how to be successful when it comes to surviving after “grid-down” when all your prepping comes into play. But, surviving is a whole lot more than just beans, bullets, and band-aids! It is about how you become a successful prepper to become a successful survivor. And success depends on skills. No, not skill…SKILLS !

And you need to understand how to use systems such as OODA Loop, Situational Awareness, and Risk Management to improve your odds of success. If you can improve your odds of success in a grid-down situation, then it will be much easier for emergencies and disasters as well. But it all takes time, effort, and commitment.


2009 - 2019 Copyright © AHTrimble.com ~ All rights reserved
No reproduction or other use of this content 
without expressed written permission from AHTrimble.com
See Content Use Policy for more information.

Where to stash your survival cache?

Hiding Your Survival Cachenote: first appeared in March 2015

There are lots of good places to hide your cache. There are lots of bad places to hide your cache. The trick is to find the places to hide your cache where no one else will find it. So the cardinal rule is – Don’t hide your cache where someone would expect to find it. The trade-off is, your cache may be harder to find and retrieve when you follow the cardinal rule.

If you haven’t read my posts 3 days ago about Survival Caches, now might be a good time Survival Cache to Stay Alive & Start Over – Part #1 – 3

Here are some basic guidelines for stashing your cache:

  1. You must be able to find it but sufficiently hidden so others can’t find it.
  2. The area must be close enough to get to, but not so close that it can be linked to you.
  3. Cops will investigate your survival cache if they find it.If law enforcement finds it they are probably going to think it is pretty weird and you are going to be questioned about it. How will they know it is yours? Try fingerprints or DNA for starters. Also, if for any reason they think it is tied to a serious crime they will investigate it and do their best to locate you. Be ready to tell whoever finds it a very good reason why you stashed it.
  4. Remember the water, if you have water in the can bury the whole can deep enough that it won’t freeze and burst. In the frigid north you could be looking at 3’ or more to get below the frost line. An alternative could be to bury your water separately, thereby allowing you to bury your original survival cache can more shallow.
  5. I think having at least two ways in/out to the spot is important. And don’t egress the area/spot the same way you entered. Someone may have watched you and just waiting for the opportunity to ambush you as you leave.geocaching can help hide your intentions of stashing your survival cache can.
  6. The spot should be hard enough to get to but it should also not make you stick out should you be seen going there…either when you originally bury it or when you retrieve it. Have a good reason ready if you are seen and/or questioned about it by someone in authority. Remember “Geocaching” is a sport now and could be used as a good excuse.
  7. Observe the area for hours, maybe days, before finalizing a spot. What looks good today might not be good on a holiday.
  8. Don’t put it on someone’s private property, which is called trespassing. And if you put your cache there it becomes theirs by legal definition.
  9. BLM public landsIf you decide on public property it’s a good idea to know that you might be breaking the law doing so (soil & vegetation disturbance).
  10. On public lands one good thing it’s illegal to use a metal detector. Bad thing is that law doesn’t apply to the agency’s folks or law enforcement.
  11. Look the area over very carefully if you are on public lands. Should you bury your cache in an area that has any archeological value you can commit a felony by digging there.
  12. You don’t want your can to potentially be underwater when you need it. So look around for the flood plain and avoid it. Yes, dry stream beds & arroyos are inviting but think about when there is water, and it can be deep at times.
  13. Once you decide on your spot spy on it. Find a good location some distance away and just watch the area where you want to bury the can. See what you notice, see if people come roaring by on dirt bikes, how about hikers or hunters?

If you decide to bury your cache can look carefully at the ground, look really closely before you dig, maybe even take a picture first. When you are done, compare the picture to what the ground looks like in the picture. When you are done then stand back and throw several handfuls of stones, pebbles, dirt, leaves, twigs, etc. on the site from a distance. That will make it appear much more “life-like” or “natural”.

Hiding Your Survival Cache in the city

Urban environment provides a lot of opportunities. Where you might think is a great place to hide it, might be a great place for someone else to look for it if they know what they are doing.

Time to get the job done, go bury your cache can, reset the ground and vegetation around it, and as you leave cover your tracks. Use a branch or bush and wipe your tracks away as you leave the area.

Now, don’t go back and keep checking on it; you will create “tells” by doing so. Other people could get interested and start poking around. They might want to try and find what you found sound interesting in the area.

Hiding Your Survival Cache in a rundown warehouse

An abandoned warehouse is a great area as long as someone doesn’t come scavenging or taking over as their new home.


If  you have two cans to bury, bury them at least 50′ apart.  Better yet, where you can’t easily see one location from the other one. That helps keep one location secure if the other is compromised.

You can also use Google Earth to scout and area without really being there. Now, do yourself a favor, don’t mark it with any software on any mapping program or setting a GPS coordinate on your GPS unit.

Hiding Your Survival Cache in the woods or forest

In heavily wooded area place next to rotted tree trunk and cover with old vegetation and dirt.

If you want to take lat/long coordinates that is OK.  Take your lat/long then write the coordinates on paper, DO NOT mark it on your GPS unit. Store the paper where you can find it and no one else will stumble across it. If you want to take one more step in the paranoia world, try to figure out a cool system to hide the numbers for the lat/long. Put it in a list of phone numbers, substitute a couple of alphabet letters for numbers, mix it all up a bit so someone hopefully won’t even recognize what it is. And if they do recognize it, they won’t have a way to figure it out since it is random based on your unique system.

Hiding Your Survival Cache in the desert

Lot’s of places to hide it in the desert. Finding it again might be tough. Watchout for snakes!

Another way to hide it in plain site is to create an overlay or cut-out out of a heavy sheet of construction paper or something similar. Take a common map, find the spot where your can is located (do not mark it on the map), then lay the piece of paper over the map. Orient the paper to something common with the map (i.e. a side, a corner, a road, etc.). Then make a small mark on the paper. Now, cut a small hole in the paper where the mark was. Write on the paper, punch a couple different holes in it that are different than your cache can hole. Then let the kids do a crayon drawing on it, play tic-tact-toe on it. Now put the paper away and remember where you put it; or post it on the refrigerator door. Leave the map where you normally would keep it.

Hiding Your Survival Cache in the neighborhood

A vacant urban lot is an option but will it be bought and developed exposing your cache?


If I were to give you two final words of advice they would be: Disguise
Distract.


I am sure there are some more ideas that ya’ll can come up with so let’s end it here and let you get to work.

The important thing is…build your cache…and then stash your cache!  Just do it!


2009 - 2019 Copyright © AHTrimble.com ~ All rights reserved
No reproduction or other use of this content 
without expressed written permission from AHTrimble.com
See Content Use Policy for more information.

.                                                     .