If you haven’t read the post on September 1, 2019 that explains this post…well, go read that post first (91/2019) and then this post will make more sense.
Is the threat of violence really the #1 threat a person faces in emergencies, disasters, or grid-down?
There is not a simple answer…but, one thing for sure…it has the highest fatality factor, with the highest severity rating, and an relatively unknown probability factor. So, yes, violence is the #1 threat/risk against you and your family overall because if you fail at mitigating the threat of violence…the outcome can be terminal and incurable.
What can you reasonably do to mitigate the threat or risk of  violence against you and your family? Well, remember that there are two ways to mitigate risk; 1) reduce or eliminate the probability that it will occur, 2) if it does occur, you reduce the severity of the impact. That being said there are steps you can take to work on both probability and severity in relation to the threat/risk of violence.
The most simple aspect of this is…to protect yourself and your family you want to keep the bad guys as far away from you as possible. Preferably they will never even know you are there. However, we will exclude the “invisibility” (a.k.a. grey man) concept from this discussion and concentrate on how to actually protect your family.
In protecting your family there are two primary aspects; 1) intangible, 2) tangible. Intangible simply means what you can do that doesn’t cost you anything and you don’t hold it in your hand. Tangible obviously means the opposite; it usually costs you some amount of money and you can hold it in your hand.
#1 Intangible –
Situational Awareness is the first and foremost intangible! You must be aware of what is going on around you. And the closer an event is…the more important it is that you know what is happening.
In my series of articles concerning Situational Awareness (SA). I go into great detail on what it is, how to improve it, and how to avoid SA problems. Well worth taking the time to read. < click here to read Situational Awareness articles >
SA in the strictest of terms by the purists is a “state of knowledge.” In other words we need to have realistic knowledge of the things taking place around us in our environment. Further, SA is being able to correctly assess that knowledge. To bring SA into reality we need to define Situational Awareness as the acquisition of, the processing of, a state of, and taking action on knowledge. That knowledge comes from the environment around you.
Here is the short version of SA:
First Step, you must understand the environment that you will be operating it; establish a baseline or what is normal and therefor expected in that environment. Hence, anything that occurs that is outside of that baseline is not normal and to be noted. You acquire that knowledge by observing what is happening around you – Situational Awareness.
Second Step, you then must identify the key cues that will indicate that something is sufficiently abnormal (i.e. different) that it would represent an increased threat or risk. And you must monitor those environment elements identified for any change or deviation from the baseline, recognize when they occur and their relative importance – Situational Understanding.
Third Step, you project the outcome of the events that are taking place that are deemed a threat or risk to determine the effect (fatality factor) it will have on your situation. You then decide on an option to mitigate that threat or risk – Situational Judgement.
Fourth Step, take timely and decisive corrective action if required. Yes, I believe that SA without “action” is a waste of time and energy. But that also makes me outside of the mainstream advocating that SA includes an element of action – Situational Influence.
That is the intangible version of mitigating the threat of violence…you identify that it is there and avoid it.
Put SA into practice… 1 – You are in a store and there is a man with an AR-style rifle slung over his shoulder. Is that normal? No. your SA should come alive.
2 – Magazine inserted in rifle. That indicates he is loaded and ready for action. Is that normal? No. You SA should be screaming at you.
3 – He appears to have an Obama “Hope” t-shirt on. Is that normal? An Obama t-shirt would be more closely associated with anti-gun, anti-Constitution Democrat radicals vs. pro-gun folks. Again, SA should be heightened even more.
4 – Body posture is relaxed and appears to be buying cookies. Both of those indicates the opposite of a person about to go off his nut. Both are good indicators that the threat is lessened.
5 – Muzzle slung down. That is a universal indicator of non-aggression by militaries. Another indicator that the threat isn’t as high as it could be.
Now the real question – What do you do next with you and your family in this situation?
Tangibles of Personal & Family Defense –
Let’s move on to the area where you simply aren’t/weren’t able to avoid all threat of violence…now what?
To keep the threat/risk of violence as far from you as possible the best way to do so is with a high-quality, long-range rifle, top quality optics, along with a great set of shooting skills. You become the “American Sniper.”
But, what happens if the bad guys get right in your face? Then you better have a way to deal with that imminent threat as well. Since an “in-your-face” scenario might actually be so close you can’t bring a weapon into action, you should have the ability to defend yourself with nothing more than your bare hands…to some reasonable degree. This would be the inner-most ring of your defensive layers protecting you and your family from the threat or risk of violence.
 Why be able to defend yourself, your family, and your home? I call this the Castle Principle. Simply put, you are responsible for the safety of your home (i.e. your “Castle”) and all those that dwell therein. If you are not going to defend the people taking refuge in your home, who will?
Seriously, if you are not prepared to defend your family and friends that have taken refuge in your home, what good are you? No, I don’t mean you have to be a combination of a SEAL and a Ninja. Yes, I do mean you have to have the means and be willing to defend your family.
If someone else is going to defend them instead of you, is it really your castle? The whole concept of the Castle Principle is you being responsible for defending your home and the people in it. If not you, who?
OK, back to defending against the bad guy from a distance or in-your-face…
Why not an AR-15 vs. your bare hands against a bad guy that has come close-in and is in your face? Because at close range it would probably be impossible to get an AR up and pointed at a guy. He could be so close that it is  physically impossible to raise the rifle. When I took a very serious defensive class I was able to neutralize a hardcore operator’s carbine from being brought into action. Yup, me!
But, his greater skill-set allowed him to forget the carbine entirely and deal with me using only his bare hands…and a training knife. Yeah, I didn’t come out so good on that one. My point is, a barehanded person can neutralize that weapon, even an experienced soldier carrying one.
However, if your attacker were just a few inches further away, you may be able to pull a knife. As he did in the example above. If there is maybe a foot or two separation between the two of you, you may have space and time to draw a pistol for defense. Add another foot or two of separation and now maybe there is enough space and time to employ an AR or shotgun.
If the guy is 100 yards away then an AR is going to be far more accurate than a shotgun. You get to 400 – 600 yards then the long-range rifle is a better choice than an AR. Although, with practice an AR-15 can be shot very effectively at ranges of 400- 600 yards.
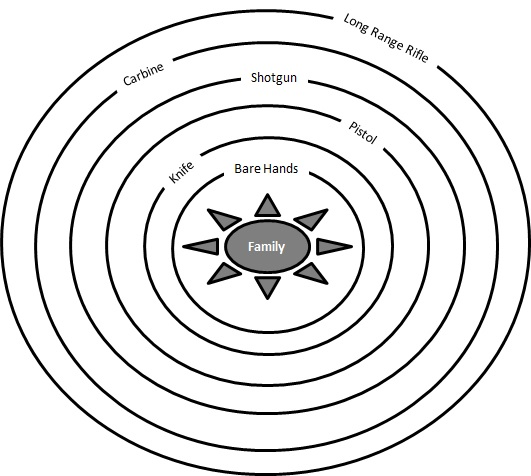
Layers of protection against the threat of violence.
Now look at all those concentric circles with you and your family in the center. The first circle is your bare hands capabilities. The next circle is a knife as a defensive weapon. The circle after that is a pistol. Then a shotgun, then an AR, and finally a long-range rifle.
With each circle you keep the bad guys further from your castle, and further from those you love and whom you are trying to protect. You have created defense in layers.
You effectively have an answer for each separate and consecutive threat. In other words, you have multiple layers of defense to protect your family. Each layer having a specific purpose, its own mission.
Bottom line, your goal is to keep all risks and threats as far away from you and your family as possible. However, as the threat gets closer you have defensive measures in-place to deal with it. And hopefully you have developed the mindset that you will employ those defenses when needed, without hesitation, and the best you possibly can.
In priority order I propose the following –
- A really good fighting or defensive knife (i.e. boot knife). For this you might want to consider –
- Gerber StrongArm
- Gerber Guardian 05803 Knife (boot knife)
- For an ultimate fighting knife – CRKT Hissatsu
- A really good pistol. For more information on this you may want to read < Choosing the Right Gun : Pistols >
- A really good shotgun. For more information on this you may want to read < Choosing the Right Gun : Shotguns >
- A really good carbine. For more information on this you may want to read < Choosing the Right Gun : Carbine/Rifle >
If you already own weapons and you want additional thoughts on what to do:
- Go to the range and practice sometime during the month of September. Don’t just punch holes in paper, shoot at 6” paper plates from different positions (sitting, squatting, laying down, from behind a barrier). Then shoot at those same size paper plates while moving laterally, while moving forward, while moving backward, in tandem with another shooter. Don’t just stand there and shoot. Not only is it boring, it doesn’t improve your skills. You need to become a “shooter” and that means working on actual shooting skills. Practice with 3 rounds in your first mag, force yourself to switch mags while moving. Do all kinds of things that you think you might actually have to do in a gunfight. Use a 9-hole, that is an amazing training tool. And finally, remember to replace the ammo that you used at the range.
- Buy more ammo! If you know how much ammo you have, then you don’t have enough. Buy the decent stuff. You don’t have to buy the best ammo out there, but buy dependable ammo. Remember, in a gunfight you don’t want the cheapest crap ammo running through your gun. Genuine military surplus is a good way to go.
- Buy a good tactical holster. I like Blackhawk Drop Leg Platform with a SERPA holster.
- Buy more magazines. For pistols I think the minimum number of magazines you should own is 3. One for the gun, two for the mag pouch. Having another spare or two is a great idea. I like Mec-Gar magazines. They are high-quality, less expensive than original manufacture magazines, just as good as original manufacture, and they have a slightly higher round capacity. FYI…many gun manufactures have Mec-Gar make their mags for them.
- If you have a good fighting or boot knife, make sure you have a good sharpener for it…and your knife has a great edge on it.
- Find a shooting class, preferably a tactical class, in your area and take the training. Take your wife with you, take your oldest son with you, you best friend, your neighbor, go as a group, have fun, learn a lot…and when you are done with the class know you are better trained than ever before. And better trained than the average person.
- Upgrade your optics. Or, buy another spare battery or two for your optics.
Home Defense –
Defense in layers applies just as much to defending your property, another aspect of my Castle Principle. You start by having strong steel doors with deadbolt locks. But you also have reinforcing bars to prevent your doors from being kicked in. But if the bad guys get inside the house you still have a bedroom door that is solid core and can withstand some considerable amount of force being applied to it. Then you have a bathroom with a strong, solid door as well. You look at this last vestige of safety as your Alamo.
Here are some of the things you can do:
- You have a stone wall or fence around your property.
- Between the wall/fence and your house you have one or more dogs.
- You have motion activated lights around your house.
- You have sensors on your doors and windows to alert you that someone is opening them.
- You have motion sensor inside your home that you can turn on at night.
- You have a sensor at the end of your driveway to notify you of someone approaching.
- You have a sensor on the framer around your roll-up garage door to alert you if someone comes in your garage.
- Install a security door on your exterior doors.
And the list goes on and on. The point being, you implement those measures that protect your house as if your house were a castle stronghold.
Summary –
So now you have plenty of solid principles, lots of ideas and thoughts on what you can do to protect yourself and your family from the threat of violence. One of the things, one of the best things, you can do is work together with one or more other families. Come up with plans to work together to protect the combined group of folks. A very old saying that truly applies in this situation is “There is safety in numbers.” Don’t discount that concept!
 What I want you to do now is based on the promptings you got while reading this article…take action. Take action in the next couple of days. Even if it is following through with a no cost idea…go to the range. Do something, do what the prompting was when you felt it.
Personal note to you –
 There are lots of changes concurring in the world right now. Recent decisions by the Progressive/Liberal Supreme Court and the Whitehouse have reinforced anti-gun laws. I would encourage you to think about purchasing a gun, specifically an AR-style carbine/rifle. Remember the gun ban put in place during the first Clinton presidency that was widely supported by Republicans? That gun ban was aimed specifically at AR’s & AK’s . There may come a time soon where you might need one and can’t buy one. Same could be said for high-capacity magazines and ammunition as well. Please consider this.

2009 - 2019 Copyright © AHTrimble.com ~ All rights reserved
No reproduction or other use of this content
without expressed written permission from AHTrimble.com
See Content Use Policy for more information.