Garden: Starting Tomatoes Indoors

Let’s talk why to start seedlings indoors. In my area you have a 50% chance of frost (36oF) by June 3rd. Two weeks later there is only a 10% chance of frost. Sure you can always cover the plants out in the garden if it looks like frost overnight, but that is taking a chance. Let’s say your tomato variety will take 2 – 3 months to produce ripe fruit.

In my area you have a 50% chance of first frost by the end of September. So let’s say you are being safe and you don’t plant your tomatoes outside until mid-June 3 months later you are looking at mid-September…and a 10% chance of first frost, 50% two weeks later. You are barely in your growing season window. And that is IF you don’t get a hail storm in the mean-time.

So why not start your tomato plants indoors 6 – 8 weeks earlier and get more fruit! (Yes, tomatoes are a fruit NOT a vegetable.)

So here is how I start my tomato seedlings in early April…

1 – I mix-up some home made potting soil < click here to read that article >

I check it to make sure I have the right pH level.

Then I use 16oz Solo cups for my seedling cups NOT regular seedling cups like you see at the stores. I put my own slits in the Solo cups to better uptake the water from the bottom. Why the bottom? It keeps your soil more evenly moist and helps prevent over or under watering. And as a bonus…it encourages roots to go deeper into the potting soil towards the water making a better root system for the plant.

I fill the cup halfway with my potting mix. Yup, just halfway…be patient.

I then place the Solo cup into a clear plastic cup about half full of water.

I place a quart size ziploc bag over it to keep the moisture/humidity and warmth next to the plant.

I place the tray on top of my refrigerator.

7 – 10 days later I get it down and here comes the magic…I add more potting mix about ½ way up the leggy stem and water that in.

It gets put in a south facing window with a grow-light on it.


Related Articles –


Just an FYI…I don’t consider myself an expert gardener at all. I started as a kid watching my dad, and have gardened along the way. Still trying to learn the ins & outs here in the high-desert southwest. Make sure you do what is best for you soil and climate. Maybe even find a local expert with a  great garden…and then do what they do.

 2009 - 2024 Copyright © AHTrimble.com ~ All rights reserved
No reproduction or other use of this content 
without expressed written permission from AHTrimble.com
No legal, economic, or financial advice is given, no expertise to be assumed.
See Content Use Policy for more information.

Garden Tip: Potting Soil

Let’s talk the potting soil racket.

This year I have already planted 113 seedlings, maybe 40 – 50 yet to go. Does it get expensive to buy potting soil. Answer: Maybe.

So let’s set a base line first. I am comparing my home made potting soil to Sta-Green Potting Soil which is sold on Amazon for about $12. Making it cost just less than 19cents per quart. If you want throw in a more popular brand we can go with the 8 quart Miracle-Gro at Lowes for $5.38 per bag, or 67cents per quart. Your choice.

So far I have used about 38 quarts of potting soil. About $7 if I had used Sta-Green or about $25 is I had used Miracle-Gro. But…nope!

I looked into exactly what good potting soil is. It is basically made up of peat moss and perlite. Peat moss is decomposed organic matter that occurs naturally in cold, marshy ecosystems. Perlite is a natural mineral that expands when heated and becomes lightweight and porous. Peat moss becomes the perfect organic germination material for seedlings. Perlite is added to the peat moss to provide drainage so the peat moss doesn’t stay saturate with water and compacted. It also provides a slow-release way to keep the peat moss damp but not overly so.

So I made my own potting mix; 2 parts peat moss, 1 part perlite.

Yup, went out to my stash of supplies to get the peat moss and perlite.

The cost is almost too small to calculate but let me get in the ballpark…about 4cents of peat moss and 3cents of perlite per quart of home made potting.

Doing the math:

  • Home made potting soil is 7cents per quart and 38 quarts…less than $3.00 for all my seedlings so far.
  • Home made vs Sta-Green…almost 60% cheaper.
  • Home made vs Miracle-Gro…almost 90% cheaper.

But you say Miracle-Gro has 6 months of fertilizer in it. Maybe, I say; depends on what you are growing. That is no problem for my home made potting soil idea. I add ¼ teaspoon of Dr Earth Pure Gold 2-2-2 Organic fertilizer and !BOOM! you now have potting soil with fertilizer. That ¼ teaspoon is added to my pint seeding container and then mixed in.

Here is a little secret for my tomato plants…I add half of my ¼ teaspoon (1/8 of a teaspoon) of bone meal to the pint seedling container and mixed in. Now there is a good mix for tomato plant seedlings…1/4 teaspoon of organic 2-2-2 and 1/8 teaspoon of bone meal.

Of course when all my plants go in the ground they get more organic fertilizer and also some gypsum for the tomato plants. (more on that in a couple of weeks)

If my seedlings will stay in their little indoor cups for more than a month I hit them with a little Dr. Earth Organic & Natural Root Zone® Starter Plant Food 0-2-2 at half strength (½ the normal concentration for mature plants). I would add the liquid mix to the watering cup, not directly on the plant itself or the potting mix around it.

So there you have it! If you are gardening AND starting your own seedlings AND want to save money this is one way to do it.

Here are my little plants so far…10 & 12 days after starting.

Note #1: I only use organic fertilizer in my potting mix, it doesn’t burn roots, etc.

Note #2: Canadian peat moss tends to be better quality overall. If you use any other peat moss, make sure it is organic and you sift out the sticks and stems.

Note #3: Before using the potting mix I add water to it. Just enough water to make it like a sponge. When you squeeze a handful of the mix just a couple of drops of water should come out.


Related Articles –


Just an FYI…I don’t consider myself an expert gardener at all. I started as a kid watching my dad, and have gardened along the way. Still trying to learn the ins & outs here in the high-desert southwest. Make sure you do what is best for you soil and climate. Maybe even find a local expert with a  great garden…and then do what they do.

 2009 - 2024 Copyright © AHTrimble.com ~ All rights reserved
No reproduction or other use of this content 
without expressed written permission from AHTrimble.com
No legal, economic, or financial advice is given, no expertise to be assumed.
See Content Use Policy for more information.

Time to work on my strawberry patch! (ooooppppssss)

(no, that’s not my strawberry patch)

Early last week I inspected my strawberry beds to see how close I was to un-mulching them for the spring. You can tell they are ready when you see healthy new growth at the base of the plants. At that point they need fresh air and access to sunlight. My plants were ready to go…and so was I.

I am ready to get outside and start my gardening!!

So here is that project/adventure. Stay around till the end and learn from my mistake.

Then I de-thatched the original bed on the left. And got two full 5-gal buckets of partially composted mulch…

And yes, since this is broken down so much I will keep this and turn it into compost. The drier mulch that I took off at the beginning will go back under the strawberry plants once the irrigation is installed. It is important to keep the berries off the dirt. That helps prevent disease and bugs from getting to the berries before you get to eat them. FYI…I got 3 full contractor trash bags of much off the beds. I am thinking it was a bit too thick for our area.

Also, as a really good note…I found earthworms in the beds when I was removing the mulch. Yea!!!

Once I got the mulch off I installed all new irrigation in the original bed and added irrigation to the 3 transplant beds. You can see how I did that in the next videos.

So now come the ‘ooopppssss’…I did all of this on Friday of last week. Made me really happy, and even more excited about my garden experience/success this year! And yes, I checked the weather report for the next 10 days. You see strawberry plants can handle some cold weather, even below freezing temps as long as it isn’t for long periods of time or too cold. The blossoms can’t though, frosts and freezes will kill off blossoms. But, no blossoms on my plants, so no worries. But…

Here is a picture from the next morning (Saturday)…

But it melted off and was in the upper 40’s.

And then Sunday morning…

But it melted off and was in the mid-40’s.

And then Monday morning…

But it too melted off and was in the mid-40’s.

This morning (Tuesday) it was bright and sunny with clear skies. It isn’t even noon yet and it is 46. Should hit mid-50’s with beautiful clear blue skies all day.

So now are 2 videos, both taken this morning. First one is to show the condition of the plants and to show you my irrigation…

And yes, the video above is this morning after three days of rain, snow, hail, and even thunder with the hail and snow.

The video also shows the irrigation I am doing for them. The original bed has bubblers since there is so much ground clutter and I can’t get tot he soil for soaker hoses. The other three beds have soaker hoses. Notice the soaker hoses are set-up with two connections with the supply line to ensure a steady and consistent water flow. I only put 3 bubblers on a 1/4″ line to make sure I was getting enough water supply there as well.

The video below is a bed comparison. The first two beds are the beds with only about 10 – 15% native soil. The last bed is about 50% native soil which means sand that turns into clay when it gets wet and also doesn’t drain as well. It was a test. If it really shows poorly I will dig it out and replace with the better soil.

So I guess I am going to have to give the patch a few days and see what damage was done with the cold, snow, rain, and hail.

So the moral of the story…time to think about your garden…just don’t get too impatient.


Related Articles –


 2009 - 2024 Copyright © AHTrimble.com ~ All rights reserved
No reproduction or other use of this content 
without expressed written permission from AHTrimble.com
No legal, economic, or financial advice is given, no expertise to be assumed.
See Content Use Policy for more information.

An Every Man’s Greenhouse – Part #1

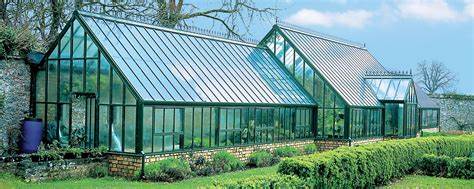
First off…the greenhouse to the left is NOT what I am talking about. That greenhouse probably cost way more than my house did! It was just a nice picture and maybe just a bit of a trap for you.

What I am really talking about is a that anyone can build with limited tools, knowledge, and skills. A greenhouse that gets the job done at minimal cost, time, and effort. Something that every man can build and use.

I didn’t have any plans to go by before I started. I just had looked online at a couple others that are similar. Why no plans? Because I just wanted to see how easy it could be, how simple it could be.

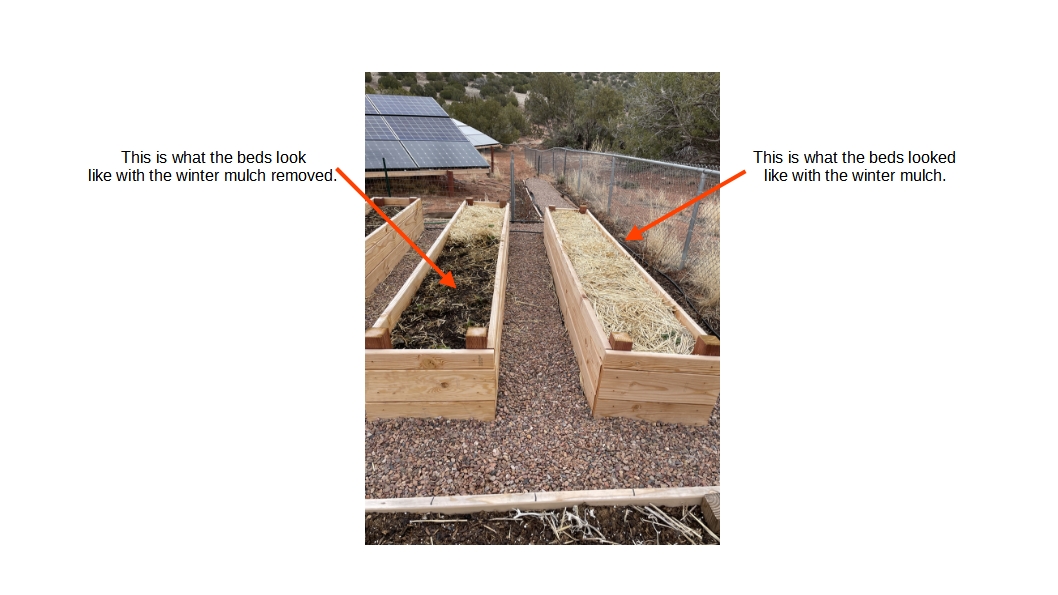
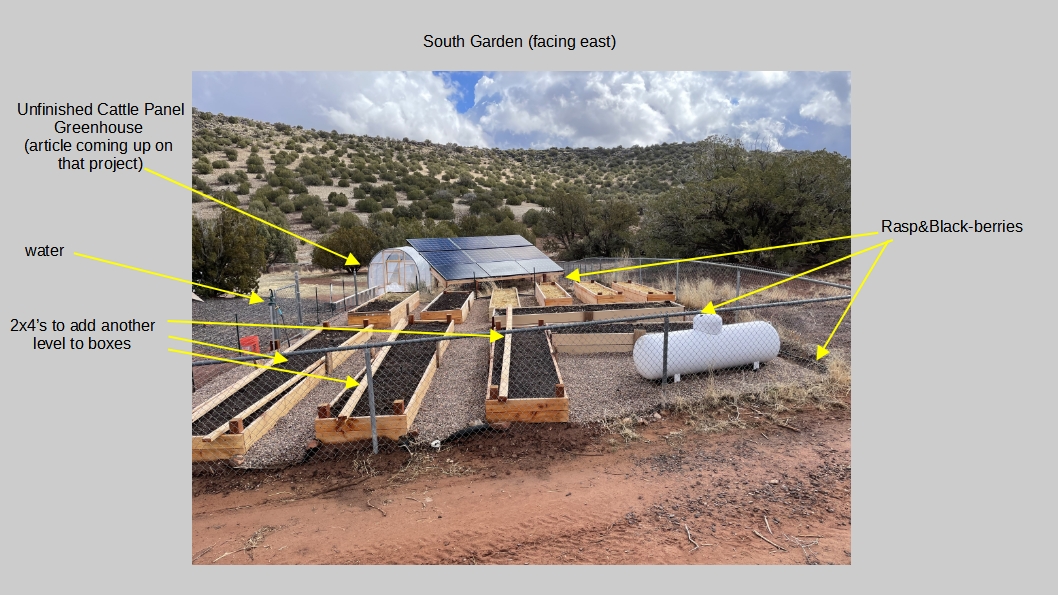
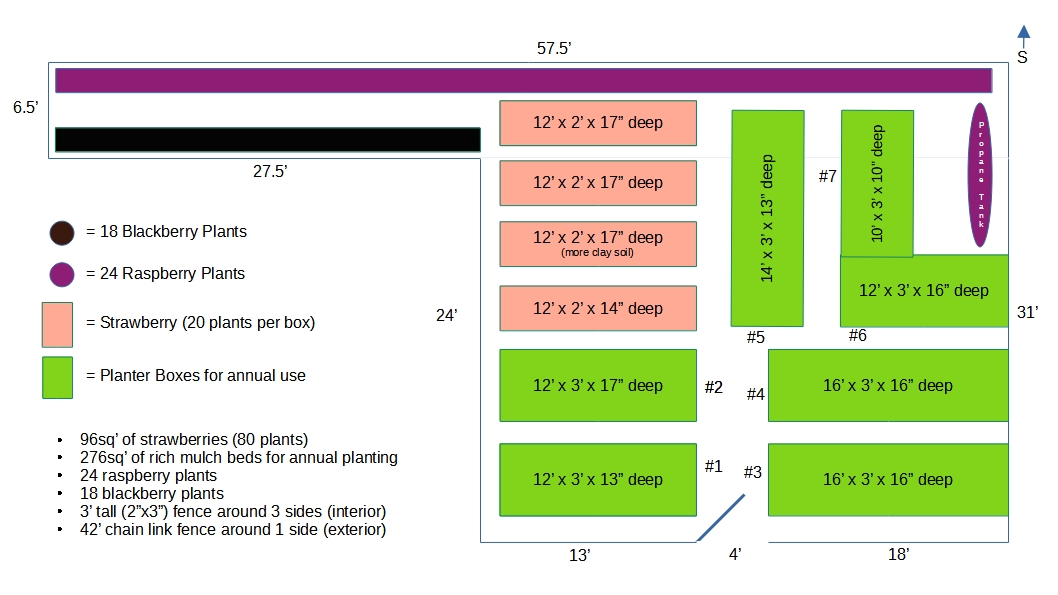
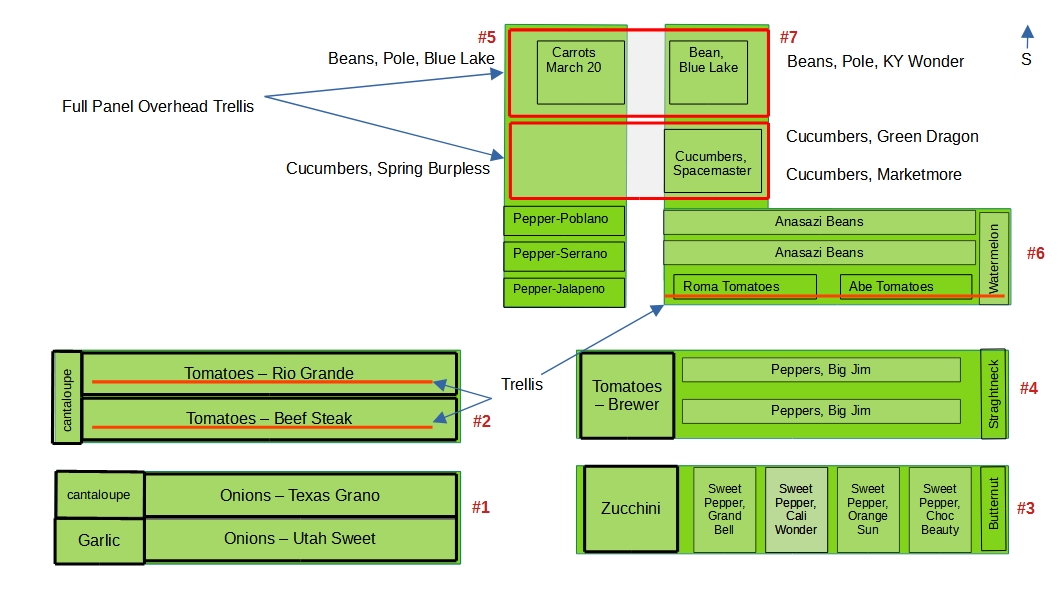
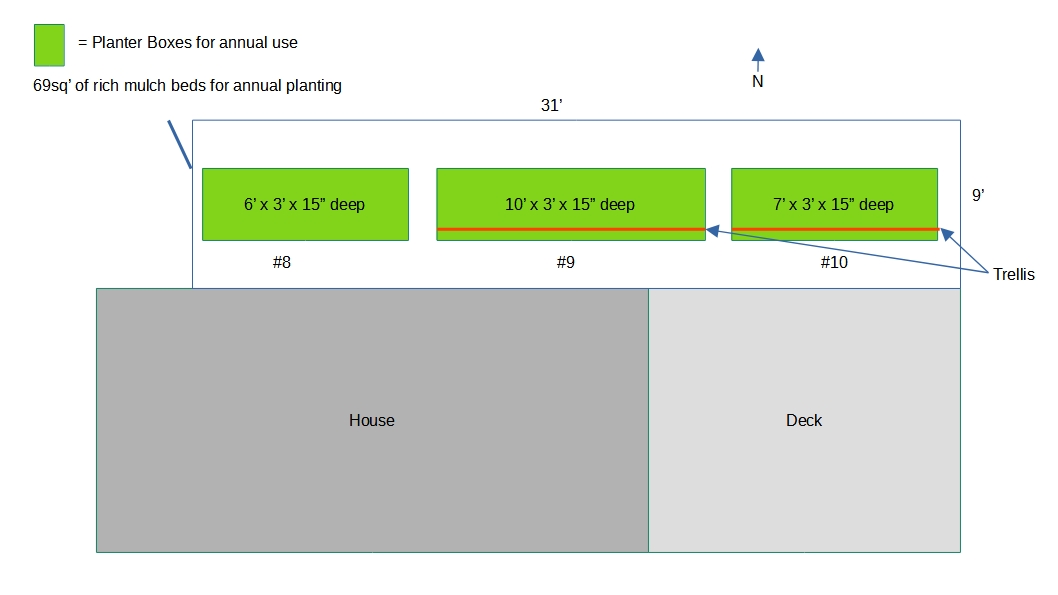
I don’t need more space that to start about 70 – 80 plants. Why? Coz where I live there is only about 3 month growing season that you can 100% count on. Normally you can get 4 – 5 months but that isn’t assured. By starting plants indoors a couple months ahead of time you get a nice jump on growing season.

Based on the size of my garden (raised beds) and using the square foot methodology I only need to start maybe 70 – 80 plants. But, I also want to start about 20 Afghan pine trees as well. I figured a 6′ plastic table from Walmart should do it. The pines will trees will go on the ground when they get about 6″ tall. All that being said I figured a 7′ x 8′ usable floor plan would be plenty of room. I also wanted it plenty tall enough to comfortably stand up in. One additional issue, wind. We have some pretty strong wind events in the spring, it needed to stand up to that.

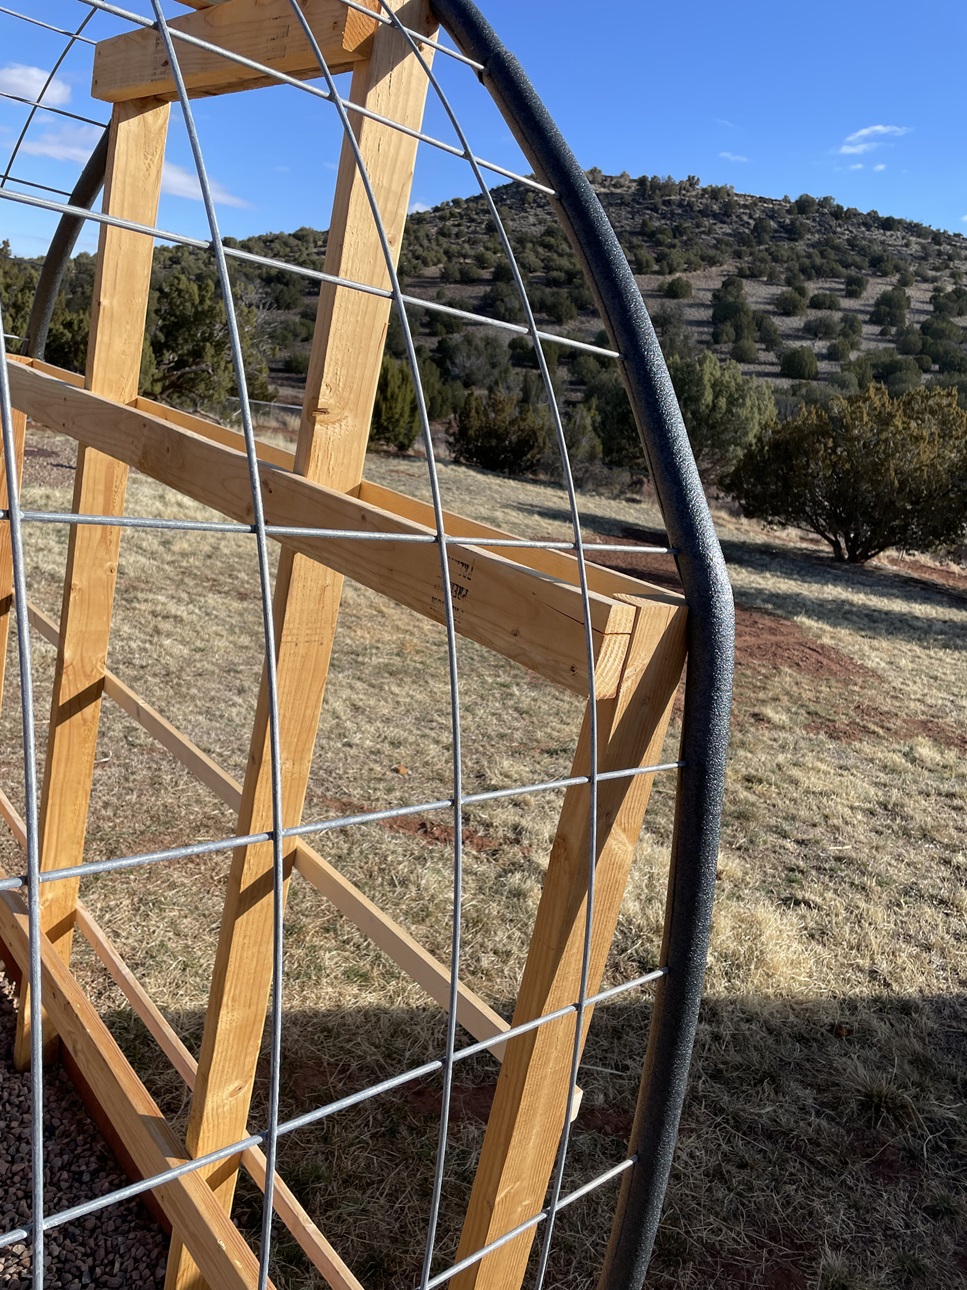
For the sides and top I decided on 16′ cattle panels. The are relatively inexpensive, $30 each. Plus they are made for outdoor use, are pre-assembled, and very strong when bent in a hoop form. And yes, I got the idea from others online. Doing some calculating I thought the height would only be about 6′ without adding any wood lifting up the sides of the panels. So the I added 2 levels of 2″ x 6″ dimensional lumber to the sides. The upped the sides by 15″ givingme a nice 7′ headroom clearance inside the greenhouse.

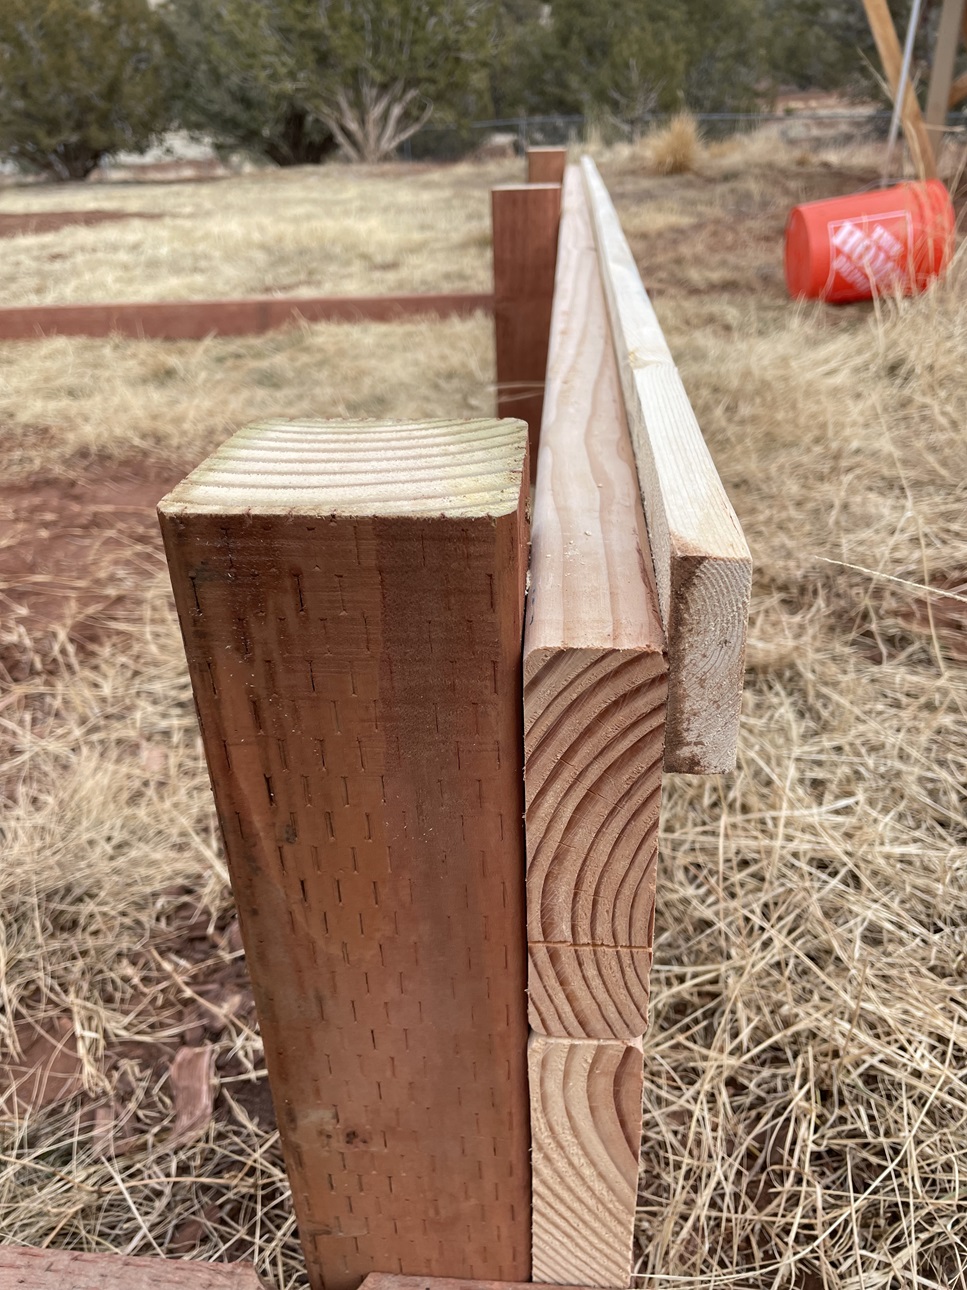
To create the corners I went with a standard 4″ x 4″ pressure treated wood post. The bottom row of wood that is in contact with the ground is 2″ x 4″ pressure treated wood.

So I laid it out real simple…

I laid it out just to get an idea of the footprint.

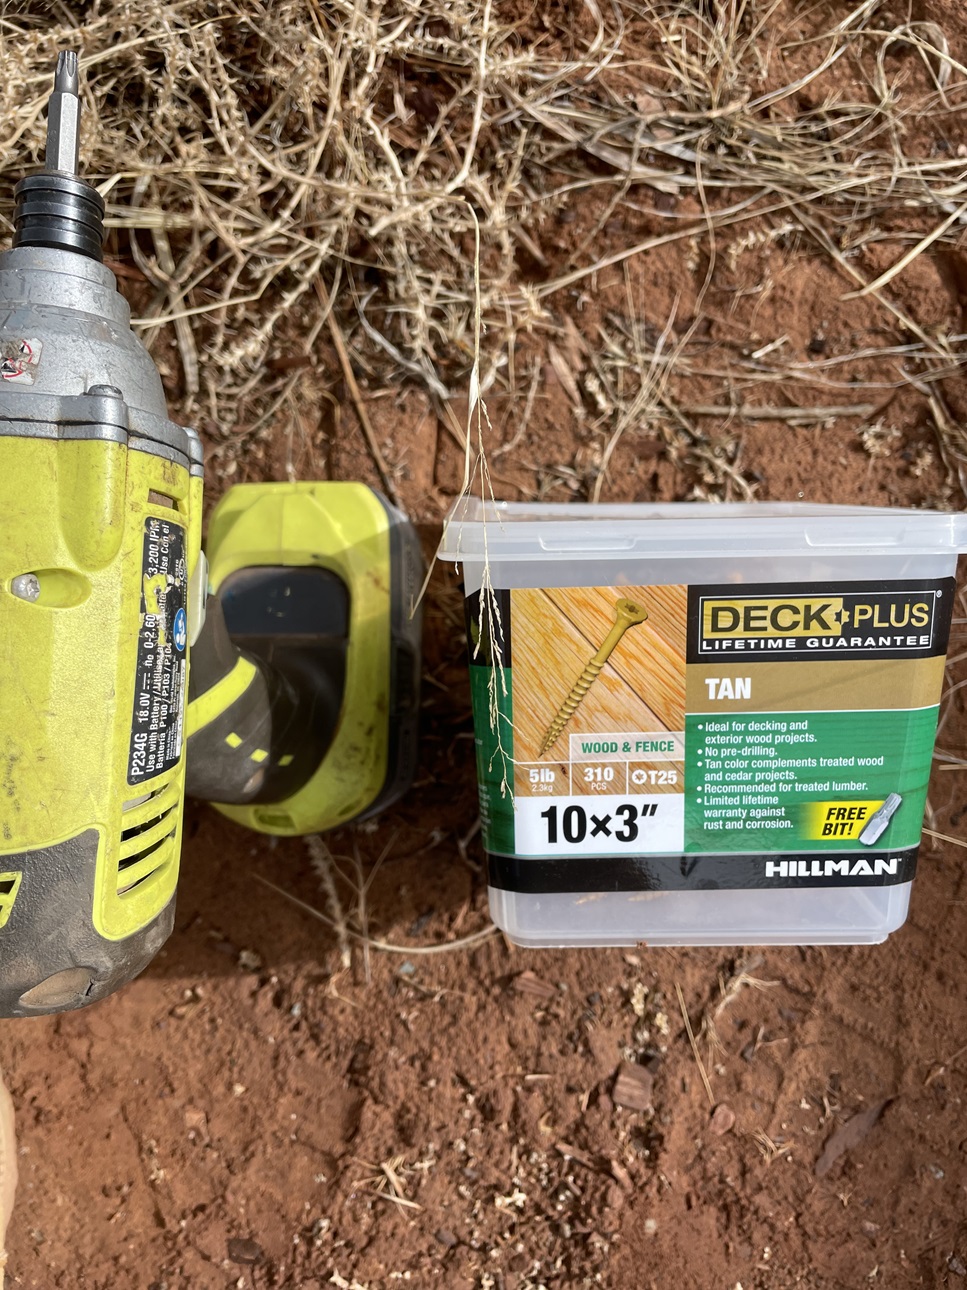
I used my Ryobi P234G impact driver. I also used deck screws. Why? because they are specifically made to be used outside, under stress, and hold firm. I used 3″ to make sure I had as much screw as possible to hold everything together.

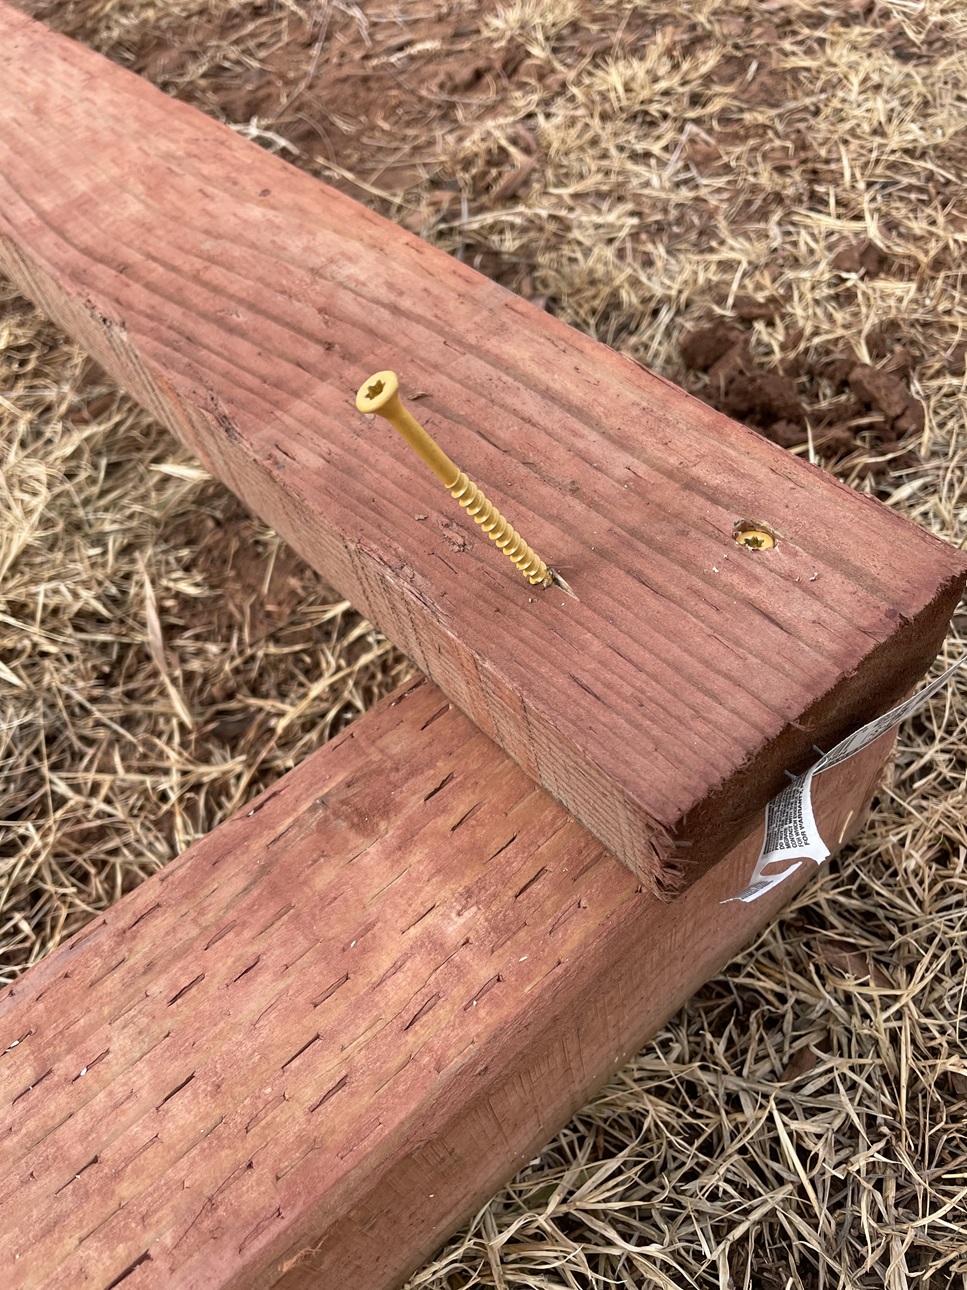
Tip: Drive your screws in at a slight angle. This will make them hold even better.

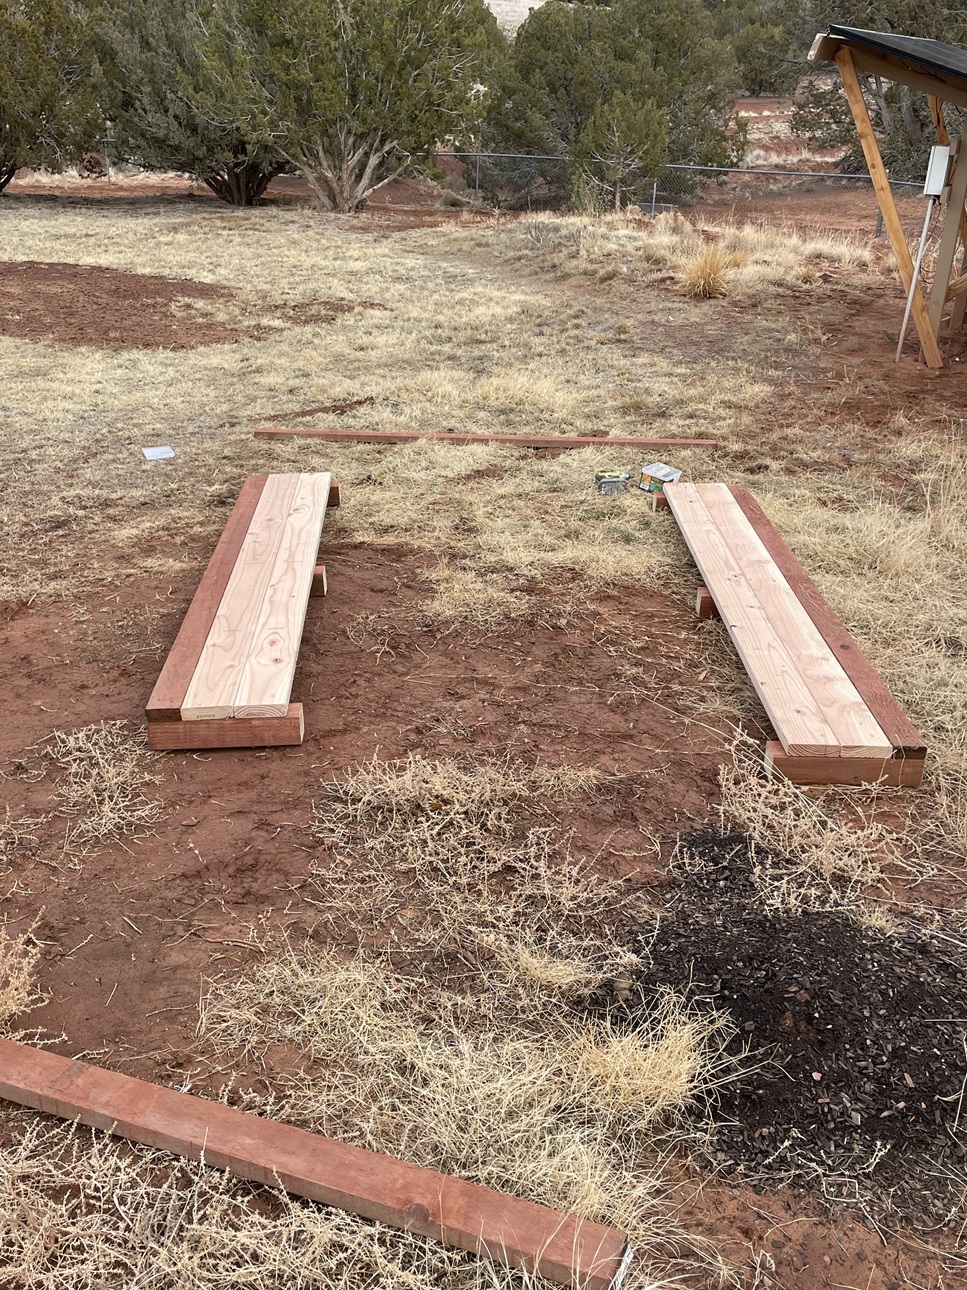
I built the long sides first, on the ground where it was easy.

Then I just connected the sides with a 2″ x 4″ board. Notice I left about 9″ of the 2″ x 4″ on the left side hanging over. I will use that to “strap” down the windward side of the greenhouse making it a bit more resistant to the wind.

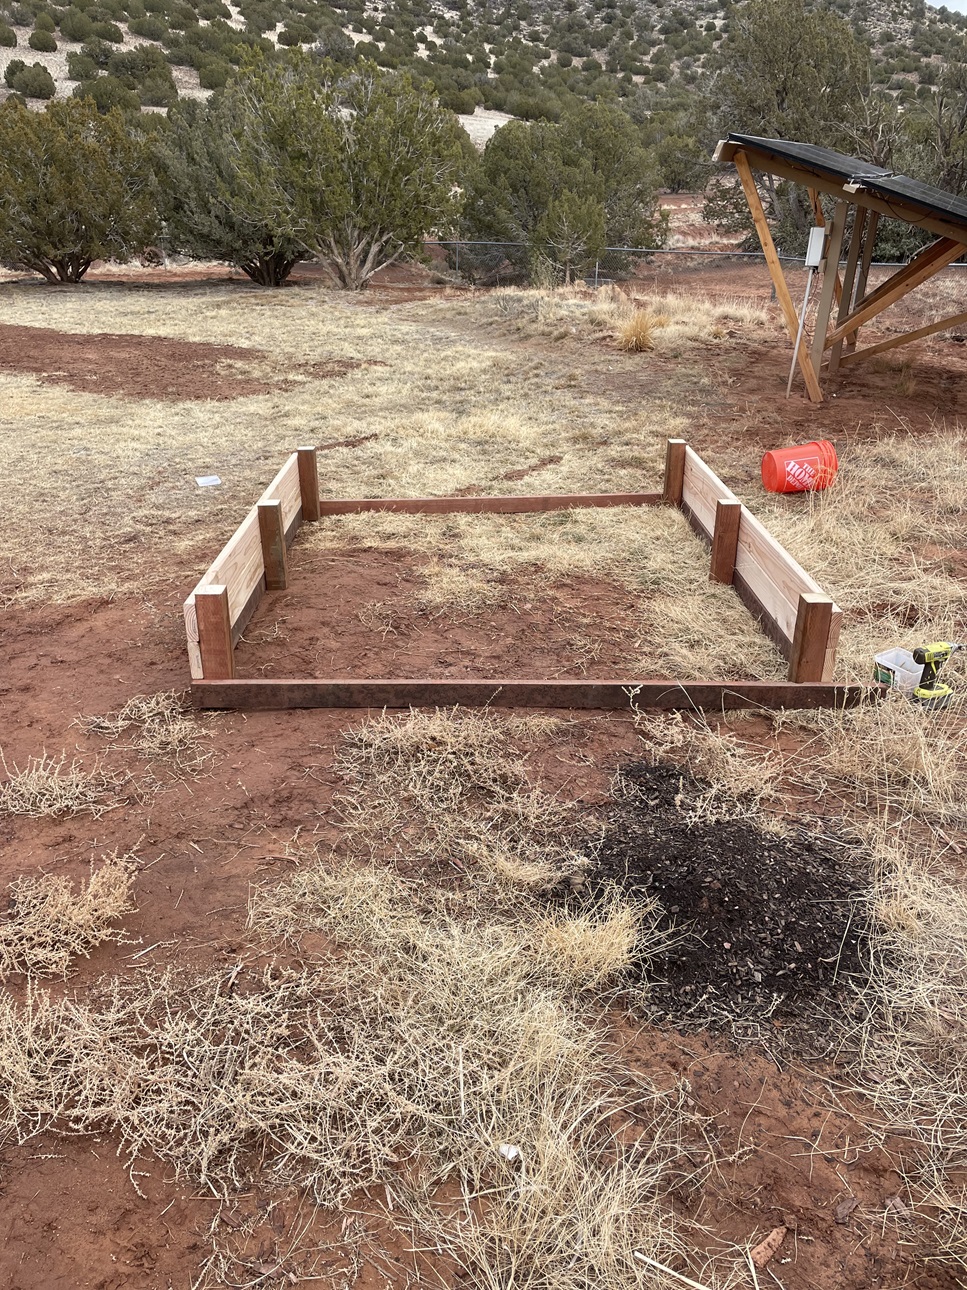
Then using 1″ x 3″ boards I added a lip to the outside of long sides. I wanted about 1″ of lip sticking above the side board material. If I were to do it again I would use 1″ x 4″ boards to make them a bit more secure.

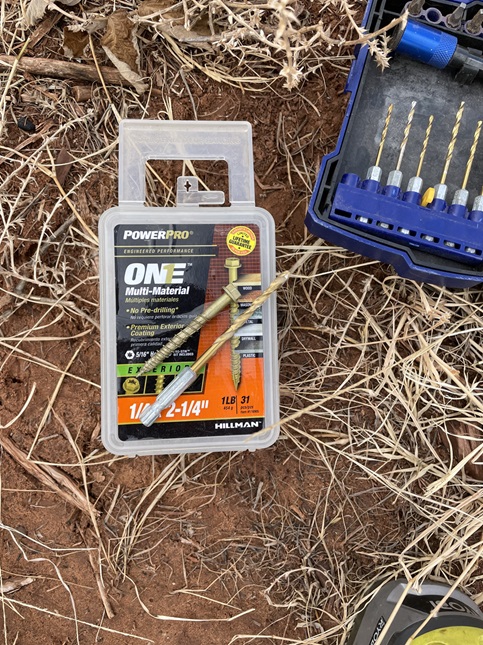
I used these “lag” style screws to hold the 1″ x 3″ boards in-place. I also pre-drilled the holes through the 1″ x 3″ boards to make sure I didn’t split them. I picked up this screw in the clearance area of Lowes…great deal!! And they are really strong!

Now you can see the purpose of the “lips”, they hold the cattle panels structurally in-place from squirting out. But I wanted them even more secure.

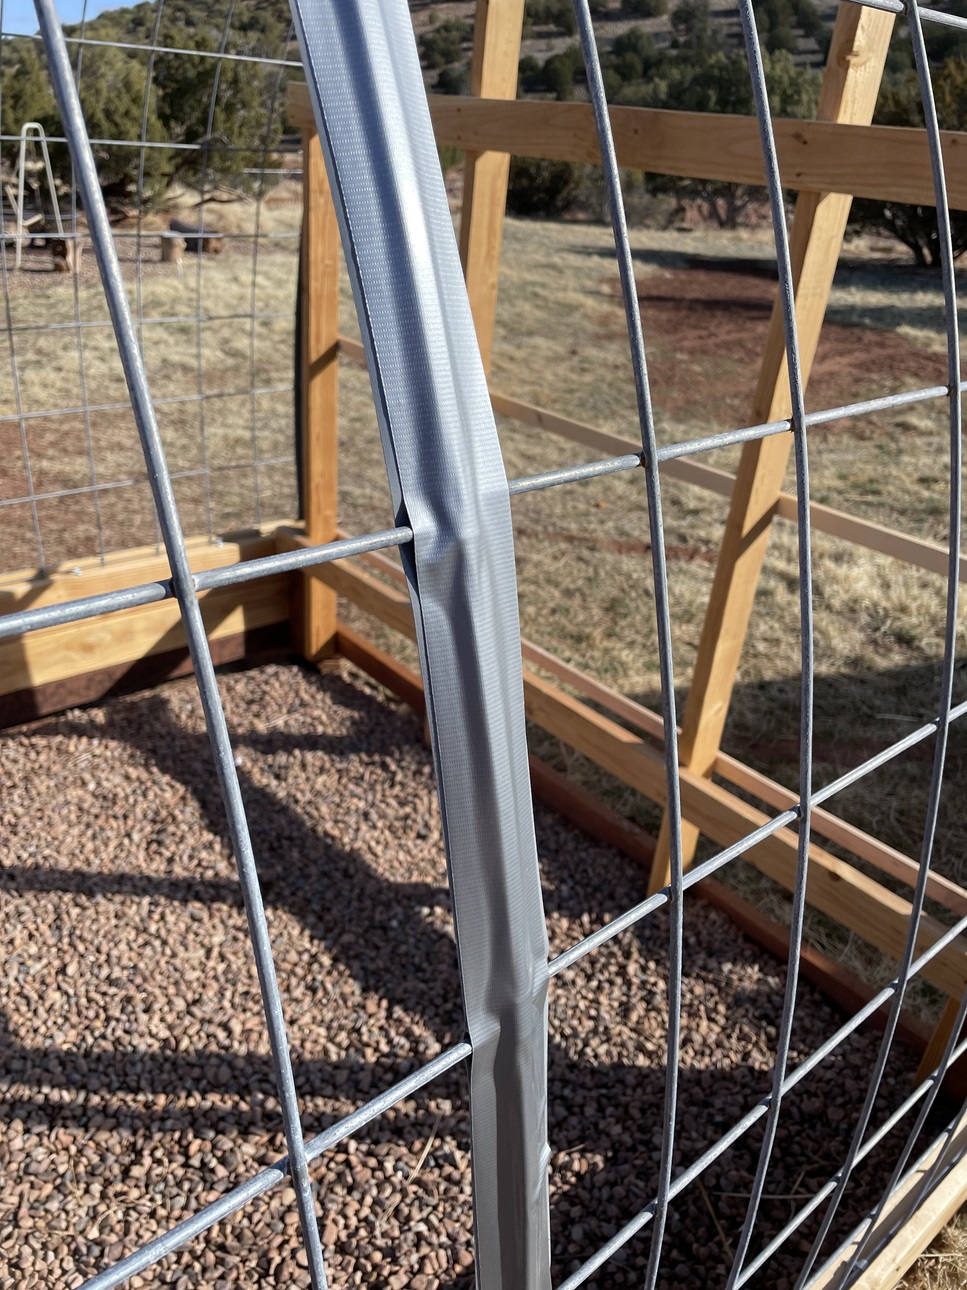
I hope you can see that I used 3/16-in Zinc-plated Steel One-hole Strap Conduit Fittings. That little silver thingy. There will a better picture in a minute.

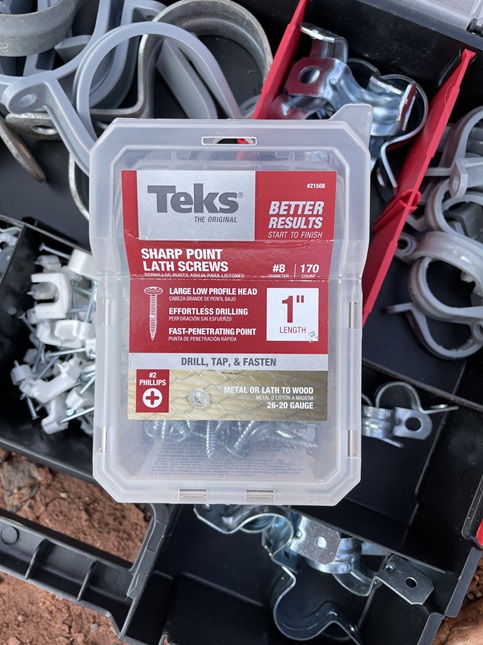
Here’s what I used to put them into place.

This is what it looked like with the panels in place. Notice I zip-tied the two panels together in the middle where they met up. I figured it would give them more strength connected like that.

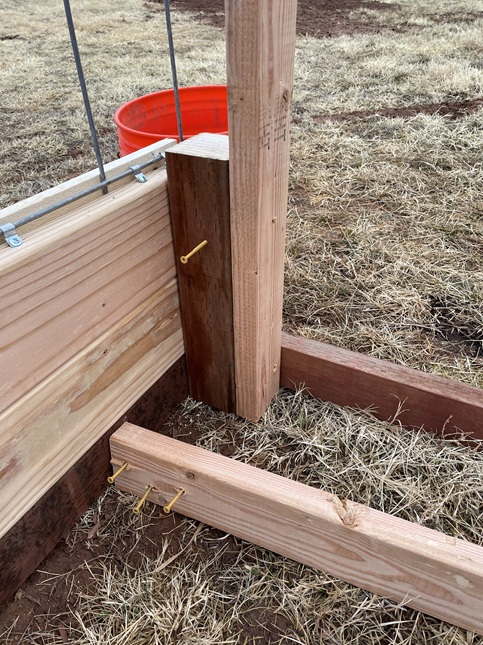
Next came the ends. Also note, this is a better picture of the one-hole straps to hold the panels in-place. Notice I started the screws with the board laying down before I put them into place. The reason for the screw in the 4″ x 4″ is to support the 2″ x 4″ in-place so I am not trying to hold it level and drive the screw in at the same time. The 2×4 just sits on it pretty as you please.

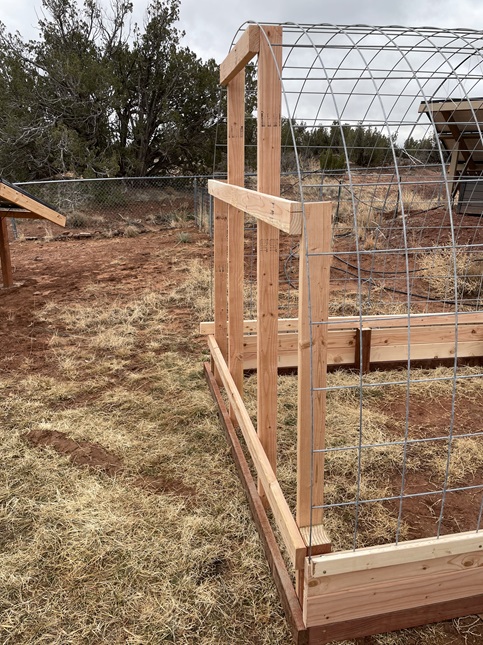
Building the ends was pretty much a guessing game. This is the end that will have a window for ventilation but it also had to be sturdy enough to hold up structurally. See how the cattle panel end sits on the wood structure? Later you will see where I put a 2″x4″ beam in on the top for added weight structure if it got snow on it and it didn’t melt fast enough or just fall off.

Here’s what it looks like with both ends done, the beam put in, and the foam pipe insulation on the cattle panel exposed ends. And I also put Gorilla Tape on the seam where the two panels connect. Before I put the on I trimmed the zip ties.The pipe insulation is for 1/2″ pipe and the self-sealing kind. Yes, you will have to do a little cutting out around some of the wood.

The door opening is for the screen door to fit on the outside of the frame. If you want it to fit like a normal jam it is up to you. Yes, I could have cut the cattle panel end off to line-up with the edge of the wood framing. But as I said, I wanted this to simple and minimal. Also note, I didn’t use any framing on the sides, just the ends. The cattle panels give it enough support…I assume.

Here is a close up of the pipe insulation installation.

Here is how I put the Gorilla Tape on.Yes, I wanted to protect the plastic. And yes, it also gives some added strength to the panel joint.

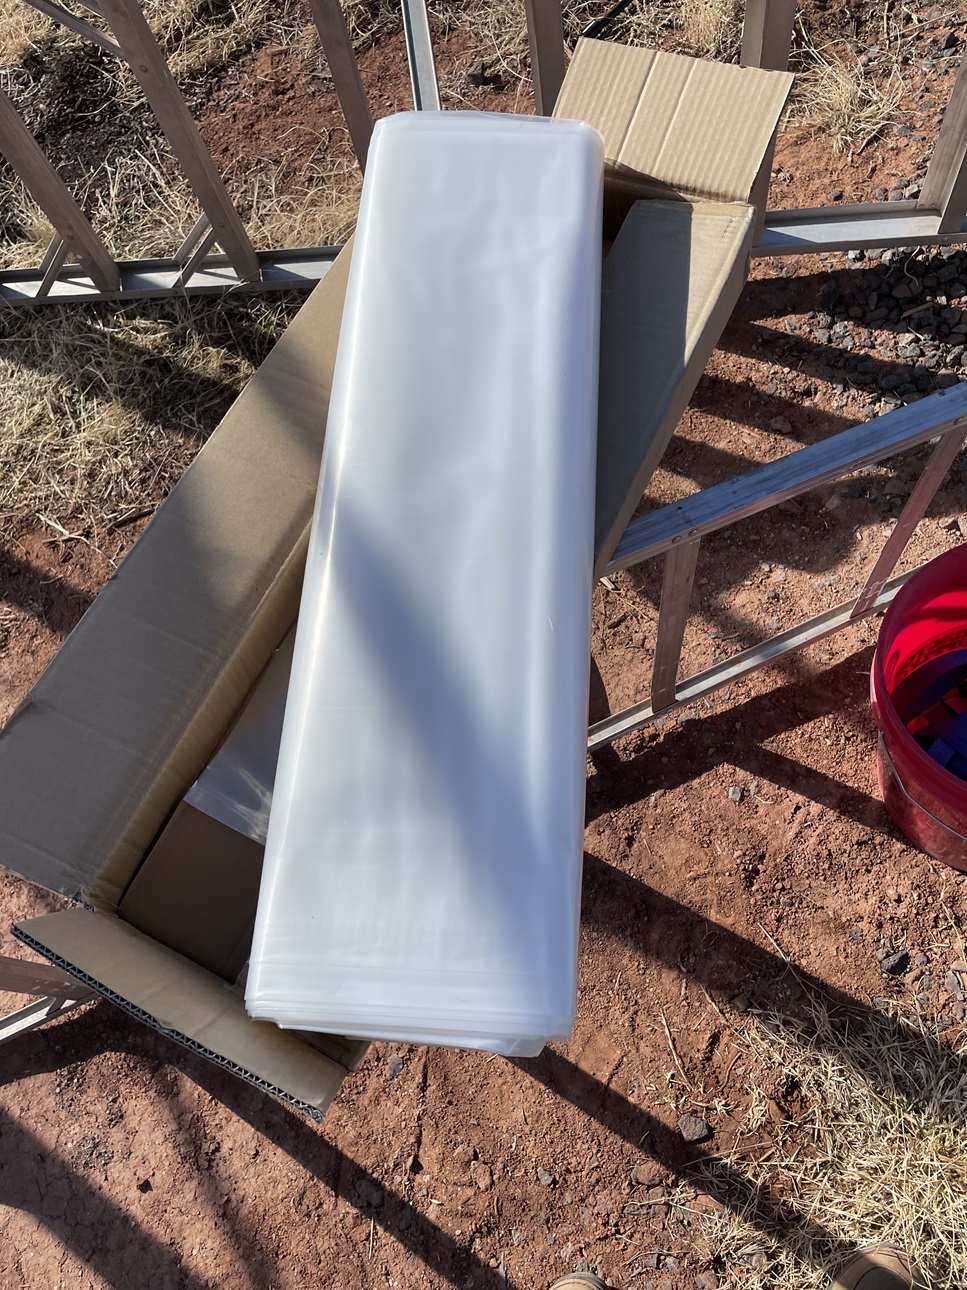
And now comes the plastic. But, I didn’t want to use just any old plastic. I looked online for greenhouse plastic, found it. UV resistant, 6mil, blah, blah, blah. I found a greenhouse supplier with the right product, cost about $80 with shipping for a 20’x28′ custom cut piece. Ouch! So I decided…what-the-heck…I looked on HomeDepot. Same thing for $58 and free shipping. But, it was on sale so I ended up paying $35. Lesson learned: shop around.

Why 20’x28′ for a 7.5′ x 8′ greenhouse? When you measure the length from ground to ground over the 16′ cattle panels it came to almost exactly 20′. Then you consider the length of the greenhouse is 8′ plus two 7′ ends that came to 22′. Then I wanted enough left over for any mistakes and to cover the screen door.

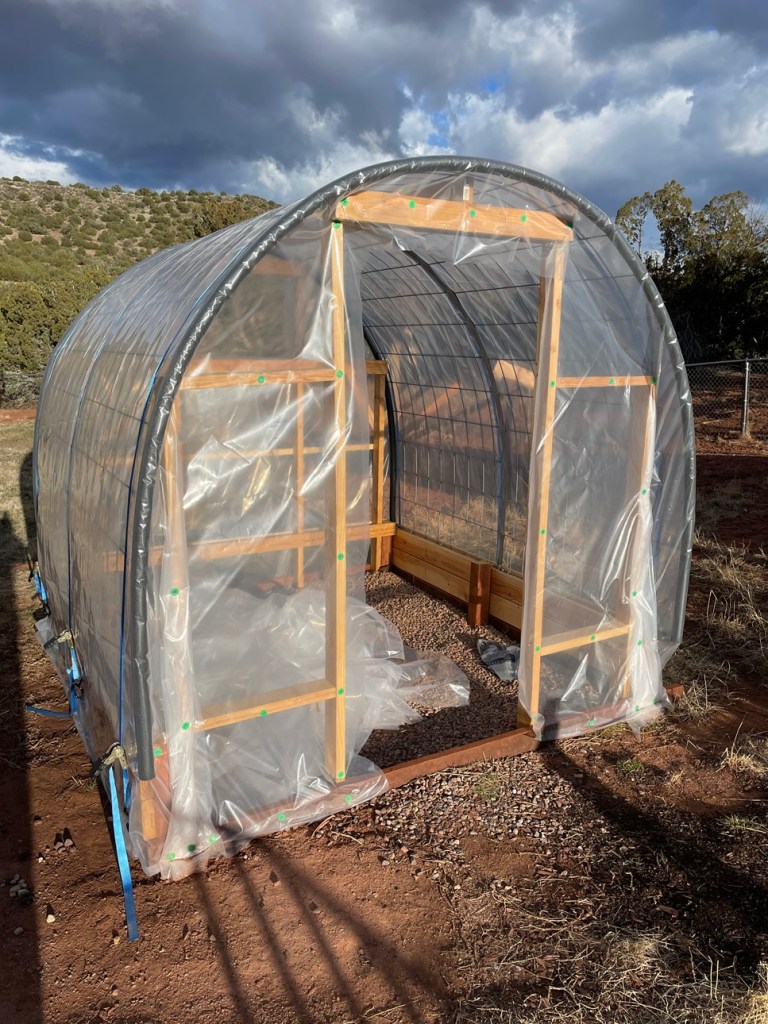
On a non-windy day I got the plastic into place quite easily.

Then I strapped it down with these 20′ long 1″ straps from Amazon. I will post a picture of them directly below.

If you < click here > you will be taken to Amazon in a new window. If you purchase the straps this way I will earn about about 54cents…and I will appreciate it. You can also < click here > as well.

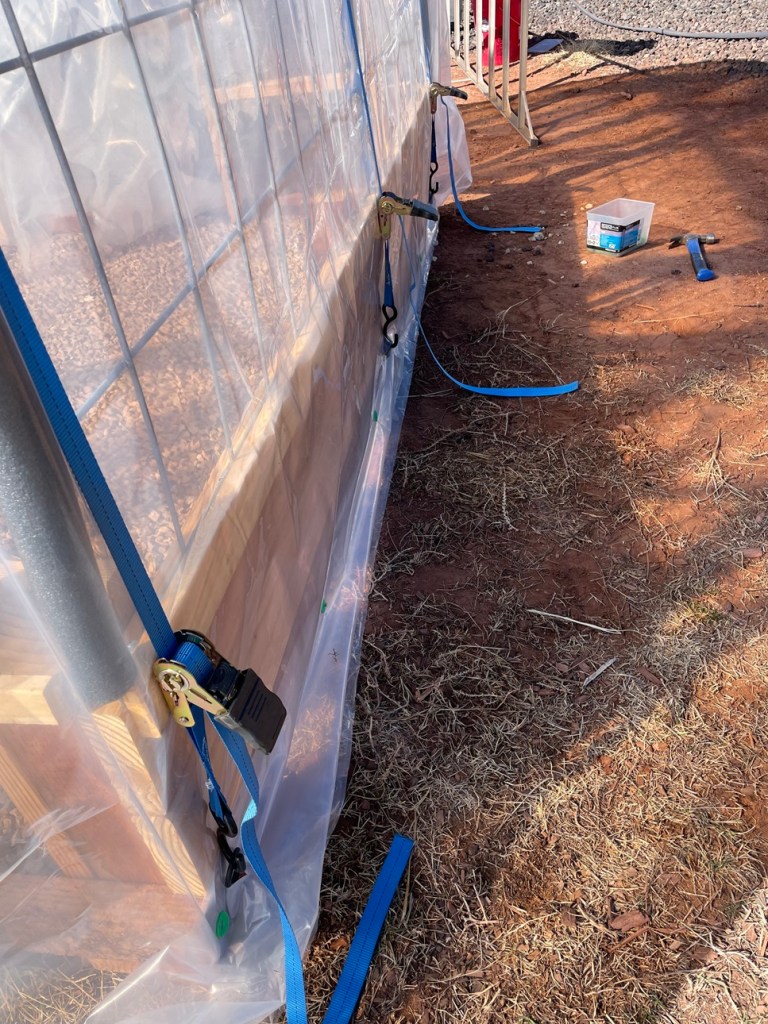
Notice how the strap ratchet is up against the wood and not just against the plastic? That is to help protect the plastic. Later I will put a couple layers of Gorilla Tape between the ratchet and the plastic to further protect it.

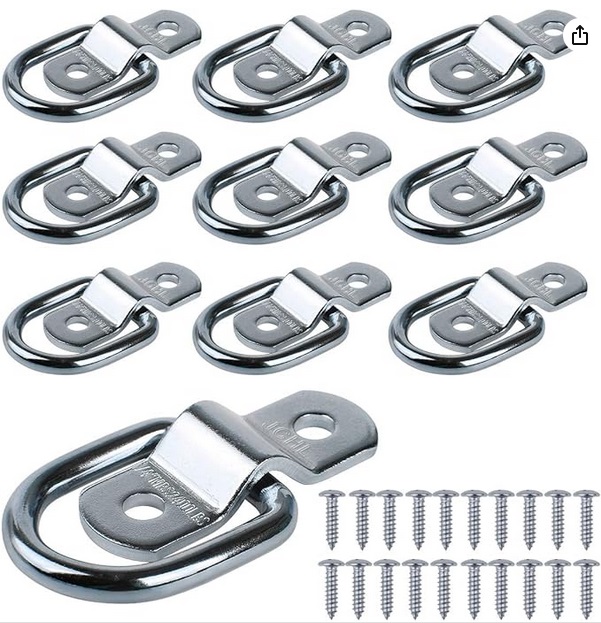
You can use these to connect the strap hooks to the wood. If you < click here > you will be taken to Amazon in a new window. If you purchase the tie downs this way I will earn about about 27cents…and I will appreciate it. You can also < click here > as well.

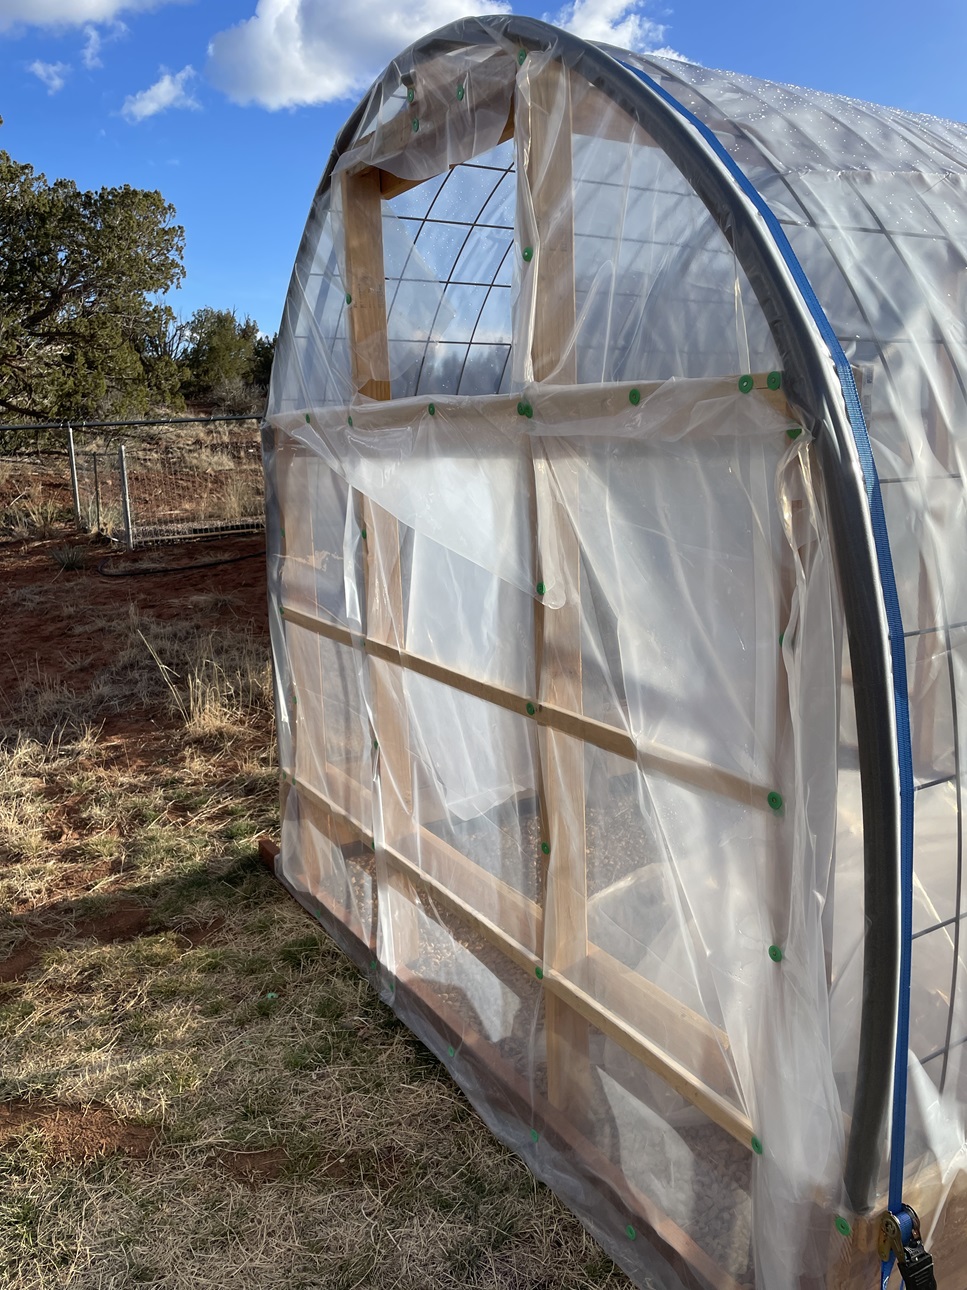
Here is where the fun starts…NOT! Figuring out how to fold the plastic into place is like wrapping a odd shaped Christmas present…good luck. You can see how I did it and it ain’t real pretty but it works.

You can see where I cut out the area inside where the window will go. But you can also see where I left enough plastic to wrap around the 2″x4″ window framing to help keep it in-place.

I did pull it snug, not tight. The pipe insulation gives you some cushion to play with. Also, notice I used roofing nails.

! DO NOT USE STAPLES !

If you use staples they will probably pull out over time…and will ripe your plastic as they do so. The roofing nails below will give you a much happier plastic.

And yes, you notice I used a couple of 1″x2″ furring strips horizontally to give the plastic more support. If you put the structural 2″x4″ on the outside vs the inside, then you won’t have to worry about the furring strips.

If you < click here > you will be taken to Amazon in a new window. If you purchase the roofing nails this way I will earn about about 8cents…and I will appreciate it. You can also < click here > as well.

Wrapping the plastic on the door end was much easier and more intuitive. Just wrap any way you want to as long as you are happy with it. I also cut out the area inside the door frame/jam area. If you don’t, then wind can build up pressure against it and potentially cause some damage.

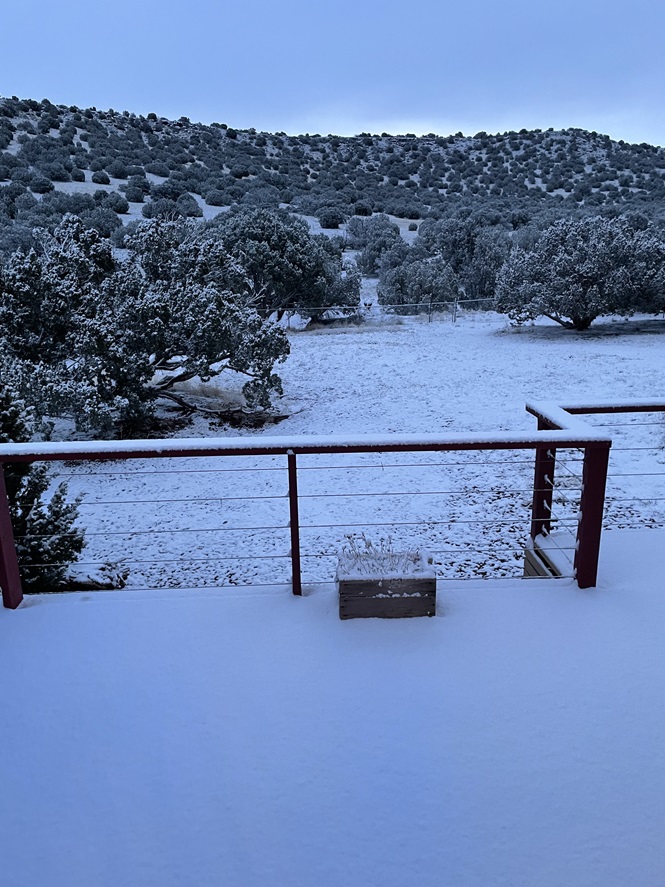
At this point I was done for the day and the forecast showed bad weather for the next week. So all work has stopped on it for now. I will pick it back up in Part #2 once I can get back after it.


 2009 - 2024 Copyright © AHTrimble.com ~ All rights reserved
No reproduction or other use of this content 
without expressed written permission from AHTrimble.com
No legal, economic, or financial advice is given, no expertise to be assumed.
See Content Use Policy for more information.

I need your feedback on my 2024 garden proposal

I have done a tremendous amount of work getting my garden ready for 2024. I’ve built boxes, hauled in compost, bought pearlite, laid down landscape cloth, hauled in 4 tons of rock, put in a water line, put up fencing…okay, you get the idea…I’ve done lots of work to get ready.

I’ve also decided to do with the square foot garden methodology, makes sense for our situation. I know the bed soil I’ve made is really terrific, it grew veggies last year that were amazing!

So now I am ready to plant. Well, actually I’ve already started planting some of the spring veggies. I had a long conversation with my wife about what we really enjoy eating. Based on that I’ve developed a plan for the garden this year. I want to run it past you folks and get your ideas, thoughts, suggestions, and any warnings as well.

So here are my two gardens as of now.

This south garden gets exposed to full sun all day, and lots of windy days in the spring. I have plenty of irrigation on timers, watering is not a problem.

Here is my south garden plant plan…

This north garden gets limited sun, but little wind. Bed #10 gets the most direct sun, maybe 2 – 4 hours per day, late morning. Bed #9 gets almost no sun. Bed #8 gets 2 – 3 hours per day, late afternoon.  I have plenty of irrigation on timers, watering is not a problem.

Here is my north garden plant plan…

o there you go

So there you go! Now it’s your turn, I want to hear from you…you can post a “comment” below or send me your thoughts via the form.


Let me here from you…

Go back

Your message has been sent


Warning

Warning

Warning

Warning.


 2009 - 2024 Copyright © AHTrimble.com ~ All rights reserved
No reproduction or other use of this content
without expressed written permission from AHTrimble.com
No legal, economic, or financial advice is given, no expertise to be assumed.
See Content Use Policy for more information.</pre

Garden: New Set-up

Before I get into the details of our garden set-up it is important to know what we are trying to accomplish. As you well-know, everything we build, buy, or develop has a specific mission. We define that mission so we know what success will look like.

For us we are not trying to be 100% self-sufficient with food production…not even close. We aren’t even trying to be big-time canning folks, although we do some canning. We also freeze some of our homegrown food. But, we also give away a bunch as well to those who can’t garden…for whatever reason. So our ‘mission’ for our garden is this…


To grow fresh food to enjoy throughout the gardening season, provide for others who are in need, and produce some extra to preserve.

Now, there is one minor catch to all of that…we do want to be prepared to produce large quantities of food if needed. Yeah, I mean ‘large’ quantities. How large? Large enough to provide most, if not all of our food, and more to share/trade with others. But, it goes further than that.

We have a…let’s call it a substantial food storage…and it is well-rounded; meaning, not just rice, beans, and wheat. In a grid-down situation anyone’s food storage will eventually run out. And, along the way you may get tired of just rice, beans, and wheat…food fatigue. That’s where a garden kicks in to add to food storage, extending it…and maybe being able to replace it…if done right. < click here to read about food fatigue >

So our mission priority list looks something like this:

  1. Enjoy fresh food on our own table.
  2. Providing fresh food to others who are in need.
  3. Grow enough food to preserve it for use outside of the growing season.
  4. Gain capacity to grow most/all of our own food in an extreme situation.

We also have a #1 Rule thanks to my wife…we only grow what we like to eat. We love tomatoes, cucumbers, lettuce, spinach, more tomatoes, onions, Anastasia beans, various peppers, garlic, more tomatoes, carrots, micro-greens, green beans, beets, squash, and tomatoes. And add to all of that…strawberries, raspberries, and blackberries. We also do some herbs.

Due to space restrictions we don’t grow corn, potatoes, or any grains.

A little more background…

Our soil here is sandy with an underlying clay…and then sandstone a couple of feet down. The soil is void of organic matter and gets rock hard by early summer due to lack of rain. As for rain…we get no more than 13” of rain per year…tops. A lot of it hits during the monsoon season…yeah, kinda of an oxymoron. So we have to amend the soil and water…a lot. Why water and what a lot? Because it is normal for us to have 0% humidity along with breezes – winds.

Our first several years here we tried different gardening methods for in-ground…they all failed. Two years ago I tried container gardening with a ‘built’ soil…success! Last year I went with raised beds with really good built soil…amazing!! So everything we do now is raised bed gardening with the exception of the raspberries and blackberries; more on them later.

If you want to read about how I ‘build’ our soil and raised beds < click here >

We also have two different garden locations due to the intense sun here. The main garden is on the south side of the house. The secondary garden in on the north side of the house, shaded most of the day, and shaded almost all of the most intense sun times of the day.

So here is the main garden layout area south of the house (you can click on the pictures for the full view)…

click to enlarge

Here is the north side garden layout (you can click on the pictures for the full view)…

click to enlarge

You might notice that each garden area is fenced. Yeah, see we have a dog that thinks the organic fertilizer that I use is an appetizer. And she also thinks that the compost I use in the soil is the main course. I wrote about that before < click here to read about that >

Between the raised beds I put down landscape cloth and then rock material to keep down the grass/weeds. Why? Well, first off…the water from irrigation made the weeds and grass between the raised beds grow like crazy last year. And… last year we found a prairie rattlesnake hiding in the tall grass and weeds between two of the raised beds. Well, more specifically…my wife found it. She wouldn’t go into the garden area again until I did the weed-eater down to bare earth. < click here to read about that >

Couple added bits of information…

  1. I am planning to build a small greenhouse in February. We need the added time sprouting our plants due to freeze as late as June 1st and frost as early as mid-September. We also want to start our own plants to save the money from no longer buying plants from the store. Yup, I will do an article on that “cattle panel” greenhouse build. I might try doing a video on it.
  2. We are going to go vertical also. We are going to try our cucumbers trellised. Yup, an article on that as well, if I build the trellis.
  3. Here is the ‘big’ part…I am working on a 40’ x 60’ area of our yard as a 3rd garden area should the need arise. It is a fairly flat area close to the house, inside of the chain-link fence house area, and close enough to a water supply. For two years I have grown a cover crop of grass. I also amended the soil with some compost. This year I am disc’ing up that part of the yard and putting down a pretty good layer of compost, working it in, and then planting grass again. When the time comes and the need is there, I can disc up that area and plant more crops…probably corn, potatoes, squash, and beans.
  4. Our property is fairly large. I have a field, currently unused with grass growing, that is level enough. That field is about 6 – 7 acres total. I could disc it up, working in the grass for organic matter, and plant grains. It would be tough to water, but it could be done.

If you have any thoughts, ideas, suggestions, or questions…send me a note via the form below.


Related Articles –

Contact me with your questions or send private messages…

Go back

Your message has been sent


Warning

Warning

Warning

Warning.


 2009 - 2024 Copyright © AHTrimble.com ~ All rights reserved
No reproduction or other use of this content 
without expressed written permission from AHTrimble.com
No legal, economic, or financial advice is given, no expertise to be assumed.
See Content Use Policy for more information.

Lessons Learned – Garden 2023

  1. Soil is Everything!

I put together some nice raised bed planter boxes…good call on my part. But, what really made the difference was the super high quality soil I made up for those boxes. Plenty of compost, mostly compost actually. And mostly organic fertilizer to help amend the soil even more.

  1. Gotta go Vertical

When you limit yourself on space, as I did with the raised bed planter boxes, you still gotta have space for those plants. I learned that next year I will trellis cucumbers, pole green beans, snap/snow peas, and maybe my small sweet watermelons.

Added benefit…I can grow less sun tolerant veggies under the trellis framework. I will be using the 16’ cattle panels for the trellis work.

And I am going to try tomatoes on cattle panels as well. The tomato cages don’t work for me. I tired wood frames and string this year…fail! So I will try the cattle panel method next year and see how that goes.

  1. Quality not Quantity

I did plenty of planting this year…wanted to see what and how plants would grow with the new system. Yeah…planted too much for sure. Next year I am adopting the “square foot” system and going for just what we eat on a daily basis.

Yup…that means one, ONE, a single zucchini plant!!!

  1. Squash can take over Everything!

So my wife loves squash…butternut, straight neck, etc. So I made sure I planted plenty of it…WRONG! That stuff took off and I can’t the pick-up truck now. On a sad note it took out some of my new raspberry bushes…just choked em out.

Next year the squash gets planted on the outside of two sides of the garden and it will be ‘trained’ to go for the outside chain link fence for some vertical space.

  1. Water Timers

I put it a pretty decent drip and soaker irrigation system. Had to run the soakers during the daylight hours to keep up with the plants and evaporation. This coming year I will have about twice the raised bed boxes and the watering will need to be rotated to ensure the right amount of water getting tot he plants. Timers will be a must to ensure that everything is getting watered regardless of my attention or not.\

I am also planning on ‘grouping’ my boxes so that plants that needed similar watering can be grouped together on the same timer.

  1. Fence

I mentioned in a previous year’s article that one of my dogs thinks organic fertilizer pellets are nothing more than appetizers. So I put up a flimsy wire fence to keep her out of the garden area. Oooooopppppppsssssss…she is smarter than me…she learned she can just push her nose into it and it separates. She then has access to all of the little nuggets goodies she thinks I left just for her to gobble up.

  1. Ground cover between boxes.

I guess I should call this something more appropriate…”Weed/Grass Control”.

You can guess by the title that I will be putting down landscape cloth between the boxes to suppress all of the weeds and grass that invariably will do as well, or better, than the plants in the planters. Downside…I could’ve sold it for hay.


Related Articles –


 2009 - 2023 Copyright © AHTrimble.com ~ All rights reserved
No reproduction or other use of this content 
without expressed written permission from AHTrimble.com
See Content Use Policy for more information.

Plan B, Plan C, and Strawberries…

So let’s do this in reverse order…strawberries first. But stick around for the Plan B & Plan C part…or jump directly to it.

You know there is always method to my madness 🙂

Strawberries –

Last spring (2022) I put in an amazing small strawberry patch, 8 plants total. Did a great job of prepping the containers, getting compost for a local source, and setting in the plants correctly with love and care. They all died.

Yup, the compost was too ‘hot’…meaning the compost hadn’t sat long enough and was extremely high in nitrogen. Yeah, the new plants ‘burned up’ and died…basically chemical burning from the nitrogen.

So for 2 weeks I flushed the boxes with lots of water and got the nitrogen out, planted 6 plants, and they flourished like crazy. I wasn’t looking for berry production, I just wanted to get strong healthy plants to produce lots of runners to create a large patch. And it worked well. I think the final count by the end of fall was 52 great looking plants ready to hibernate for the winter after I mulched them in.

Then spring hit and I was patient and didn’t ‘unmulch’ them too early which resulted in a great looking strawberry patch with 50+ plants ready to give us plenty of big, juicy, sweet berries. That amount of plants would produce about 25 – 40 pints of berries if all went well. ‘If’ being the operative word…and it didn’t.

I am switching my gardening style over to water-soluble fertilizers…mostly fish emulsion based, but others as well. So, early in the spring it was time to give my plants a good start with fertilizer to bring em up right…a nice dose of fertilizer. Each plants already had a nice bunch of berries started and it looked to be a bumper crop. And that was fine with me because I love strawberries!

I won’t go into all the details but it was a heavily weighted nitrogen fertilizer and I put too much mixture on each plant. Within 10 days all of the berries that had been on the plants were dead or completely gone. Well, with the exception of the 5 berries that I picked, each the size of a marble.

So what happened? Uh, strawberry plants don’t like a bunch of nitrogen…at all…especially in the spring with fruit on the plant. So I had to do some research on the best way to fertilize strawberry plants. Yeah, I know what you are thinking…you’re right.

Generally speaking, I will be using a 10-10-10 water-soluble fertilizer…and apply it after the plants have produced its fruit but well before fall sets it, probably about late August. This will give me strong healthy plants, plenty of runners if I need them, and the plants will be ready for the next year. If the plant flowering looks too thin and spotty I will add bonemeal as needed to the soil and water it in generously.

But what does that have to do with Plans B & C?????? Ahhhhhh yes. Remember I was expecting 25 – 40 pints of berries earlier this spring. Yeah, well, didn’t work out so well did it? But what does that actually mean?

25 – 40 pints of strawberries means 3000 – 4700 calories, 180 – 285 grams of dietary fiber, and most importantly…5300 – 8400mg of vitamin C. OK, the absolute heaven of eating them as well…meaning to help stave off food fatigue. So how would you replace that in a grid-down prepper scenario?

Plan B & C, etc. –

Late last August we had a hail storm hit us…destroying our garden completely. And I just shared how I screwed up the strawberry patch this year. Fortunately for us we are not in a grid-down prepper situation or in dire need to eat from our garden last year, or depend on our strawberries this year. But what if it had been different…and we were dependent on both?

My point, we would have been fine. We have sufficient and appropriate food storage to handle a worst case scenario. We would not have starved and we have enough supplies to replant a garden.

So it looks something like this:

  • Plan A – Buy our food at the store just like normal.
  • Plan B – Supplement store-bought food with garden produce.
  • Plan C (hard times) – Plant larger garden and reduce store-bought food. Barter food with neighbors as needed and appropriate.
  • Plan D (hard times, limited store available food) – Plant much larger garden, supplement with food storage, utilize green house for additional food production. Barter food with neighbors as needed and appropriate.
  • Plan E (very hard times, no store available food) – Plant seriously larger garden, supplement with food storage, utilize second green house for additional food production. Barter food with neighbors as needed and appropriate.

Will my plans work? I have no idea with complete certainty. I do know that without a plan I will fail. But my plans do give me a framework to build on. Starting with Plan B I have to acquire gardening skills and supplies. With Plan C I have to have considerably more garden supplies plus multiple years worth of seed bank. Plans D & E require that I have either built, or have the supplies to build, two greenhouses. That gives me a clear path on what to buy, when, and either store the supplies or produce with them.

Something to think about…for a family of four, to have a large enough garden to feed yourselves you are realistically looking at about 2 acres of well planned, good quality land. Put in your head about 1-1/2 football fields of garden. Yup, that is about what you are looking at on average. Yes, you can go vertical, do ‘square foot gardens’, greenhouse gardening, etc.

My point is this…have you done enough planning to put in over a football field of garden? If not, how long will your food storage last your family? And no, I didn’t ask if you had already put in a huge garden, I asked if you’ve done enough planning to do so.

When it comes to long-term food storage the general rule of thumb is one case (6 cans) of #10 cans of food is enough food for one person for one month. How many cases of food do you have? A family of four would need 48 cases of #10 cans of food stored…properly stored. How many cases of food do you have? Are they all stored in one place such as your house? What happens if your house is flooded, burns down, or is vandalized?

Plan B & C: Generally Speaking –

prepper ics planing section long-term and special projects planning branch responsibilitiesThe point to this article is get you thinking about back-up plans. And back-ups to your back-ups…with every aspect of prepping.

Consider self-defense tools (i.e. guns & Ammo). First, do you have some? Second, are they all stored in the same place? What is your plan if your guns are confiscated or stolen? What happens if they have a part that breaks?

Is all your ammo in one place? What if it is destroyed, stolen, or confiscated? Can you reload your spent brass?

What I am asking you to do is simple…review your plans. What is your Plan A? Do you have a Plan B…if so, what is it? Do you have a Plan C…if so, what is it? Does you family know what your plans are and how to execute them?Basic emergency preparedness for emergencies, disasters and grid-down. Plan Planning

And this review process applies to ALL aspects of prepping!

If you need a guide to help you through this review the 7 Common Risks & Threats to help get you organized in this effort. Another helpful guide would be to review the ‘layering’ aspect of prepping in regards to the 7 Common Risks & Threats – Layering.

Summary –

In April of this year I wrote that I believe that it all falls apart by the end of 2024…ALL of it! < click here to read the article > No, that is not a 100% certain revelatory fact. It is what I see coming based on the cumulative of current events as of April 2023…and as of today as well.

I am thinking it would be a pretty good idea with you and I were ready for that ‘fall’ of America. That way we can protect our families and communities/congregations as best we can. And it could be very, very ugly in this country by then. Then again, it might be all roses and butterflies with pink unicorns for all. But at least you would be ready if it is not that fantasy land and no one gets a unicorn.

Do you have to be perfect in your planning and prepping? That goal is impossible, let alone remotely realistic. But you can do your best and together we can do this!

PLan for bugging out and bugging in. failure to plan will bring failure and that means death or injury to you and your family.


Related Articles –


 2009 - 2022 Copyright © AHTrimble.com ~ All rights reserved
No reproduction or other use of this content 
without expressed written permission from AHTrimble.com
See Content Use Policy for more information.

Time to be thinking spring…garden, orchard, & berry patch!

Yup, yesterday morning got me thinking about spring…garden, orchard, berry patch…YEA!

I’ve been putting it off because of weather, mud mostly, but yesterday was one of my most favorite times of spring (ok, late winter)…pruning my fruit trees.

I spent a couple of hours hacking away at my apple, peach, cherry trees like a man in love. Okay, that sounds a bit oxymoronish I know. But I am pretty harsh when it comes to pruning. Now remember, several of my trees are only coming into their third year, the other 4 are only starting their 2nd year. The single most important goal for new trees…setting really, really good root system. The #2 goal is as strong a trunk as you can get.

#3 is great shape…meaning strong branches, well-formed and correctly placed. To get the branches and shape right…I am pretty brutal when it comes to pruning…at least when the trees are young. I think the main idea…keep the center of the tree as open as possible to allow plenty of light in to ripen the fruit. And of course you want to ensure strong branches to begin with…and that means directing as much of the tree’s energy to producing those strong branches.

So the late winter, dormant, pruning is done. Now, I have to find the right location and dig 4 more large holes (3’x’3) for the 4 dormant apple trees my neighbor gave be last year. They have been sitting in a planter pot just waiting for me to not be lazy and get them in the ground. Maybe Saturday…we’ll see.

But the most fun yesterday…planting 30 dormant raspberry bare-root starts. One of my buddies, and a good neighbor, has a huge raspberry and blackberry patch. He offered some of his canes that had grown outside of his patch…duh, of course I took him up on the offer. We dug up 30 really good looking canes, some of which already had the new starts hiding in the ground several inches below the surface.

He also turned me on to a new product called Agri-Gel. It’s a formulation that absorbs and holds water to roots. The swollen crystals adhere to plant roots, reducing transplant shock. Safe, nontoxic, easy to use. Useful for garden seedlings as well as woody plants. Highly recommended for brambles and conifers. Let’s see if I can tell a difference.

I already had my holes dug, had filled them several times with water to get the surrounding area saturated with water. Remember, I live in a dry part of the country, starting out with moist soil is a must. I didn’t use the native sandy soil. I did a mix of my local compost plus Grow King composted steer manure. No added fertilizer at all in the hole to start out. Brambles should not be planted with fertilizer, wait till they are well established before fertilizing.

I saturated the holes really well with water after planting. I will do a light & loose layer of weed-free straw as a mulch today. I will also cut back the canes to 6” – 12” above the surface. Remember, it is not the old canes that will produce the fruit…it will be the new shoots that come up that will produce the fruit.

I checked on my strawberry patch when I was done. Some of the protective winter straw mulch has gotten a little thin but is still protecting my plants. I am not quite ready to uncover them yet, some cold weather still ahead. But they are close, within a month I am pretty sure. I will look for the new growth on the plants, then they get uncovered…should the weather look promising.

I am behind the curve on building my new above ground containers for the garden this year. I am just running out of time each week. I have already scrapped the cattle panel green house due to lack of time. But, I won’t ignore the planting boxes…and you know why…we must grow food this year!

So how are your garden, orchard, and patch projects coming along?


 2009 - 2023 Copyright © AHTrimble.com ~ All rights reserved
No reproduction or other use of this content 
without expressed written permission from AHTrimble.com
See Content Use Policy for more information.

Garden: Winterized Strawberries

My strawberry venture has been an interesting one this year to be sure. First, I started out and killed the initial 8 strawberry plants…$32 down the drain! But I learned not to trust others when it came to my food. Or rather, I learned to trust my own judgement and to do things right no matter what. In case you don’t remember…the compost I used initially was still really chemically hot with nitrogen. It burned the roots of all my new plants.

After having watered the boxes several times a day for multiple days I bought 6 new plants and went at it again. Success!!

Then expanded the patch with “daughter” plants and more boxes, then expanded it again with the mega box. But finally, it was time to put the plants to bed for the winter. I do this to prevent damage to the plants themselves during the cold and freezing months of winter. Fortunately we don’t have severe winter weather here so I can let the plants go till late November and still get growth out of them.

Granted, this is the first year doing so here on the glamstead so we will have to wait till spring to see how it worked out. But, it should work out fine since I did my research for this particular area…including speaking with experienced gardeners. And if you want to ensure success for your patch in your area…check with the locals as well…you will be very glad you did.

First thing I do is clear out any dry, brown, or diseased looking leaves and stems. I smooth out the mulch and then water the plants/boxes thoroughly.

Next comes at least 3″ of straw on and around the plants.

And yet another reason to not fill the box up to the top with dirt…leave room for things like mulch and winter straw. Now, nothing left to do till spring 🙂

Oh, final tally on the patch…6 plants have turned into 42 plants. The mega box has plenty of room to expand the existing 12 plants with 12 more “daughter” plants at the end of next growing season. Giving me a total of 54 plants from 6 starter plants. Not bad math if you ask me.

Yup, I will keep you posted on how things go in the spring.

And yes, I will still be doing more gardening work during the winter. I am getting ready to plant 15 raspberry plants/canes in January. A neighbor/friend of ours offered for us to dig up some of his seasonal runners. Sweet! I will post and article on that “bare root” planting project as well.

And yes, you should be thinking about raspberry and blackberry planting for this winter as well. I am telling you flat out…get your food production capability to a point where it will at least be a reasonable supplement to your family’s overall food consumption. You will be healthier, you will save money, and you will be preparing your skill-set for when you might well need gardening to keep your families bellies full and alive.

And along with way…you will feel a true sense of peace and calm that comes with tending a garden and watching yourself take part in life…real life.


Related Articles –


 2009 - 2022 Copyright © AHTrimble.com ~ All rights reserved
No reproduction or other use of this content 
without expressed written permission from AHTrimble.com
See Content Use Policy for more information.