
 In addition to Pepsi I am a addicted to strawberries…yup, I love em! You will always find an open can of freeze dried strawberries in the cabinet for use on my Special K. This past spring I did a strawberry planting in containers. I was going to write an article about the experience but simply kept putting it off. Now, months later, I am once again out in the patch working on my strawberries. And I definitely wanted to write about yesterday’s experience. But, to understand yesterday, you gotta understand last spring.
However, I can’t find a single picture of my spring strawberry planting at this time. So on with the work I did yesterday…
I ended up with two containers of strawberry plants, 4 plants in one, 2 in the other. Here is a picture of the container with 4 plants…
 Note: When I planted the original strawberry plants in the spring I made sure to not let the plants bear fruit. I pinched off blossoms as soon as I saw them, I wanted strong roots, healthy plants, and lots of runners…not fruit. However, 3 berries did ripen and they were delicious. My goal was not to eat fresh strawberries the first year…I wanted to seriously increase the size of the patch. And that would give me WAY more berries to eat next year, and the year after, and the year after…
Last month I had taken 10 of the small plant containers that I had used this spring for new garden vegetables purchased at Lowes. I had filled them with potting soil and stubbed strawberry plant runners (daughter plant) into them to root them. Nine were successful in rooting, one just didn’t cooperate. And there were several that had rooted themselves on their own that I would transfer those as well.
I had more containers now that the garden had basically died out, mostly from a lot of damage from the hail storm we experienced. So I moved those containers over to the patch, freshened the soil in them, repaired two cracks, and got to work.
For the nine that had rooted I simply planted them as I would new plants purchased from the store. I planted them at the correct depth, then pressed the soil around them to form a slight indented ring around each plant. I then placed about a tablespoon of an organic fertilizer around each plant, pressed it into the soil, and watered it in really well.
 In our area we have to water regularly and the water will evaporate fairly quickly due to low RHs and
  wind/breeze. To help prevent rapid drying of the soil I placed about 3/4” layer of GrowKing steer manure compost over the entire surface of the container. Then about a 1” layer of wood chips on top of that. This allows for plenty of air movement and for water to seep into the soil but slows down evaporation.
As you noticed I only put 3 plants in each box vs the 4 I did this spring. I wanted them to have a little more room to grow and expand. Yeah, MORE berries 🙂
When all was said and down I ended up with 15 new plants in the larger containers. In addition I have another 15 small containers set-up to root additional runners. Hopefully when it is all complete in a couple of weeks I will have 36 strawberry plants from the original 6. And that my friend means lots and lots of berries next year!
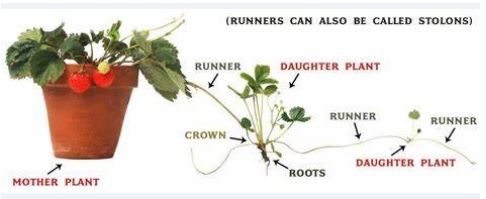
 My neighbor came over in the middle of me working and started asking questions. One in particular I thought would be appropriate to share here. “Which runners do I decide to use?” Well, first off I only
  use runners that are strong and healthy looking, not puny or dry looking or skinny runners. Then I only use the bud closest to the main plant. I cut off the runner past the bud I am using, I don’t cut the runner off from the plant. The bud has to get its nutrients from the mother plant until it has established its own roots. When I stick the runner bud into the small container in which it will root, I make sure it is well into the container, and then I back-fill it with the GrowKing compost.
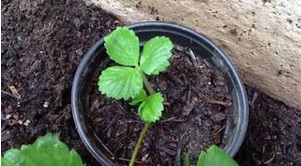
To know when the bud has sufficiently rooted I gently tug on the bud plant, if there is resistance then I know the roots have sufficiently grown to where they can be transferred into the permanent container. If there isn’t resistance and the bud still looks healthy I simply add a little more GrowKing, water, and put it back to try and root again.
Next year I will take one of the permanent boxes from this past season and allow them to produce runners vs fruit so I can replace damaged plants and expand the patch some more. IMHO…you can never have too many strawberries!
 I gotta ask…what are you doing to feed your family next year? Any garden plans? Any fruit trees? Any berry patches?
 2009 - 2022 Copyright © AHTrimble.com ~ All rights reserved
No reproduction or other use of this content
without expressed written permission from AHTrimble.com
See Content Use Policy for more information.

Pingback: GARDEN: Strawberry Patch 2024 Fall Work (video) | A.H. Trimble - Emergency preparedness information for disasters and grid-down
Pingback: Garden: New Set-up | A.H. Trimble - Emergency preparedness information for disasters and grid-down
Pingback: Lessons Learned – Garden 2023 | A.H. Trimble - Emergency preparedness information for disasters and grid-down
Pingback: Care & Share | A.H. Trimble - Emergency preparedness information for disasters and grid-down
Pingback: Brain Dump… | A.H. Trimble - Emergency preparedness information for disasters and grid-down
Pingback: Garden: Winterized Strawberries | A.H. Trimble - Emergency preparedness information for disasters and grid-down
Pingback: GARDEN: Strawberry Patch 2022 Fall Update | A.H. Trimble - Emergency preparedness information for disasters and grid-down
Strawberries And cream, or strawberry short cake, or strawberries by themselves, or Strawberries and cereal Some of my favorite things. Our garden is doing well we have planted a fall garden. Holdovers from the spring garden are tomatoes and sweet peppers. Garden is not big but kits what it can be in the space available.
LikeLiked by 1 person
Pingback: GARDEN: Our Strawberry Patch – Fall — A.H. Trimble – Emergency preparedness information for disasters and grid-down – chazrothmsg