Baofeng/BTECH UV-5X3 Radio

note #5: over the next several days I will be posting a number of articles on handheld radios…specifically Baofeng…and which is the best to buy. Hold off buying any radio until you’ve read all the articles. You will be glad you waited.

So here we go with another radio review…maybe boring to some…tantalizing to others. And you may be disappointed when you are done reading this article. But…oh well….

This is the first substantial improvement in this line of Baofeng line radios. I started out years ago recommending the Baofeng UV-5R radio…I still highly recommend the Baofeng UV-5R radio.

So why am I writing this review? Ah, yeah…you might want this new version of the radio…if you have the need.

Clarification –

Technically the name of this radio is “BTECH UV-5X3” but don’t let that confuse you…it is a Pofung/Baofeng. And made by Fujian Nanan Baofeng Electronic Co in China. Yup, China. Now, that might not be a bad thing…I just wanted you to be aware of it. “BTECH” is just the American distributor of Baofeng radios. Pafung was originally created to be the international arm of Baofeng. So, Pofung, Baofeng, BTECH…all the same radio made in the same manufacturing plant in China.

Background –

You already know I love the Baofeng UVf-RA radio. If you haven’t already read that post <click here>. That article will give you a great background to build on…and allow about 85% of the BTECH UV-5X3 Radio to be understood.

Difference between UV-5R and UV-5X3 –

The addition of the 1.25M band and that is the only difference by in large. What is the 1.2M band? It is the 222MHz – 225MHz range of frequencies.

This frequency range is open to even Technician level licensees.

There is also another difference but far more minor. It is called “Sync” display. It allows you to program your radio to show Channel Name and the Frequency on the display. Yes, you lose the ability to display the second channel when you are in Sync mode.

And also, you cannot display three bands at the same time. You can’t monitor three bands at the same time.

Ease of Use –

This radio is every bit as easy to use at the Baofeng UV-5RA radio. And it has a couple extra features as well. I won’t get into them because they are so minor and I don’t use them.

Accessory Compatibility –

All Baofeng UV-5R accessories are supposed to be compatible with this tri-band cousin. However, as I have written about over the years…beware. Some batteries fit, other don’t. If you buy from Amazon then you can easily return anything that doesn’t work or fit right.

Battery Life –

Should be the same, or close to it, as the Baofeng UV-5RA. But, it will be better than the UV-5RMHP or BF-F8HP,,,if you are running those radios on their “high” power setting.

Summary –

OK, down to the basics…Should you buy this radio?

No…and Yes.

No – Unless you have a specific reason for needing the 222MHz – 225MHz range of frequencies this radio is not worth the 150% higher price than the Baofeng UV-5RA radio. So, is there a need or mission for you using the 222MHz – 225MHz range of frequencies? If there isn’t then don’t buy the radio. Buy more Baofeng UV-5RA radios instead…or better or more accessories for the Baofeng UV-5RA radio.

Yes – If you have a specific reason for needing the 222MHz – 225MHz range of frequencies this radio is worth it.

Before you answer the mission/need for the 222MHz – 225MHz range of frequencies…write down that reasoning. Does it make sense? Can you get by on the hundreds and hundreds of other frequencies available on the Baofeng UV-5RA radio?

OK, now that you did that homework…you can make your decision and feel comfortable with it.


2009 - 2019 Copyright © AHTrimble.com ~ All rights reserved
No reproduction or other use of this content 
without expressed written permission from AHTrimble.com
See Content Use Policy for more information.

Food Storage Methodology

repacking food storage boxes - new food storage methodologynote: first appeared in May 2015

Pretty much my whole life has been figuring out scenarios and then planning and preparing for them. I was in military school during high school and then on to the military at the tail end of Vietnam. My professional life as a firefighter means a lot of my planning and preparing involved the potential for life & death. My side-line, security work, was a lot the same way to some degree. But whatever I’ve been doing for the last 40+ years has to do with the “what if” kinda of stuff. This reviewing and revamping of our food storage was no different.

Background –

Quite a while back I looked at our food storage and realized that I needed to have the ability to “grab & go” if the situation Leaving home in a hurrydemanded it. So I developed a series of scenarios that would cover a quick departure:

  1. If time was very very short, just a minute or less, I would grab our two buckets of freeze dried food that we bought at Sam’s Club.
  2. And if there is another two minutes to spare I would grab the 3 cases of MREs and a large case of Mountain House pouches.
  3. If I have another two minutes on top of that I would grab the Mountain House 45-day supply that is in four cases of #10 cans.

But then what?

Well, we had several stacks of food storage in #10 cans packed 6 cans to a case. They were all neatly stacked and grouped with similar items (wheat, rice, beans, etc.) in the same location. Looked great, nicely organized, but what happens if I have 10 – 15 minutes to load some more food? What would I take and how would I get to it easily? Or would I even know what to take?

The Problem –

I mean I could start grabbing boxes but I might end up with two cases of veggies and no milk; or five cases of wheat but no meat. And that made absolutely no sense to me at all. There had to be an answer, there had to be some kind of answer to resolve my grab & go problem.. So I did what makes the most sense, I forgot all about it and went back to daily issue and challenges…life set in.

Yeah, that worked for about two weeks; I just felt that I had to correct this situation and very, very soon. Then my wife started talking to me about it so I knew it was time to really do something and stop putting it off. For about two weeks we worked on a new method of food storage. A couple Family Home Evenings, some heart felt prayers, lots of discussion, pondering…well, you get the idea…Poof! We had a new food storage methodology.

The Solution –

The three scenarios I listed above haven’t changed at all, that is our “quick reaction” food storage. But we now have a new plan that builds on that old plan. And here it is:

We now have a “3-case month.” That means three cases of food are grouped together to make up a meal plan for two people for one month. The food is balanced, nutritional and meets a minimum calorie diet.

Each case in the group falls into one of three categories; A, B, or C. Also, each case of food is also “stand-alone” and can be used individually if needed. In other words…each case has a balanced set of contents.

P-51 Can Opener, P51 can opener, P-38 can opener, P38 can openerAll the “A” cases have the high value food that we would take first. Then the “B” cases have the next most high-value food. Then the “C” cases of food the lowest valued food (but still plenty good, it is just relative). All the cans in each case have their own plastic lid. Each case has a P-51 can opener in the case.

So that addresses the main concern – What food do we take first?

How we did it –

We made up a total of 12 “grab & go” groups of three case sets for a total of 36 cases We figured that would be a decent, well-balanced, nutritionally correct diet for a year.

Each “A Case” Contents –
ITEM           SERVINGS        CALORIES per SERVING       TOTAL CALORIES
Meat                     48                           110                                         5280
Vegetable             50                           110                                         5500
Fruit                      42                            25                                         1050
Rice                      54                           160                                         8640
Wheat                   58                           140                                         8120
Spices
TOTALS               252                                                                       28,590

Each “B Case” Contents –
ITEM           SERVINGS        CALORIES per SERVING       TOTAL CALORIES
TVP                    47                           80                                           3760
Potato                 41                           35                                           1435
Cheese               44                           140                                         6160
Milk                    69                           100                                          6900
Pasta                 27                           200                                          5400
Bean                  55                           150                                          8250
TOTALS           283                                                                         31,905

Each “C Case” Contents –
ITEM           SERVINGS        CALORIES per SERVING       TOTAL CALORIES
Drink                     94                           80                                         7520
Grits                      61                         130                                         7930
Biscuit Mix            30                         210                                          6300
Peanut Butter       81                           60                                          4860
Apple Slices         16                          110                                         1760
TVP                      43                          100                                         4300
TOTALS              325                                                                      32,670

Nutritional Needds from food storageOur “3-Case Set” provides us with 860 servings of food and a total of 93,165 calories. How does that stack up against our nutritional needs? We get a little over 3,100 calories of energy between the two of us each day. That means we are looking at a “minimal” diet. A woman my wife’s age will need about 1,200 – 1,300 calories a day with a “normal life-style.” That leaves me with about 1,800 calories a day. That is barely enough for a man my size, age, and life-style. If we have to accomplish hard work we would have to double that caloric intake to stay healthy.

Now, how to extend what you have in your 3-Case Sets can be a bit tricky, maybe confusing. But, I will take a stab at it. Remember that a 3-Case Set is designed to be food for two people for one month. But it is barely enough for a man and women as far as calories go. Now, it would be easy to increase calories by simply adding beans, wheat, rice or oats; and it would be very cost effective as well. But you could end up suffering from food fatigue if you aren’t careful. To avoid that situation and boost calories…there are a number of ways to accomplish that. You put together a case of “caloric extenders” while adding a little “taste” as well. Here are some ideas for both:Food Storage Extenders - grains, beans, rice

Caloric extender foods:

Wheat
Rice
Beans, pinto/black/white/refried
Oatmeal
Pasta
Potatoes, mashed

Food Storage Enhancers - Sugar Brownie mix Yogurt bits Cheese ButterTaste enhancer:

Sugar
Brownie mix
Yogurt bits
Cheese
Butter

You can mix and match them in any combination that you wish to get the desired foods, taste, caloric intake, bulk and nutritional content. And you can do all of that while keeping food fatigue away. Now, don’t think you have to run out and spend a fortune on freeze dried food or a long list of fancy canned food. If you have the extra money fine, then do so if it fits your budget. But if you are like most of us you don’t have that kind of money just sitting around. No problem, just add a single #10 can each payday if that is all you can do. Steady progress is what it is all about. This is a marathon not a sprint.

Summary –

All-in-all, we are really grateful that we undertook this change in food storage methodology. It was eye-opening to say the least. We both feel we are far better prepared now to meet the challenges that will come our way when we face a disaster, emergency or a “grid-down” event in the future.Lessons Learned

Here are some specific Lessons Learned from this significant change in the way we stored our food storage:

  1. We didn’t know before exactly how long our food would last. Now we have a firm estimate. Makes a big difference for planning purposes.
  2. Putting a can opener in each box really gives us a feeling of comfort. Talk about redundancy!!
  3. We found the bottom seams of many of the boxes (especially shipped boxes) had tape that no longer functioned. We took the time to re-tape each of the 3 seams on ALL the box bottoms; two shorter edges and the one long seam in the middle.
  4. With our computer printed, easy-to-read labels, we marked each box with the exact contents and the servings and calories.
  5. We rearranged how we physically stacked and placed it in the storage area. We can now easily see what we need to round-out our food storage. But more importantly, which cases of food should be loaded first in the event we need to bug-out.
  6. We feel confident, that should we be able to take it all, we will have well balanced and tasty meals. With well-balanced cases of food it will help ease the problem(s) that caused us grab & go our food storage to begin with.
  7. We realized that if we are to take all our food storage we will need a larger, sturdier truck. But, we’ve identified the most important 36 cases of food in case that is all we can take.
  8. If the grid goes down and we have to leave in a hurry we will very likely not be able to take all our food storage with us. But we will easily know what to take, and we will be able to do it quickly and efficiently.
  9. We really liked the idea that we put plastic lids on every can in the A/B/C and Support (caloric & tastes extender) cases. Once the food is used out of those cans, the cans will have more value because they will all have a lid.

Now…what kinda ofr methodology do you use for your “grab & go” food storage?


2009 - 2019 Copyright © AHTrimble.com ~ All rights reserved
No reproduction or other use of this content 
without expressed written permission from AHTrimble.com
See Content Use Policy for more information.

Smith and Wesson M&P Shield – Part #2

Smith & Wesson M&P Shield Review Part 2Well, kind of an interesting morning at the range. Let me explain…

I actually didn’t go to the range at all. I have a place I like to go in the desert, its remote but close enough to town not to be a long drive. It is all boxed in with high canyon walls all around. It is quiet and I am always alone unless I take people with me. So that’s where I headed…and I am glad I did.

Alright, so I drop the tailgate to my pickup and layout all my shooting gear. I had brought 220 rounds of 115gr Winchester FMJ ammo with me. That stuff is nothing fancy but the price is right and the brass is reloadable. I really wasn’t trying to become an expert shot with the Shield, I just wanted to run the rounds through it to see how it performed and get through the “break-in period” with it.

Let’s cover all of it…the factory magazines that came with it were a decent quality. If I did my research right, Mec-Gar makes them for S&W. With the pistol came a 7-round mag and an 8-round mag. The 8-rounder has a little pinky finger extension on it. Both mags were a little stiff at first but broke-in just fine. I did notice that even at the end the 7-rounder was a little stiff getting that last round in as I was loading, but it wasn’t a big deal at all.

The first round of any new gun I send down range is always an interesting one for me. My head always wonders what might happen. I wasn’t surprised or startled by the first round at all. It just went “crack” and the tree stump splintered. Same thing for each round for both of the first mags.

After about 100 rounds I started to pay more attention, snapping up from a low-ready, changing my stance, aim, not aiming, and trying different positions on the trigger with my finger. What I did notice were a few things –

  1. I tended to want to put more of my finger over the trigger than I normally do. I figured out it is because the Shield is small compared to my Sig 1911 Ultra-Compact or my Sig 226. So my big paw wanted to envelope more of the gun than it is designed to handle. So I had to consciously work at keeping my trigger finger where it belonged.
  2. I noticed I was shooting a little to my left pretty consistently. When I really slowed down and was taking each shot seriously I noticed that I didn’t have a natural sight picture with the pistol. I can work through that with range time and getting the right feel for the gun…hand position vs. aim point.
  3. The Shield is much smaller in my hand that any other gun I have with the exception of the Sig 938 I have.
  4. It was simple, easy, and second nature for each follow-up (second) shot. Even with a small, lightweight gun the second shot was very easy to manage.

Once I had shot up 200 rounds I got out the 15 rounds of misc rounds I had brought. I mixed in those rounds with a few of the remaining Winchester rounds I still had left. Ran them, no problems. Then I got out the good stuff, the 147gr Hornady XTP rounds that I absolutely love. I feel these are the undisputed best round to run in a 9mm pistol. I loaded them up mixing them in with the remaining 115gr Winchester rounds.

It ran like “crack” “crack” “thump”. The “crack” were the 115gr rounds, the “thump” was the 147gr round. There was a noticeable difference in the feel of the gun on top of the sound. The 147gr rounds were ones that I had reloaded myself and they are a little on the hot side since I run them through my full-frame Sig226. The Shield handled them just fine. Even the second shot was no issue at all.

After about an hour and 250 rounds later, I have to say I like the Shield. The 7-round magazine leaves my pinky finger dangling. But for some reason it quite naturally tucked right under the grip and was no issue. The 8-round magazine removes any issue at all. The 18º grip angle is just right for me. The grip is a little small for me, but it is entirely doable with no issues. I do like the 8-round mag grip better, it feels more natural, and I think I have better control on the pistol with it. That being said, I am perfectly fine with the 7-round mag grip with no complaints.

A few more technical observations –

  1. No failure to feeds.
  2. No failure to ejects.
  3. Two failures to go completely into battery.
  4. No misfires.
  5. No magazine feed issues.

I want to explain the battery failure issue I mentioned. There is a thumb button slide release. But, don’t think for a minute you are going to be able to use it…you simply can’t. Yes, I know you are supposed to release the slide by “racking” but I just wanted to test the release. The release button is simply too tight and stiff to allow it to be used under normal circumstances. Overall, it is a good thing, forces you to into good habits no matter how resistant you might be. I think the two failures to go completely into battery were my fault. They occurred early on and I just feel I didn’t have enough “snap” to my racking the slide. I will keep my eyes on that one and report more later.

I did a medium and long distance test fire on it as well. At a medium distance, about 80’ the gun was plenty accurate enough. Without really trying I was grouping 12” – 18” with one flyer. When I went to 100 yard distance I found I was able to pick up the aim point pretty quickly. I would have no problems trying to engage someone at 100 yards if I had to. I would have to slow my shots down a bit, but it is perfectly doable.

The trigger reset is clean. There is even an audible “click” when it resets. However, in a gunfight I am not sure that you would hear it. I only heard it because I use Howard Leight electronic ear muffs. There is a “feel” when it resets but I hard a hard time feeling it. Next time at the range I will slow down and really work the gun to become proficient. I will let you know if it becomes any kind of an issue.

I did a glove test on the pistol as well. Unless you are using a “golf glove” (i.e. thin leather) you might struggle getting your trigger finger inside the guard. I could do it but it felt a like fumbling at first…and later as well.

Then I had to remind myself…this isn’t a battle gun. This isn’t something I am going to strap onto a drop-leg rig and head into some pitched firefight. This is a CCW EDC pistol. It is designed to be highly concealable, highly reliable for carrying on your person every day.

One thing I will point out that is fairly weird, maybe it is just me. I do a lot of shooting and I have a decent variety of pistols. But, I have never had a problem retrieving a spare magazine to place into a pistol that I was shooting (magazine swap). Seriously, I’ve never had a problem…period. With the Shield three times I brought the spare mag up reversed. As I tried to repeat the error it boiled down to the base plate of the magazine. It is just kind strange to anything I am use to. The base plate itself stick out to the front and to the rear of the magazine so there is no easily distinguished forward position. I think this is just a “me thing” and I will get over it with practice and consistent handling of the mags. I didn’t have the problem with the 7-round mag…but it doesn’t have the strange base plate that the 8-rounder does.

I wrapped up the range time and headed home…after picking up my brass. I felt very pleased with the Shield and I felt 100% confident that I could carry it as my EDC piece and not worry a bit.

When I got home I cleaned it. I gotta tell you, it was the easiest pistol I ever stripped down. It was simple, easy, and very fast to clean. While I can’t say I enjoy cleaning guns, cleaning the Shield was no big deal, fast, and easy. And that is good enough for me.

At that point I made the decision that this was going to become my new EDC…period. I liked it, it packed plenty of punch, was light, really concealable and just what I was looking for. So the next step…

I ordered four different holsters for it –

    • Outbags LOB3P
    • Galco SG652B Stinger
    • Blade-Tech Revolution Klipt
    • Desantis Mini Scabbard

Why those holsters? Because I did about four hours of research online to find the holsters that I feel are most likely to me what I am looking for. I will write an article on that once my testing is complete. And yes, I will have a recommendation as well.

I ordered another 8-round magazine. I figure that since this pistol was meant to be more highly concealable I would carry the 7-round mag in the pistol on my belt. That gives the gun the smallest possible “print.” But, my two spare mags will both be 8-rounders vs. 7-rounders. Yeah, I know…only two rounds of difference. But I keep thinking that I would rather have two too many rounds, than two too few rounds. That is just me. And why two spare mags? Because you never know how long the gunfight might be or how many bad guys you might be dealing with.

One thing I had to do…just had to. When I was ordering the spare mag from the supplier…right there just two tiny ads over was a 10-round magazine option. Yes of course I bought that one also. I just couldn’t resist! Come on, if 8-rounds is good…10-rounds really rocks! I will return and report on that as well.

I know I talked about two other issues; 1) night sights, 2) trigger job. At this point I see absolutely no reason for a trigger job. Yes, I might change my opinion later on, but for now I am perfectly fine with the trigger it has. I am almost struggling with getting the night sights or not. I was just fine with the way it was at the range. But, the sun wasn’t its normal desert brightness nor was I am attempting to shoot in low/no light conditions. I will probably go with the night sights but not just now. I am more interested in another day at the range really working the gun and finishing the break-in. I am also going to enjoy figuring out which holster is best suited for it. I am hoping that one holster really stand outs.

So there you have it…all of my initial impression of the Shield are positive and I think this is going to be as great CCW EDC gun. And I will be writing at least one more article covering all the new stuff I test.


2009 - 2019 Copyright © AHTrimble.com ~ All rights reserved
No reproduction or other use of this content 
without expressed written permission from AHTrimble.com
See Content Use Policy for more information.

Baofeng BF-F8HP Radio

note: over the next several days I will be posting a number of articles on handheld radios…specifically Baofeng…and which is the best to buy. Hold off buying any radio until you’ve read all the articles. You will be glad you waited.

OK…more radio stuff…hope you are ready for it.

So what about this radio? It is the latest version of its incredible grandfather…the Baofeng UV-5R. With an additional feature or two…and more power. I am not going to make this review painful or long…so here goes…

The primary difference, the only one worth going into detail about is the increase in power.

The original Baofeng work off of high/low power setting (4w/1w). This version has three power settings high/medium/low (8W, 4W, 1W). However, if you rad my review of the Baofeng UV-5RMHP radio that appeared first in 2016 and resurrected yesterday, you see where the antenna makes a huge difference the actual power you get when transmitting. And remember also, “power” doesn’t make a whole lot of difference when receiving…power when transmitting it the key.

Ease of Use –

As I have written about before…the entire Baofeng UV5 family is very easy to use. Well, easy to use if:

  • You have it programmed correctly
  • You use software to program it
  • You use the manual(s) that I have produced
  • You actually take the time to train yourself on the radio
  • You keep familiar with the radio’s operational capability be using it as often as practical.

Bottom line…the radio is easy to use.

Accessory Compatibility –

Well, officially all the accessories that are compatible with the UV5 family are compatible with this radio as well. And just as predictably…some are, some aren’t. As I’ve written about before, sometimes accessories don’t fit exactly right…mostly batteries. Buy the accessory you want, try it, if it doesn’t fit right send it back. That’s why I love doing business at Amazon.

Battery Life –

If you run on high power all the time you will get less life out of this radio’s batteries than previous, lower power, versions of this radio. Batteries are fairly inexpensive so just buy more batteries if you need, and will be operating on, the high power setting.

Summary –

If you don’t currently own a handheld radio this is a radio to seriously consider. It has a great pedigree and plenty of accessories to make it very useful. But, at $63 for the radio…it is well more than double the price of the Baofeng UV-5R radio. For me…if there were four members of my family and I was somewhat limited on funds…I would buy 4 Baofeng UV-5R radios rather than 1-1/2 Baofeng BF-F8HP radios.

That being said, if I $250 available to buy radios for my family of four, I would…Oh, wait…I would still buy the Baofeng UV-5R radio (4 of them) and and use the other $155 for much needed accessories.

All that being said…If I had the money and the NEED for 8wats of transmitting power then I would buy the Baofeng BF-F8HP Radio…but only if there was the need for the higher power capability.


2009 - 2019 Copyright © AHTrimble.com ~ All rights reserved
No reproduction or other use of this content 
without expressed written permission from AHTrimble.com
See Content Use Policy for more information.

Baofeng UV-5RMHP

Baofeng UV-5RMHP vs. Baofeng UV-5RA2019 note #1: article first appeared in April 2016

2019 note $2: the radio is not available from what I can find.

2019 note #3: the radio has been replaced by the BaoFeng BF-F8HP which I will be doing a review on very shortly.

2019 note #4: this article still contains useful information that you may find interesting.

2019 note #5: over the next several days I will be posting a number of articles on handheld radios…specifically Baofeng…and which is the best to buy. Hold off buying any radio until you’ve read all the articles. You will be glad you waited.

Power –

We all want power! If we have some power, we want more power!

No, I am not talking about government, the police state, or our former Dictator-In-Chief Barry, or anything along those lines. I am simply talking about a way cooler subject…radios!

Over and over again I have told you how much I like the Baofeng UV-5RA radio…I think it is simply the best Baofeng UV-5RA Love Itprice/performance handheld radio on the market today. Yes, there are better quality radios Yaesu FT-60r handheld Ham radiosuch as the Yaesu FT-60r but the Yaesu also costs about 6 times as much at the Baofeng. True, if I could only have one handheld radio and the money wasn’t a real factor I would choose the Yaesu. But for many of us mere mortals money is a factor. And, I would rather each family member and all of my close friends have a radio rather than just one or two having a radio. Hence, the Baofeng UV-5RA handhelds are an amazing combination of price and performance.

But, there was always that talk swirling around by other Baofeng users claiming that their radio was a 5watt or an 8 watt, etc.  I began to suffer from “watt envy”!

I have already shown where the UV-5RA radio outperformed both the UV-6 and UV-8 version of the radio in previous Baofeng UV-5RMHP radioreviews. But, the venerable UV-5RA radio has finally met its match. Well actually, the radio that outperformed the UV-5RA is just its bigger brother…the UV-5RMHP.

I acquired an evaluation version of this radio a few months back. I started testing it and really couldn’t find anything wrong with it. Well, that isn’t 100% true. When I tried to program RT systems software for Baofeng UV-5R radioit with my RT Systems software…it failed. I looked to see if CHIRP had a version and NOPE, they didn’t.

I called RT Systems about the programming problem and within two days they had their UV-5 programming software humming along just fine with the new UV-5RMHP radio. Now that is why I like RT Systems software…they respond and they are professional programmers maintaining critical software.

So, I programmed up the UV-5RMHP with my standard channel plan and began the testing for performance. Wow!

I was very pleasantly surprised with the radio. First, it operates exactly like the UV-5RA so that eliminated any learning curve. It also programmed exactly the same with one exception, in the “Tx Power” column there were three choices vs. only two with the UV-5RA. The UV-5RMHP has three settings “L, M, H.” Which translates into 1w, 4w, 7w of power programmable for each channel. SWEET!

Back, to the testing…I looked over the radios to find any differences and couldn’t find a single operational difference other than the key that first locks/unlocks the radio, then is used to switch between “high” and “low” power on the UV-5RA radio. On the UV-5RMHP that key still locks/unlocks the radio, but it now switches the power; “high” “low” “medium.” Which corresponds to the new wattage capability while transmitting.

So naturally I had to test the new wattage with various antennas…

baofeng UV-5RMHP vs UV-5RA antenna resultsIf you look that chart over and you are a tech geek you will see that there is vastly improved power being delivered to the antenna. For all of us non-tech geeks the chart shows 50 – 100% more power to the antenna in some frequency ranges. Not only that but the SWR readings are terrific with only a couple of exceptions. And even then the SWR readings are still well within operational parameters.

Some Technical Specs –
  • FirmWare: 2015
  • Frequency Range: 136-174 / 400-520MHz
  • Dual-Band Display
  • Dual Frequency Display
  • Dual-Standby
  • 7 / 4 / 1 watts of Output Power
  • 128 Memory Channels
  • 50 CTCSS and 104 DCS
  • Built-in VOX Function
  • Burst Tone 1750Hz
  • FM Radio (65MHz-108MHz)
  • LED Flashlight
  • Large LCD Display
  • High/Medium/Low Power Switchable
  • 25KHz/12.5KHz Switchable
  • Emergency Alert
  • Low Battery Alert
  • Battery Saver
  • Time-out Timer
  • Keypad Lock
  • Monitor Channel
  • Channel Steps: 2.5/5/6.25/10/12.5/25KHz
More Info –

Field testing was amazing! But, since my field testing environment is different than your environment I am not going to say I was able to get X more distance with the UV-5RMHP over the UV-5RA. I will just say that I clearly got more distance with the UV-5RMHP.

And now one of the greatest aspects to this new model of the UV-5R radio…the UV-5RMHP uses all of the same accessories as the UV-5RA radio! Every single accessory works on either radio just fine.

UV-5RMHP-003UV-5RMHP-004And another great feature…the RT system programming software of the UV-5R works on both models as well! I just have three options now on the “Tx Power” column when programming a UV-5RMHP vs. two when programming a UV-5RA.

So where are we on the price/performance benchmark? Not bad, not bad at all.

  • The UV-5RA retails right now for about $25. That is $6.25 per watt of output.
  • The UV-5RMHP retails for $40. That is $5.72 per watt of output. (note: radio is not available as of 2019)

But when you consider there are times you can 11watts going out the antenna, then that makes it $3.64 per watt of output. Although, I would stick with the more realistic and consistent $5.72 per output watt performance. That makes the UV-5RMHP a better performance for the price while being only about $15 overall more expensive than the UV-5RA.

So which radio do you buy?

  • If $15 is no big deal, buy the UV-5RMHP !
  • If you need to buy 5 radios for your family the $15 difference comes to $200 vs. $125. With the $75 difference can buy three additional UV-5RA radios. So you might be better off with the UV-5RA radios.
  • If you are not going to be using the radio over longer distances the UV-5RA is just fine.


2009 - 2019 Copyright © AHTrimble.com ~ All rights reserved
No reproduction or other use of this content 
without expressed written permission from AHTrimble.com
See Content Use Policy for more information.

I want to help you from becoming lame and dying…

ingrown Toenail Infected

note: first appeared in December 2015

If there was ever a headline that should get your attention, I think that was it, yes? You’re reading the article so it must have worked.

Have you ever had serous foot problems? I mean the kind where you can barely walk? Maybe not even be able to walk? Well, I have and it ain’t fun!

I want to paint the picture for you…It is 4 months into grid-down, how many times have you cut & trimmed your toenails?

Yes, I am being serious. Yes, I really want you to answer the question. Yes, of course you can answer the question silently to yourself.

Are you getting my point about now? I am concerned about good foot hygiene, specifically toenail care. Can you imagine for a minute how you would take care of your toenails without a toenail clipper? Your fingernails would be somewhat easier to care for, but your toenails could prove to be be a serious challenge.

So I really want you to add a toenail clipper to your GOOD BOB and whatever other supplies you have boxed up and ready to bugout with. But, I also want you to go buy an extra one for your house. It is kind of a Murphy’s Law’s cousin, needing something and not knowing where it is. Put this extra one someplace obvious but different that your regular everyday toenail clipper.

So which brand do you buy?Revlon Toenail Clipper

I have tried a number of different brands and find Revlon to generally speaking be the best quality, most sturdy, and cost effective brand.

Oh, come on… Yes, I am actually giving you advice and recommendations on toenail clippers. I am sure you could do fine on your own. But, I bet you a dime to a dollar that you don’t have a pair in your GOOD BOB. I know I didn’t, and I am supposed to be kind of an expert on these preparedness issues.

Just in case you are wondering – I was standing there in my bathroom, wife calls it the “master bath.” And there was my toilet kit for when I go on wildland fires. I went through it just to make sure everything was there. I was planning on putting it away until next season. But then I started thinking about it and realized there was a prepping hole in my GOOD BOB.

So, my advice to you is to get a good quality toenail clipper, or two, and put them into your prepper supplies. If you don’t, you may screw up your feet so badly you end up virtually crippled.

Revlon Toenail ClipperWhile you’re at it consider this little beauty as well. If you have to work on an ingrown toenail it is a real tool!

Yeah…I am flipping serious.


Lessons Learned: I shot myself…

Yeah…OK…it was “click bait” to be sure. But yes, it is also true…just not maybe the way you were thinking.

Truth…yes, I shot myself. More truth, it was with a nail gun.

Background –

So there I was…10′ up in the air,  on a ladder, using my air-powered nail gun to install soffit under the eves of our 1000sq’ retirement house. Things were going along nicely until I felt a dull stabbing pain in my left index finger. I looked at the finger and there was a nail that had gone through the piece of soffit, through the furring strip and into my finger having entered right beside the knuckle. And yes…I was kind of in disbelief.

So I had to lift my hand up to pull the nail out of my finger, then climb down the ladder. Of course I gently lowered my Hitachi nail gun to the ground first. Once on the ground it really dawned on me what I had just done…and the pain started to show up. Strangely enough it wasn’t a searing or sharp pain…more like a dull ache. I wrapped my handkerchief around my finger to stem the blood flow.

I started to walk to the cabin…then it dawned on me, “Why walk the 100 yards?” So I turned and headed to the UTV to drive the 100yards to the cabin where my Family First Aid Kit (FFAK) was. All I could think about was getting it washed out, cleaned up, bandaged, and get back to work. Yeah…not thinking real well at the time.

I got to the cabin, retrieved my FFAK, went out to the front deck, and started to asses the damage. I didn’t really think about it at the time…but I was shaking. I used the BandAid Wound Wash to clear away the blood BandAid Wound Washand allow the lidocaine in the Wound Wash to dull some of the pain. It would also help prevent infection due to the antiseptic in it.

I had been thinking about it and while it wasn’t too painful, I started wondering if there was any bone damage…as in penetration of the bone or splintering. Having been an EMT on the street with the fire department for a number of years I knew that if bone damage or fragments were present I could be dealing with not only infection but other more serious issues.

I flexed the finger, it hurt, but was flexible, although not as much as normal, I didn’t sense and grating. I then felt around the entry hole, joint, etc. and could feel no unusual movement or anything like bone fragments. But, I am no expert or doctor so I decided an x-ray was the safe bet on this one.

It was weird…there was this tiny entry hole and no exit hole. I remembered not seeing the tip of the nail poking out the skin. I figured it had slid up the finger right along the bone. Total length inside my finger…about 1-1/4″.

I got it cleaned up, applied some triple antibiotic, and then wrapped 1-1/2″ gauze around it. Now, time to call my wife. After a somewhat brief conversation, once I got her on the phone, it was decided she would double check to see if there was a closer place for treatment than the hospital in the nearby larger town while I would start the 30 minute drive. No, no need for a medi-vac or even an ambulance…not really life threatening or even all that serious in reality.

On the way to town, about half way, she found an emergency clinic that was closer than the hospital emergency room. Cool…it would be closer, probably less waiting time, and obviously cheaper. I asked her to call them back and make sure they accepted our medical insurance.

Making the story much shorter…got to the clinic, I was patient #2, got in quick, x-ray, bandaged up, prescription for 10-days of cephalexin, and I was on my way back to the cabin.

Issues/Mitigation/Reality –
  1. Issue: I am building a house which can be fairly dangerous due to the potential of construction accidents. Mitigation: I would keep my phone on me at all times in case I was hurt I could call for help. Reality: I had been working on the house for 4 months with not even a close call with an accident. My phone was in the UTV not in my pocket where it should have been.
  2. Issue: Accidents do happen. Mitigation: We have a well-stocked FFAK for just such instances. Reality: The FFAK was 100 yards away in the cabin
  3. Issue: Our house is located out in the sticks. Our closest neighbor is 500 yards away. The closest nice neighbor is 1000 yards away, small town 20 minutes away, larger town 30 minutes away. 10 – 12 minutes of fairly rough dirt road just to get to the highway. Mitigation: Keep truck ready to go, keys in the ignition during the day, UTV handy at all times. Reality: Truck improperly parked, no keys in the ignition, didn’t even think about the UTV at first.
  4. Issue: There is the potential need for emergency medical/accident care. Mitigation: In addition to the FFAK and training, we have a great trauma hospital 30 minutes away, there are two life-flight helicopters available. Reality: I wasn’t sure that I would make the drive myself if shock set in. I don’t know our address to give to 911 to get an ambulance there. I don’t have the GPS coordinates to my house to facilitate a helicopter ride to the hospital.
  5. Issue: While there is a great trauma hospital 30 minutes away, there might have been closer medical care facilities but I didn’t know that. Mitigation: Pre-identify any potential medical treatment facility. Reality: Not done.

So there I was…accident victim, alone, 30 minutes from medical care, and honestly…fairly unprepared for it. I always thought that if something serious happened I would call my wife (320 miles and 6 hours away) and let her coordinate the response via phone. Well…reality time! She was busy at work. First call to her office got someone who didn’t know where she was. I then called her cell-phone…ignored. Called her right back…ignored. Called her right back…text message response…she was busy and would call me back later. Called her right back…text message response…she was busy right then and couldn’t talk. Called her right back…she answered and was a little miffed, she had been working with a client.

While she was talking I spoke over her, “I just shot myself and I need to go to the hospital.”

Yeah, that got her quiet. Shortening the story…the plan…

  • She started to coordinate the response while I headed into town.
  • She was to call me back in 20 minutes to make sure I was still mobile.
  • She would check to see if there was a closer medical treatment facility. Yeah…Google it!
  • She would call ahead to the hospital to let them know I was coming.

What happened…

  • She found a closer emergency treatment clinic.
  • I went there instead.
  • She called ahead to let them know I was coming.
  • She called them back to make sure they took our medical insurance.
  • She called me back and kept me on speaker phone while I drove to the clinic…about 15 minutes.
Lessons Learned –
  1. Having the cell phone on me as a mitigation step was a great idea…if I would have had it on me. I had grown complacent. So, I need to stick with our mitigation strategy and avoid complacency.
  2. Having a great FFAK was wonderful! Having it 100 yards away from the worksite was not a very good idea. So maybe a better idea would be to move it to the worksite. But, considering I spend more time at the cabin than the worksite…maybe not such a great idea. Better idea might be to have two FFAKs…or at least a scaled down version at the worksite to provide immediate first aid till I got to the FFAK at the cabin.
  3. Having cell-phone communications with my wife is great! Depending on her to coordinate a medical response…not so much. Rework that whole mitigation strategy for more practical response/coordination.
  4. Having great medical treatment centers nearby is fantastic! Knowing where each is, what their level of trauma care they can handle, and how to get there is absolutely necessary. And all of that needs to be done in advance of the actual accident.
  5. Having ambulances and life-flight helicopters available is an incredible blessing. Knowing how to get them to your location could be considered imperative. Knowing that in advance of an accident is a necessity.
Summary –

I am recovering nicely. Finger is at about 75%, mostly no swelling, no infection, and very little discomfort. And I know I got lucky. There were a number of points along the way that could have made things turn out far differently. Fortunately, I can learn from this experience…and maybe you can learn something from my experience as well.

It’s great to have plans in-place to deal with risks/threats…but only if they are realistic. And part of that means that you actually have taken the mitigation steps. The other main take-away for me…avoid complacency. I became complacent and left my cell-phone in the UTV vs. having it on my person. What if the nail had actually nailed my hand to the house where I couldn’t climb down off the ladder? Then what? Yeah, I hate to think about that one.

Accidents are real. Risks and threats are real. It doesn’t take an emergency, disaster, or grid-down event to require advance planning to mitigate the potential of injury or worse. Neglect mitigation steps at your own peril…or that of your family.

Whatever project/task you are involved with:

  1. Identify what realistically can hurt you.
  2. Develop a realistic mitigation plan.
  3. Stick to the plan.
  4. Avoid complacency.

<to read more about risks/threats/mitigation click here>

<to read more about emergency medical care and kits click here>


2009 - 2019 Copyright © AHTrimble.com ~ All rights reserved
No reproduction or other use of this content 
without expressed written permission from AHTrimble.com
See Content Use Policy for more information.

Smith and Wesson M&P Shield

note: originally published in 2016, updated/edited in 2019

I am never satisfied!

Duh, like you didn’t already know that by now. But, in this case I hope it might help you a bit. I sure enjoyed the time!

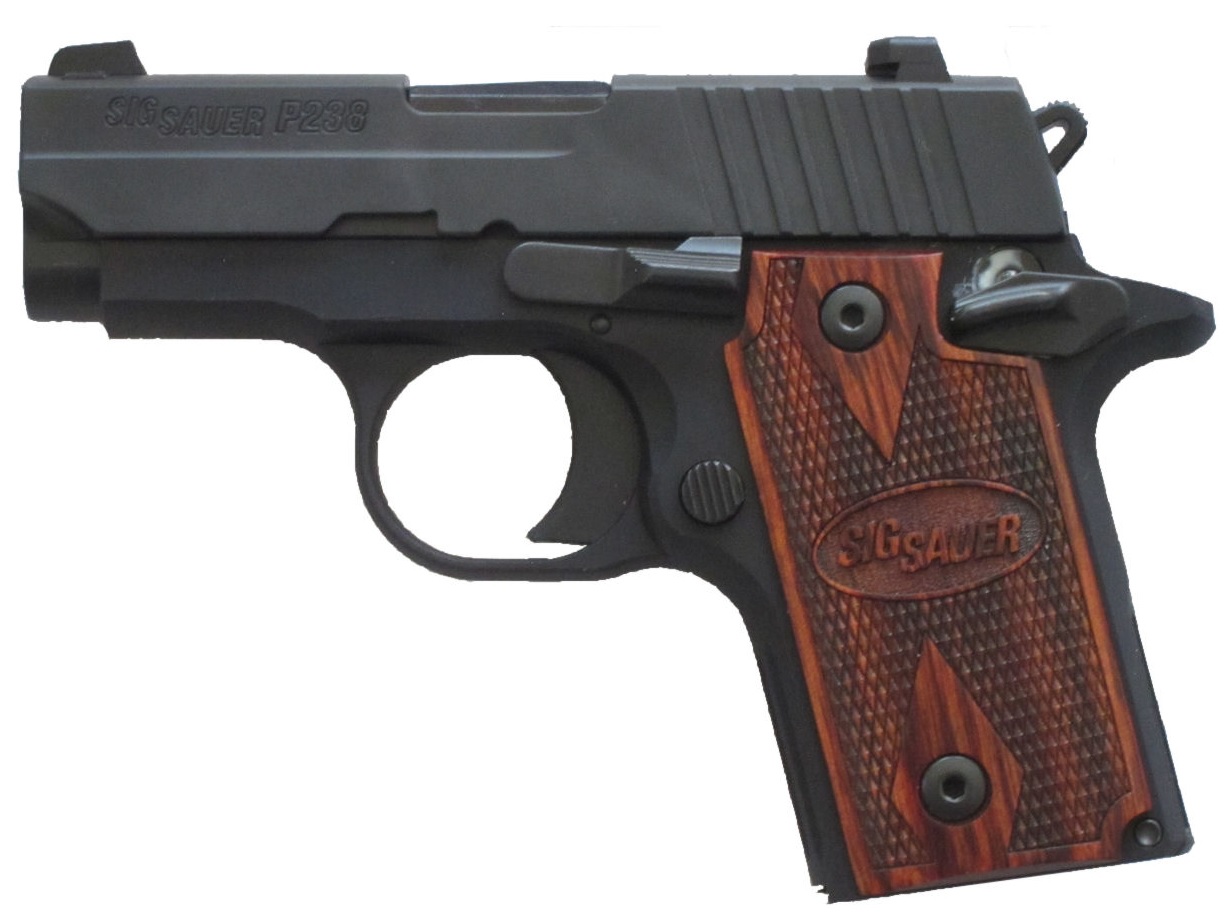
So, for my normal every day carry (EDC) I have been carrying a Sig Sauer 1911 Ultra Compact is an excellent large caliber conceal carry pistol..45cal Sig 1911 Ultra-Compact. It is a great gun, never failed me, can run any kind of ammo, and it is dead-on accurate. So why was I looking for another EDC piece? Weight and bulk.

The Sig is a solid chunk of steel. While that makes it a fine piece of craftsmanship and very good looking, it does make it a bit heavy. And since it is a .45cal there is a little inherent bulk. When I am doing any personal protection detail I like having that .45 at my disposal, lots of stopping power. But, I am finding that I am really a lot better with my second shot placement when using a 9mm round.

For 9mm I like the 147gr Hornady XTP round. In the .45cal I like the 230gr Hornady XTP round. My testing shows 9mm Pistol ammunition ammo - 147gr Hornady XTPHornady XTP 230gr .45cal that the 147gr 9mm makes up a lot of the lost ground when switching to a 9mm round. The 147gr is a decent weight and the XTP round petals and creates a devastating wound channel. Sorry, back to the gun issue…

I am not overly concerned about “printing” with the Sig. It does print with thinner material shirts or just a t-shirt on. With a suit coat or casual jacket you can’t really tell it is there unless you are looking, and you know that you are looking for.

But, I found myself wanting a lighter gun, a thinner gun, and a 9mm for really good second shot placement. I naturally looked at Sigs…because I am a gun snob. I SigP238-380-001also found myself really disappointed. I had previously looked that Sig P238 (.380) and I liked the gun’s size and weight but didn’t much care for the size of the round, a .380 is pretty light for what I might need it for.

About three years ago I looked at and eventually bought a Sig 938 9mm. I liked the 9mm Sig 938 9mmround, loved the 1911 style, enjoyed the Sig name, and thought the size was incredible…nice pocket gun. And rarely carried it. Why? It was too small and it got lost in my hand. Subsequently I was not really accurate with it and didn’t have a lot of confidence in it should it come to a gun fight. It sits in the gun safe. I was still without that really great sized CCW EDC pistol that I loved to shoot and had confidence i, should it come to free exchange of lead.

Then one day about 2 months ago after a security gig watching over two people I decided that I was going to get a different gun period. And so the quest began anew. While I was in the gun store last month I Sig P250 9mmlooked at the Sig P250 (9mm) and it was a nice looking gun and the right caliber. What I didn’t like was the grip…it was short, squat, and really didn’t feel right. I am not sure if it was the balance, weight, or something else. The gun wasn’t what I was looking for. It’s too bad because I liked everything I had read, great reviews, and it was a Sig. I was 95% sold. Well, 95% sold till I picked it up. I didn’t like the gun at all…not a single bit.

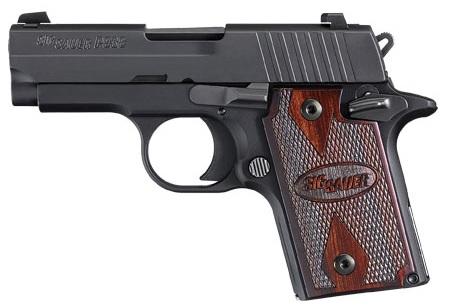
Not able to lose a sale the shop owner suggested I try a Sig 320. I liked the way it felt. I Sig P320 9mmhave large hands and I like the feel of a double-stack mag grip. I liked this gun, it felt really nice, it was a 9mm double stack so it held a few more rounds than I was used to, and it was a Sig. I was 95% sold. Well, 95% sold till I held it up next to my Ultra Compact. It was almost the same size and felt virtually the same weight. I was crushed.

I begged and pleaded with the owner to find me a solution…I was desperate…I had money in my pocket just burning a hole and needed a new gun. OK, maybe it wasn’t all that bad…sounds a little melodramatic for what actually took place.

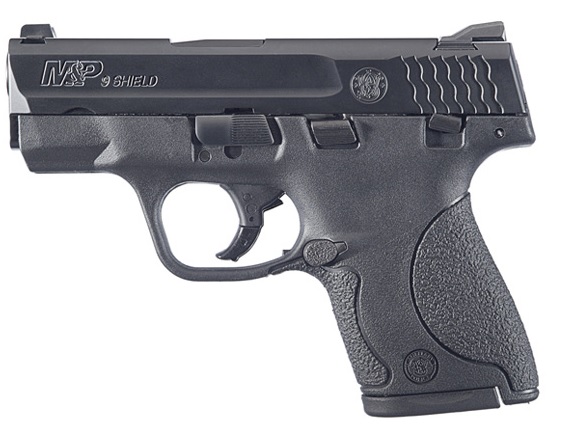
Then the unspeakable happened, he asked, “Have you ever held a Shield?”

I recoiled in horror and disgust…it was a lowly Smith & Wesson pistol…an M&P Shield. I felt like vomiting in the trash can. What did this man think I was? Who did this peddler of pistols think I was? What an insult…I felt like challenging him to a duel! Offer a S&W to a Sig man…how thoughtless and stupid.

But, I was desperate…”No, let me try one” came my reply before I could stop myself. I should have cut out my tongue first…or at least after those despicable words left my lips.

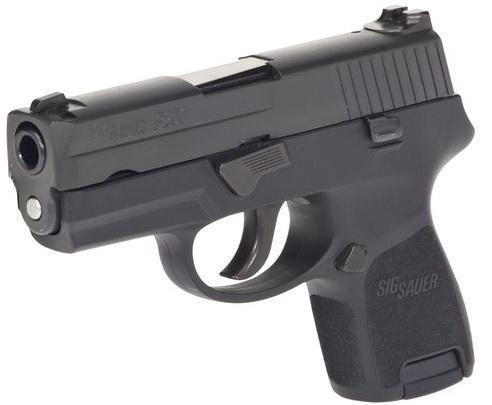
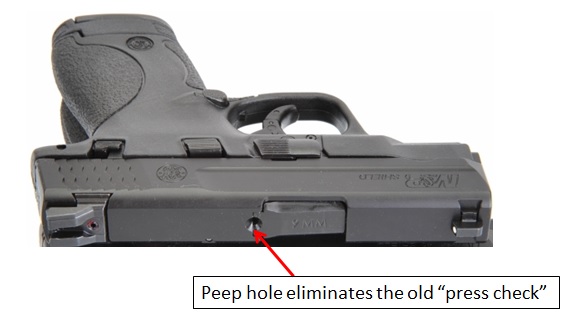
After clearing it, he handed me this black, skinny, piece of plastic and steel that didn’t appear to be all that terrible Smith Wesson MP shield peepholelooking. I cleared the gun myself and immediately noticed the little “peep hole” at the breach. Sweet! No more press checks to see if there is a round in the chamber…at a glance I can tell.

After a proper grip I noticed that the 18º grip angle gave me a very natural and accurate aim point. The grip was plenty long enough, my pinky finger didn’t dangle out in mid-air. I also noticed that the gun was very well balanced. All of those things added up to the Shield feeling very nice, and quite natural, in my hand.

I requested permission to dry-fire it. After a quick nod from the owner, I did so. I went very slowly on the trigger to assess the trigger quality. I wasn’t impressed. But, I also wasn’t disappointed. I had to remember that this was a striker fired pistol so it had to do several things at once, not just release the hammer. I will say that the trigger felt a little “gritty” but not bad. I estimated that the trigger pull at about 5lbs, the owner said it was 6.5lb trigger. Hummmm, my trigger finger must be getting stronger.

I mentioned it to the owner and he said there is a trigger replacement option that he promised was smooth as silk. It brings it down to the 4.7lb range and has zero “grittiness”. The price for the replacement trigger assembly sounded reasonable and I filed that away back in my head.

I saw that the factory sights were not night sights. Bad!!!  For me I feel night sights are an absolute must, no option, a pistol must have night sights. I talked with the owner and he mentioned that Tru-Glo makes a night sight option that is really sweet. He showed me a trainer pistol with them installed.

Let me explain about sights, night sights to be exact. Here in the desert southwest it is extremely bright outside about 394 days of the year…and I mean brilliant bright, hurt-your-eyes bright. And that tends to make sights in general disappear. You just lose track of the white dots in the bright daylight conditions. Not these Tru-Glo sights! These were amazingly easy to pick up quickly from a low-ready position. I loved them. When you get my age you need any edge you can get if you are going to get into a gun fight. These sights would be just such an edge in daylight conditions. But notice that there are supposed to be night sights…so how would they look at night.

Back inside the shop the owner said to go into the restroom and turn off the lights. There was no doubt that he Tru Glo Night Sights for Shieldwasn’t getting kinky or creepy so I did as he suggested…locking the door behind me just to be safe. The freaking night sights lit up really well…really well. And I liked an additional feature…the front sight was orange in color and the rear sights are green in color. Why is that important? If you want to, or need to, make a fast “snap shot” in the dark you don’t have to worry about sight alignment at all. Just set that orange colored front sight where you want it and pull the trigger.

This make-believe, half-plastic, striker-fired, non-Sig pistol kept feeling better and better the longer I held it. I was begging to fall in love all over again as if I were 15 and dating Sherri Greene at the Akron Rod Stewart concert. Meaning…This dang-gone Shield was nice!

After another 15 minutes of talking I ran for the door. No, not trying to steal the gun, I had to get out of there before I bought the thing. But, the owner and I parted on good terms. I was going to talk to a couple of friends to get their opinion and I thought a buddy of mine had one. I was going to ask him if I could shoot his before making the purchase. And to top it off…the owner made me an unreal deal on it. Because of my job I am eligible for a special discount…a substantial discount offered by S&W. The pistol retails for $449.00. Street price is $389 – $399. My price was going to be substantially less than that.

For ten days I did my research and everything –I mean everything– pointed that his was a great little gun. I had myself convinced that it was a match made in heaven. I had to own this gun. Back to the shop I went with money in hand and a “little kid at Christmas” attitude. And they were out of them!!! Yup, not a single 9mm Shield in the store. I was crushed! I ended up buying one, or I should say paying for one. And for that privilege of paying for it then and there I would get the first one that came in. Done!

But, here is my plan…

  1. Only buy the gun, no accessories, nothing else but the gun.
  2. Take 300 rounds to the range with the pistol and run the ammo through it. Different weights, loads, and types of ammo.
  3. If the gun still was the right thing to do then I would buy, a two spare magazines, a good EDC holster, and good double-mag pouch.
  4. Then run another couple hundred rounds through it on the following Saturday.
  5. If I still liked it then I would get the Tru-Glo night installed sights on it.
  6. And if I still liked it and have any money left over AND I still think the trigger is a little gritty then I will get the premium, gold-plated, platinum filled trigger replacement.

Once I have run 500 – 600 rounds through the gun and it has proven itself reliable and didn’t jam (no FTEs/FTFs) on more than one or two rounds AND I have the night sights on it…then I will begin to carry it as my EDC.

So, where am I today? I am just leaving for the range time for the first 200 – 300 rounds pushed through the gun. But, unlike my Sigs, I will clean the Shield first.

In my next article of this adventure I will report back on how the Shield performed at the range, and more about the night sights…assuming I get them installed.


2009 - 2019 Copyright © AHTrimble.com ~ All rights reserved
No reproduction or other use of this content 
without expressed written permission from AHTrimble.com
See Content Use Policy for more information.

The Defender’s Creed

Minute Man ColonialThe Defender’s CreedMinute Man Modern

by John Farnam

I accept and understand that human predators exist. Criminal or terrorist, they take advantage of our civilized society to prey upon the weak. They represent evil and must be confronted and defeated.
I believe that self-defense is a moral imperative, and that illegitimate force and illegal violence must be met with righteous indignation and superior violence.
I will not rely on others for the security of myself, my family and my community. I proudly proclaim that I run with a like-minded pack. I do not amble through life with the mind-numbed herd.
I will train with my chosen weapons, maintain them and carry them in a condition of readiness at all times. I will be mentally prepared and physically equipped to effectively respond to an attack or emergency.
I will constantly test myself against realistic standards to discover my strengths and weaknesses. I will turn weakness into strength.
I will seek to learn new skills and techniques, and then teach what I have learned to other members of the pack. Be it with firearm or blade, empty hand or blunt object, I will hit my enemies hard, fast and true.
I will live a quiet and unobtrusive life, but I will develop and retain the capacity for swift and decisive violence. I recognize that I am the modern equivalent of the traditional Minuteman, and that I may be called to service at any time against heavily armed enemies. I will respond effectively.
I accept that I am a pariah among some of my countrymen, and a quaint anachronism to others.
I will not hold their ignorance against them.
I will win, or die trying.
I swear this creed before God, my family and my fellow citizens.
Sheep dog guarding and defending the flock of sheep.

Predators Beware – I am a sheepdog.

Mini-Communications Center using an FT-60R or Baofeng UV-5

Baofeng UV-5r handheld radioYaesu FT-60r handheld Ham radioWhile I was beefing up my communications capability I was trying how to maximize my Baofeng UV-5 and Yaesu FT60 handheld Ham radios. Both are great radios for different reasons. Read more about each radio rfom the articesl that posted earlier this morning…Yaesu FT-60 and Baofeng UV-5

The radios are called “handhelds” or “handi-talkies” for a reason. They are meant to be lightweight, portable, and carried on your person. However, there are times when transmitting or receiving over greater distances would be preferable, or even needed. So I was trying to figure out how to make them more useful. I had already purchased the mag-mount vehicle antennas with handheld microphones and antenna adapters. Then I decided to go back and write a mission for what I was trying to do.

Mission –

An antenna system to provide longer transmitting/receiving ranges for handheld radios and to create a mini-communications center that is highly portable.

Yup, while I was writing the “mission” for this application I realized that if I did this right I could really use the ability of the handhelds to dual scan the UHF & VHF bands. And if I had a second radio then I could talk on two primary use freqs as well. Then it hit me that I was talking a mini-communications center using two handheld radios if I had the right antenna set-up.

Here is the result:

Mini Communications center with Tram 1600 marine antennasMini Communications center with Tram 1600 marine antennas


I took a 1-1/2″ x 36″ angle aluminum.  then decided I could mount an antenna on either end. I already had a couple of new Tram 1600 1/2 wave marine antennas sitting in the shed for UHF/VFH radios that I wasn’t using.


I drilled out the center hole for mounting on a camera tripod just like had already done for the FT-8900 radio. Then I drilled the holes for the Tram marine antennas and mounted them.

I attached the bracket to the camera tripod using a wingnut purchased at Lowes.

Mini Communications center with two baofeng UV-5r handheld radios

Nest came the big test, hooking up my Baofeng UV-5R handhelds and putting the SWR meter to it.

BINGO!!  My SWR meter readings were well within acceptable limits and no tuning of the antennas were necessary. So now I have a mini-communications center with low-cost handhelds. Or I can hook up my more expensive Yaesu FT-60Rs. My mini-communications center gives me the ability to scan lots of frequencies at one time by a single person. The remote microphones is added comfort. Using headsets can add privacy and security if it is needed as well.

Mini Communications center with two baofeng UV-5r handheld radios

Be creative with what you have! There are solutions out there is you just think through what your need is and correctly defining the mission.

Have fun – create !

Note: The camera tripod has a hook located in the center of the legs that is designed for something, I am not sure what. But for my use it is a perfect place to attach a rope, bungee cord, or some 550 paracrod to hold the tripod to the ground.


2009 - 2019 Copyright © AHTrimble.com ~ All rights reserved
No reproduction or other use of this content 
without expressed written permission from AHTrimble.com
See Content Use Policy for more information.